Let’s get to know Microsoft business solutions. ERP, CRM, BI, AI, Cloud and beyond.
In this article, I will introduce you to Microsoft business solutions. Microsoft invests a lot in business solutions. As a result, new products are constantly being released, or the name and content of an existing product may change. This is sometimes confusing even for us. I will try to explain each box in the picture below without going into much detail.
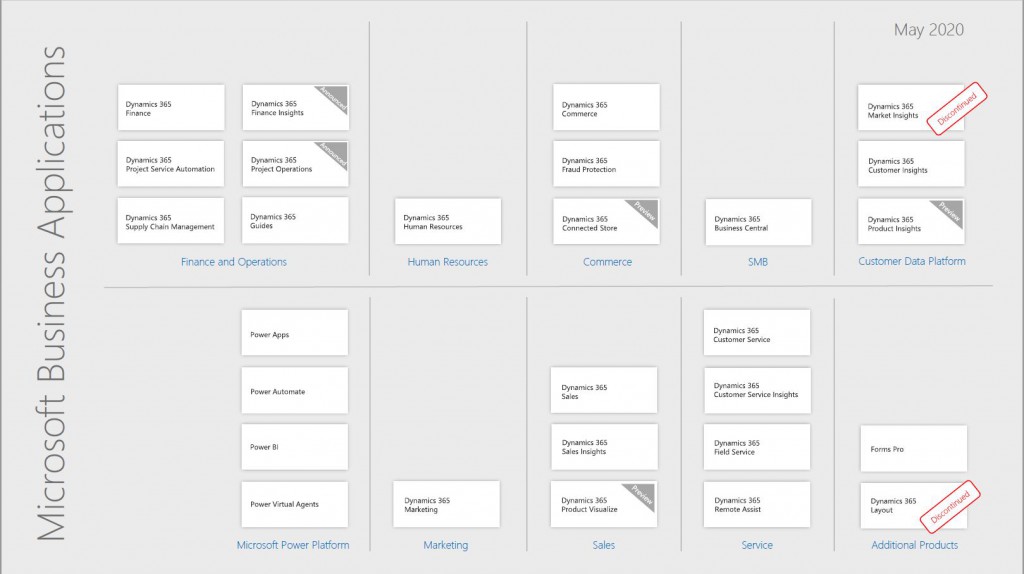
Image-1
Finance and Operations
The general name of the ERP product, formerly known as Dynamics AX (formerly Axapta), bought and incorporated by Microsoft.
Dynamics 365 Finance
It is a product that includes financial affairs modules of Dynamics AX, formerly known as Dynamics AX. It is a powerful product that allows medium and large-scale companies to easily manage their financial affairs processes, including Accounting, Finance, Budget, Accounts Receivable, Accounts Payable, Bank, Fixed Assets and similar modules. It has ERP infrastructure, so it can be extended with X++ and new functions can be added. Also, localization and suitable E-Transformation modules are provided by business partners.
Dynamics 365 Supply Chain Management
It is a product in which the trade and logistics modules of Dynamics AX (former name) are collected. It is a powerful product that medium and large-scale companies can easily manage their trade, logistics and production processes with Sales, Purchasing, WMS, TMS, Customer, Supplier, Product, Stock, Production and similar modules. It has ERP infrastructure, so it can be extended with X++ and new functions can be added. In addition, there are many additional modules developed by the partner ecosystem such as Payroll, Check Bond, Credit, Online Marketplace Management, Cargo Management.
Dynamics 365 Project Service Automation
The Project Service Automation (PSA) product enables you to effectively monitor and manage project-based services from initial quotation through sales to invoicing. Some of its features are:
- Planning projects, creating forecasts and work plans
- Forecasting and tracking project cost and revenue
- Forecasting resource requirements for pipeline projects
- Monitoring project status and cost consumption
- Managing the quoting, pricing and invoicing processes for projects
- Assigning and managing resources
In addition, it helps you track and control costs for your project-based work, and you can easily track project time and expenses on a mobile device or using a web browser. It uses the CRM infrastructure. It works with F&O and MS Project.
Dynamics 365 Project Operation
Dynamics 365 Project Operation will be available for preview in June 2020 and is scheduled to be available from October 2020. Due to the corona epidemic, these dates may change.
Microsoft says it will be an end-to-end project management application from opportunity to project accounting. The existing Dynamics 365 Project Service Automation (PSA) application will combine the features of Microsoft Project and Dynamics 365 Finance. The new application will include Project’s planning and Scheduling capabilities which are not available in Microsoft Project’s PSA application. It will use the Common Data Service infrastructure, so it will be customizable and extensible with the Power Platform. It will include all of Dynamics 365 Finance’s existing project management, accounting and expense management capabilities. Most likely it will replace PSA and be used in the future.
Dynamics 365 Guides
Microsoft Dynamics 365 Guides is a mixed-reality application for Microsoft HoloLens that enables operators to learn by giving holographic instructions when and where they need it during their workflow. It is mainly designed for educational use. Instructions can be created with videos and 3D holographic models. Operators see what needs to be done and where it is done. Therefore, they make fewer mistakes and can acquire new skills. New instructions can be created without writing any code. It uses the CDS Infrastructure. HoloLens unfortunately is not yet sold in Turkey. You can import it from abroad.
Dynamics 365 Finance Insights
It is an artificial intelligence application that integrates AI and BI such as customer payment forecasts, budget proposals, financial predictions and cash flow forecasting, and can connect to many different sources and receive data. It provides better financial decisions and actions by taking advantage of artificial intelligence without the need to write code. It uses the CDS infrastructure, so it can be customized and extended with Power Platform. The release date may vary depending on the Corona epidemic, but is expected in the second half of this year.
Dynamics 365 Human Resources
Dynamics 365 Human Resource, formerly known as Talent, is a product that covers all end-to-end processes for human resources management. It supports the entire employee life cycle. All processes from recruitment, employee management to talent management are integrated.
It has integrations with LinkedIn Talent for recruitment and Dynamics 365 Finance for finance. It also works with LinkedIn Learning and Dynamics 365 Guides for training, certification tracking, and employee progress tracking. It uses the CDS infrastructure, so it can be customized and extended with Power Platform.
Dynamics 365 Commerce
Dynamics 365 Commerce is a comprehensive product that addresses all the capabilities of Dynamics 365 Retail as well as all retail needs and combines it with ERP and CRM. It uses the ERP infrastructure, so it can be customized with X++. Type Script is used on the pos side. In addition, with the E-Commerce plugin, the missing part on this side was also fixed. Retail is one of the industries that Microsoft invests the most. It is constantly developing and gaining new capabilities in the product.
Dynamics 365 Fraud Protection
Microsoft Dynamics 365 Fraud Protection focuses on payment fraud protection and related scenarios in e-commerce. It helps e-commerce merchants reduce fraud loss, increase bank acceptance rates to generate higher revenue, and improve online shopping experience for their customers. It is a cloud-based AI service. It uses the CDS infrastructure and is designed to work with the retail solution.
Dynamics 365 Connected Store
Dynamics 365 Connected Store is a service that uses cloud-based AI, Azure IoT and Machine Learning capabilities for physical stores. It uses the CDS infrastructure. It is expected to be available this year. It helps store managers and professionals working in retail make better decisions by getting information from many different sources, such as video cameras and IoT sensors.
Dynamics 365 Connected Store creates employee alerts that can increase store efficiency. For example, if there is a malfunction in the cooling of the refrigerator, it can alert the employee; when there is a rush in the cash register, it can notify the officer in the aisle to support the cash register. Connected Store reveals event patterns by examining in-store customer and product mobility data. Connected Store can be used with Commerce product.
Dynamics 365 Business Central
Formerly known as Dynamics NAV, it is an ERP software that enables small and medium-sized enterprises to follow all of their processes. Unlike Dynamics Nav, it does not use the C/SIDE development platform. It provides the ability to customize screens and lists. It is not yet available in Turkey.
Dynamics 365 Market Insights
The product was discontinued. It was decided to continue with Customer Insights.
Dynamics 365 Customer Insights
Customer Insights is an AI-powered customer data platform that provides clear insights and personalized customer experiences. It uses the CDS infrastructure and can receive data directly from many different data sources. It enables high-speed analytical operations using Microsoft Azure and Power Platform. It provides many different analytical perspectives on the customer.
Dynamics 365 Product Insights
Dynamics 365 Product Insights automatically collects data from businesses’ products and services and enables customers to transform this data into insights. With this data-driven view, businesses can transform in many areas. For example, product development, production, sales, customer service processes can be reconfigured with data from Product Insights. The application that brings together BI and AI uses the CDS infrastructure.
Dynamics 365 Marketing
It is the product of what is formerly named as Dynamics CRM which includes marketing modules. It has built-in business intelligence. It uses the CRM infrastructure. It can be extended with the power platform. Some of its features are:
- Creating graphical email messages and online content to support marketing incentives
- Designing interactive customer journeys to develop leads with personalized experiences
- Reviewing candidates on LinkedIn
- Sharing information between teams
- Getting to know your leads better
- Analyzing and documenting your marketing return on investment (MROI)
- Prioritizing leads for better achievements
- Making survey results more actionable
- Configuring and extending the application
Dynamics 365 Sales
It is the product of what is formerly named as Dynamics CRM which includes sales related modules. It enables sales representatives to build stronger relationships with their customers, take action based on predictions, and close sales faster. Dynamics 365 Sales tracks accounts and contacts, feeds your sales from lead to order. It allows you to create marketing lists and campaigns, and even track service requests associated with specific accounts and deals. It uses the CRM infrastructure. It is a model-based application developed on the Common Data Service (CDS) platform. In this way, you can make additions using Power Apps.
Dynamics 365 Sales Insights
Dynamics 365 Sales Insights is an AI application that uses the CDS infrastructure. It constantly analyzes the vast collection of customer engagement data stored in your Dynamics 365 Sales and Office 365 databases. This helps you better understand your business relationships, evaluate your previous activities and choose the best from the options available. It also allows you to build stronger relationships with customers, take insightful actions and close opportunities faster. There is a free version that comes with Dynamics 365 Sales and also a paid version. The features of the two versions are shown in the picture below.
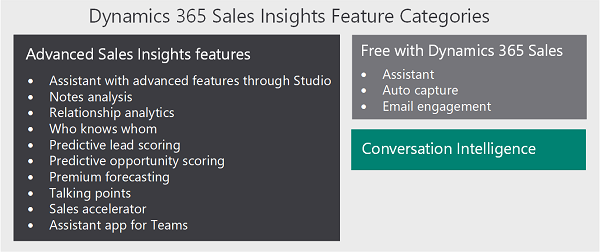
Image-2
Dynamics 365 Product Visualize (Preview)
Microsoft Dynamics 365 Product Visualize allows you to see the Product Visualize product with augmented reality as if it were in a real environment. In this way, you will have the opportunity to observe how a machine to be used in production will be located on the factory floor. This helps establish a common understanding between buyers and sellers to speed up complex sales processes. In industries such as manufacturing, healthcare and automotive where products are often complex and highly configurable, or very difficult to transport, the need for product visualization is vital.
Using Dynamics 365 Product Visualize, vendors can show products to customers directly within their Dynamics 365 Sales workflows. It can leverage directly from Microsoft Teams to deliver critical customer-oriented solutions to improve vendors’ collaboration and accelerate the sales process. It needs SharePoint and Dynamics 365 Sales for setup. It uses the CDS infrastructure. The exact release date is not yet determined.
Dynamics 365 Customer Service
It is the product of what is formerly named as Dynamics CRM which includes customer service related modules. Dynamics 365 Customer Service is a model-based application developed on the Common Data Service (CDS) platform. You can create and manage model-based applications using Power Apps.
With Dynamics 365 Customer Service, you can:
- Track customer problems through service requests.
- Record all service request related interactions.
- Share information in the knowledge bank.
- Create queues and route service requests to the right channels.
- Create and monitor service levels with Service Level Agreements (SLAs).
- Define service conditions through support rights.
- Manage performance and productivity through reports and dashboards.
- Create and schedule services.
Dynamics 365 Customer Service Insights
Dynamics 365 Customer Service Insights provides critical performance metrics, transactional data, and trends evolving from your customer service system. Built-in dashboards, interactive charts, and visual filters support operational data across channels and highlight areas of improvement that will have the most impact, helping you quickly assess and respond to key performance.
Customer Service Insights uses artificial intelligence for your support service requests using natural language processing. Topics allow you to discover current and emerging trends, identify improvement, brand return, and problem areas. By demonstrating and fixing issues before they affect customers, you can create better customer service experiences. It is an application where AI and BI come together and can be connected to many different CDS-based data sources.
Dynamics 365 Field Service
Dynamics 365 Field Service business application is a product that organizations can use for field and service automation. The application provides mobile capabilities for many different jobs such as workflow, automation, scheduling algorithms, and on-site troubleshooting. It is a model-based application developed on the Common Data Service (CDS) platform.
Field Service application allows:
- Completing weekly service calls per technician
- İzleme çalışmalarınızı yönetmek ve satın yararlanmanıza ve çapraz satış fırsatları
- Reducing travel time, distance and vehicle wear
- Organizing and monitoring, resolving customer problems
- Notifying the correct arrival time to customers
- Providing the field technician with the correct account and hardware history
- Scheduling on-site visits when convenient for the customer
- Scheduling on-site visits when convenient for the customer
- Preventing equipment downtime thanks to preventive maintenance
Dynamics 365 Remote Assist
It is a mixed reality product that enables remote support and similar operations with mobile devices using HoloLens and HoloLens2. It has areas of use such as Collaborative Maintenance and Repair, Remote Inspections, and Knowledge Sharing and Training. It can work with Dynamics 365 Field Service and other CRM products. It uses the CDS infrastructure. HoloLens is not yet available in Turkey. It has to be imported from abroad.
Microsoft Forms Pro
Forms Pro is a simple yet comprehensive survey solution based on Microsoft Forms’ current experience of creating surveys in Office 365. It is built on Microsoft Forms and offers new features that make capturing and analyzing customer and employee feedback easier than ever. Your customers can respond to surveys using any web browser or mobile device. Once responses are submitted, you can use Power BI to analyze them with reports and make real-time decisions. It supports the CDS infrastructure.
Dynamics 365 Layout (Canceled)
Microsoft Power Platform
It is the name of Microsoft’s product group that enables us to develop software solutions without writing code or using very little code (low-code / no code). This product family is based on CDS and consists of the following products.
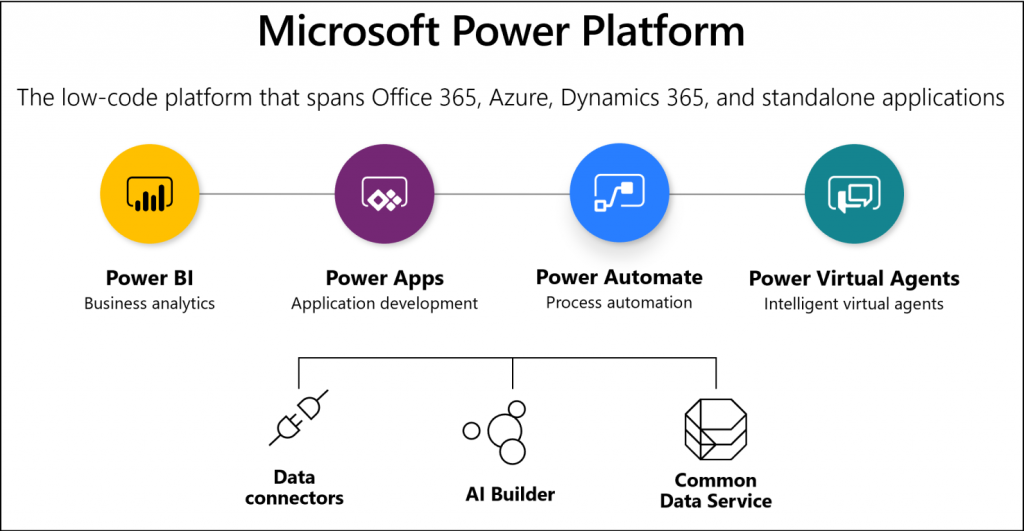
Image-3
Power BI
Power BI is a collection of software services, applications, and connectors that work together to transform your unrelated data sources into consistent, visually understandable, and impressive ones.
Power Apps
Power Apps is a platform that contains applications, services, connectors that provide a fast application development environment to create custom applications for your business needs. Using Power Apps, you can easily develop mobile applications by getting data from CDS (Common Data Service) or various online and in-house data sources (SharePoint, Excel, Office 365, Dynamics 365, SQL Server, etc.).
Power Automate
Power Automate is a service that helps you synchronize files, receive notifications, collect data and more by creating automated workflows between your favorite apps and services. With the many connectors available, you can set up workflows between applications.
Power Virtual Agents
Power Virtual Agents is a product where you can create powerful bots using a code-free graphical interface without the need for a software developer or data scientist. Power Virtual Agents tackles many important bot building issues in the industry today. It eliminates the gap between subject matter experts and the development teams that create the bots, and the long delay between teams recognizing a problem and updating the bot to fix it. It also minimizes the IT effort required to install and maintain a custom speech solution.
Dozens of articles can be written for each topic here. I wanted to introduce business solutions to you in general. The picture below provides a general summary.
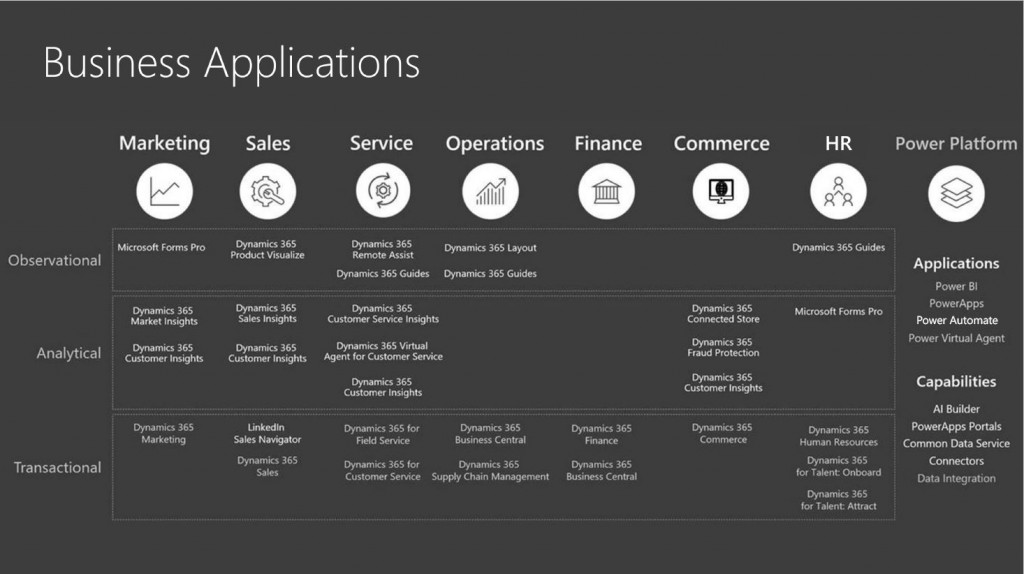
Image-4
Microsoft continues to invest heavily in business solutions. For this reason, there are frequent updates, new products and name changes, but there is no other service provider that can solve all the needs of a certain organization under one roof. Operating system, Office applications, SQL, Cloud services (Azure), HoloLens, AI, AoT, ML and similar services, CRM, ERP, BI and Low Code platforms all work integrated with each other and offer the same user experience. They have created an enormous range of products. It is not surprising that it became a leading supplier in a short time. I think that these applications will be used much more commonly, especially when the issues related to Law on Protection of Personal Data in our country become clear and safe countries agreements are made. Of course, we also have a currency problem. I hope this can be resolved in a short time.
www.fatihdemirci.net
TAGs: Microsoft Dynamics 365, MsDyn365FO, MsDyn365CE, MsDyn365, Dynamics 365 Insights Power BI, Power Automate, Power Apss, Power Virtual Agents, what is Dynamics 365, Dynamics 365 ERP, Dynamics 365 CRM
