Posts Tagged ‘ x++

X++ :2- Base Enums Nedir?

X ++ sabitleri desteklemez ancak sabit değerlerin bir listesi olan numaralandırılabilir bir tür olan Base Enum sahiptir. Enum değerleri tabloda tamsayı olarak tutulur. İlk element 0 rakamı, bir sonraki 1 ve sırayla devam eder. Standart uygulamada yüzlerce Enum vardır. Örneğin, NoYes gibi. Şimdi bir örnek oluşturalım.

Resim-1

MonthsOfYear Enum için en iyi örneklerden birdir.

Resim-2

Şimdi kendi örneğimizi oluşturalım.

Resim-3

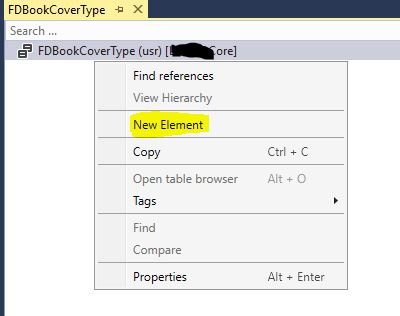
Kitap kapak tipi adında bir Enum oluşturdum. 3 tane Element ekleyeceğim.

Resim-4

Element eklerken İlk elementi None bırakmak genel yaklaşım. Değeri sıfır olduğu için varsayılan olarak geliyor. Elementlerin adı değeri ve etiketi en önemli özellikleridir.

Resim-5

Karton kapak elementi ekliyoruz.

Resim-6

Bu yazıda Enum nedir ve nasıl kullanılır anlatmaya çalıştım. Veri yönetimi acısından çok önemli bir araç. Kodda kullanımı çok fazla olan bir özelliktir. En çok düşülen ikilem ne zaman tablo ne zaman Enum yapmak gerektiğidir. Burada İki şeyden bahsedebilirim. Eğer değerler herhangi bir şekilde ayrılması gerekiyorsa veya son kullanıcı tarafından tanımlanması gereken bir veriyse tablo olmalıdır. Kodda değerlere göre kod yazılacaksa Enum olmalıdır.

Selamlar.

www.fatihdemirci.net

TAGs: X++, Base Enum, Microsoft Dynamics 365, MsDyn365FO, MsDyn365CE, MsDyn365, Dynamics 365 nedir, Dynamics 365 ERP, Dynamics 365 CRM

X++ :3- Container Nedir?

X ++ Temel veri tiplerinden biri olan Container farklı tipteki verileri içinde barındırabilir. Tablolara açılan alanlar Container tipinde olabilir. Birçok fonksiyon ile veri yüklenip alınabilir. Özellikle farklı tipteki verileri bir yere göndermek ve çekmek için kullanılır.

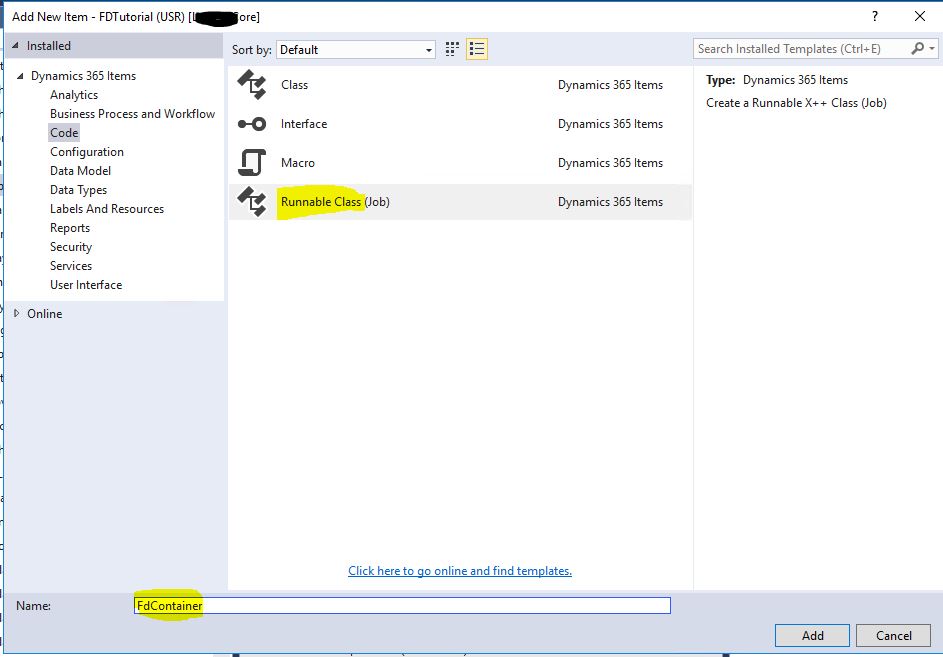
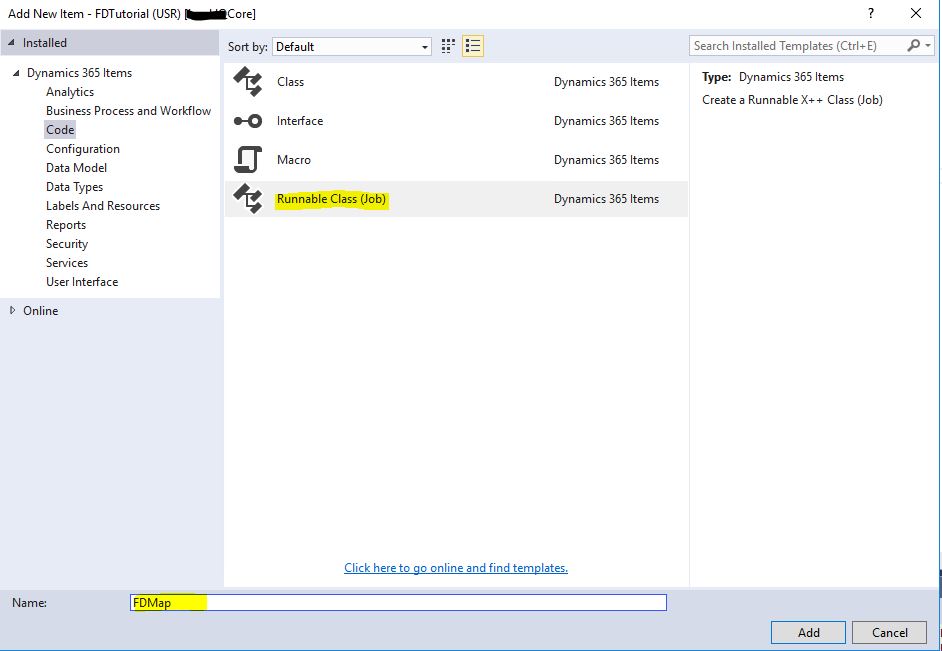
Yeni bir Job oluşturup bir örnek kod yazalım.

Resim-1

class FDContainer

{

public static void main(Args _args)

{

int             number1;

str             name;

AccountNum      AccountNum;

CustTable       custTable, custTable2;

container       c;

Gender          gender;

utcDateTime     dateTime;

;

name        = “Fatih Demirci”; // DeÄŸiÅŸken ataması

custTable   = custTable::find(“M000017″);// DeÄŸiÅŸken ataması

c = conins(c, 1, name); // Contianer Insert iÅŸlemi

c = conins(c, 2, custTable);

c = conins(c, 3, 12321);

[name,  custtable, number1] = c; // Container’daki değerleri değişkenlere alma.

c = ["fatih", 12, custtable, Gender::Male]; // Tek seferde çoklu değişken atama

dateTime = dateTimeUtil::newDateTime(systemdateget(), timeNow());

name        = conpeek(c, 1); // tek bir değişken seçme

custTable   = conpeek(c, 3);

c           = conins(c, 4, dateTime);

info(“OK”);

}

}

Bu yazıda Container’ı size tanıtmaya çalıştım. Çok kullanışlı bir veri tipi çok sık kullanıldığını göreceksiniz. Bende bunu basit işler için kullanıyorum. Çok büyük veriler için uygun bir yapı değil. Dizi gibi düşünün.

Selamlar.

www.fatihdemirci.net

TAGs: X++,Container, Azure, Azure DevOps, Microsoft Dynamics 365, MsDyn365FO, MsDyn365CE, MsDyn365

How to deploy a new X++ development VM for Dynamics 365 Finance and Operations?

In this article, I will try to explain step by step how to deploy a new virtual machine for new X++ developments. In this example, I will explain how to do this in a client environment. It has a similar logic in virtual machines for partner or educational purposes.

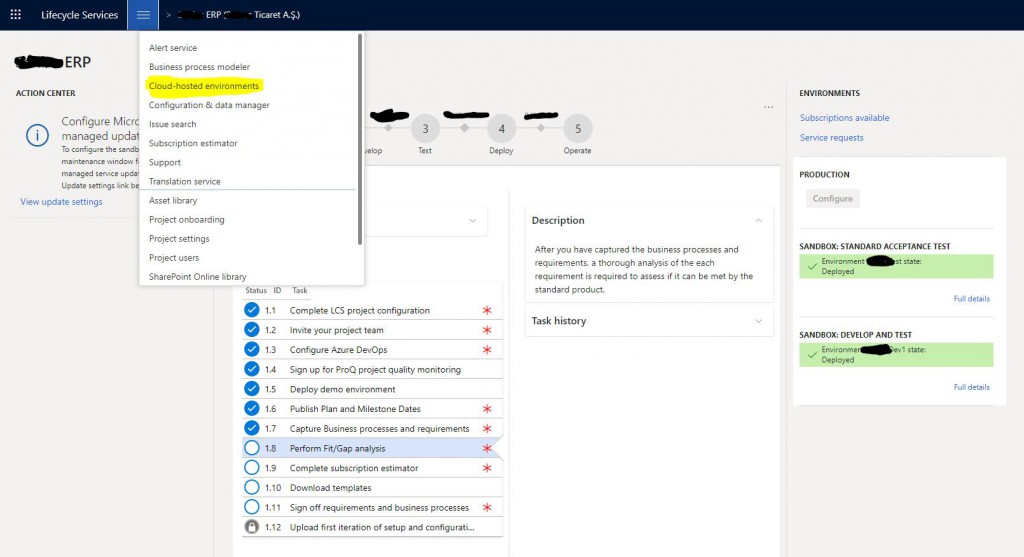
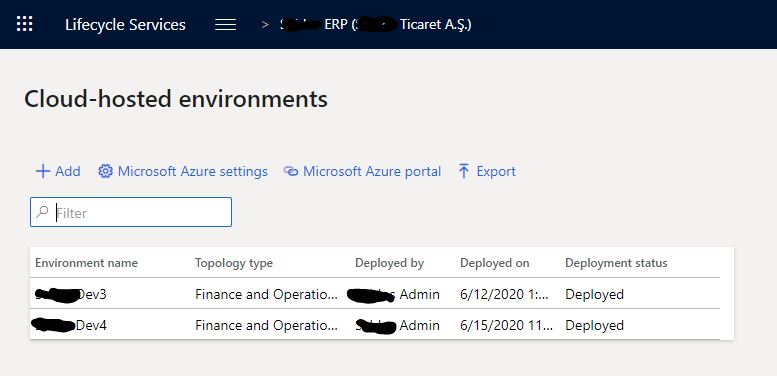
First, we log in to Lifecycle Services. Select your project and select Cloud-hosted environments from the hamburger menu.
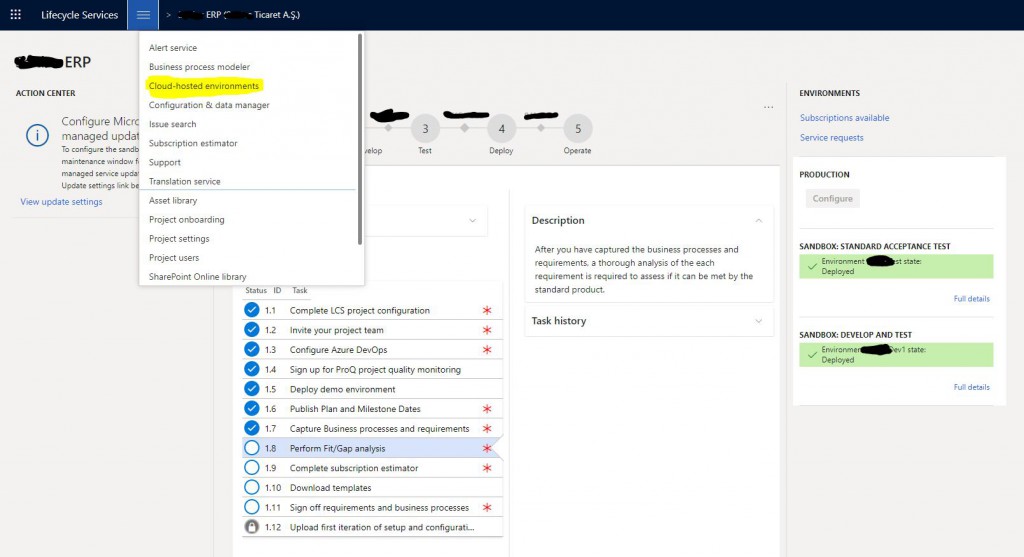
Image-1

A page will open and list your environments. Here you can view the details and manage their status. For a new environment, click the + Add button.

Image-2

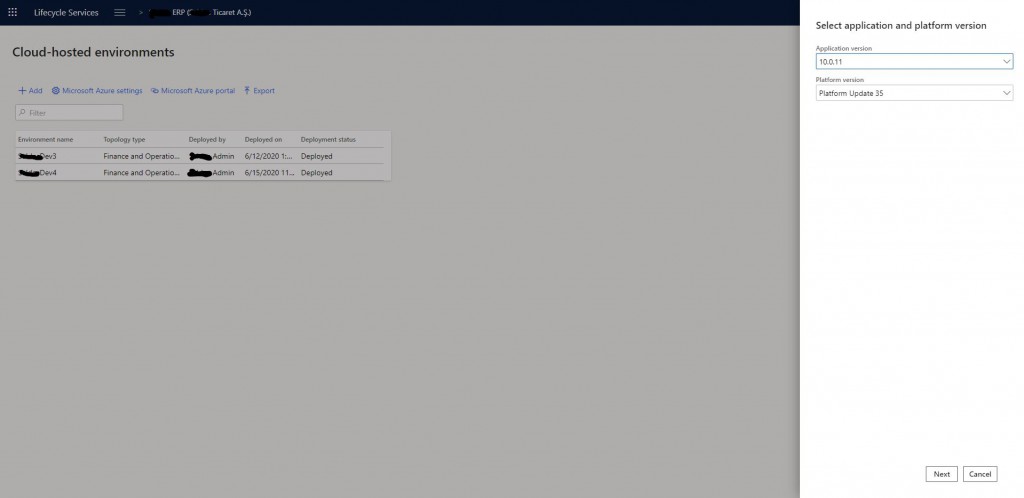
The first screen that opens has Application Version and Platform Version. You usually select the most recent one. Of course, you should select the version of your environment here. Click Next to proceed.
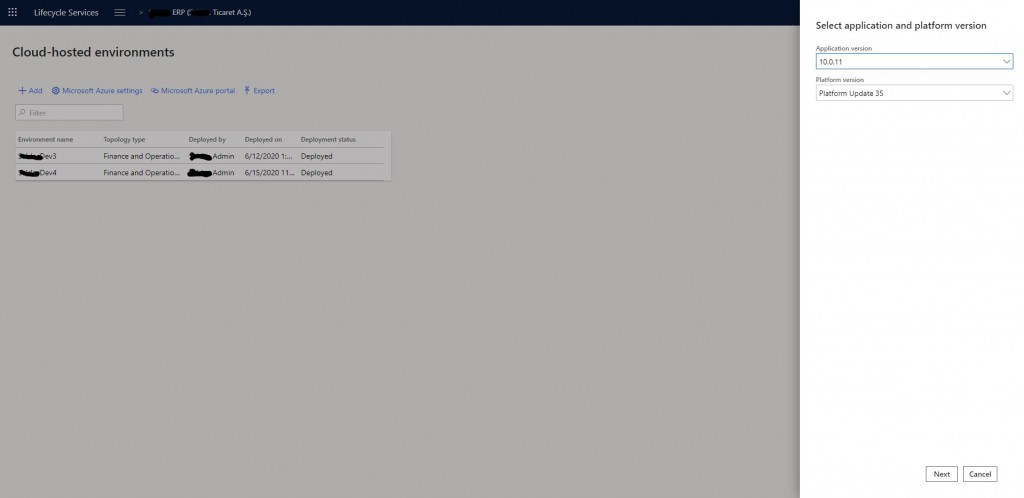
Image-3

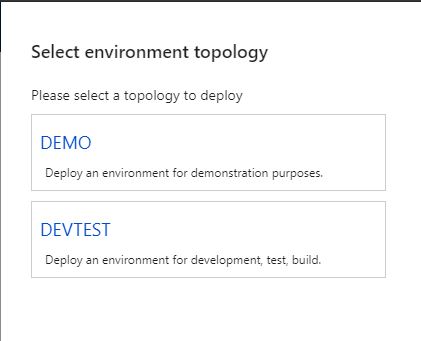
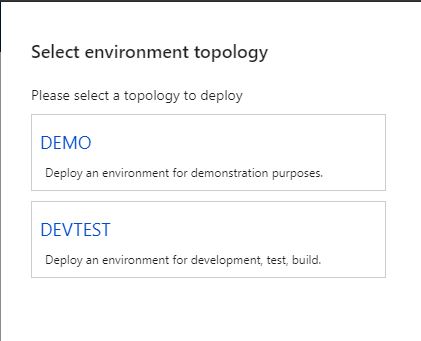
Here you select the type of the environment. Available options are Demo and DevTest. For development, you should select DevTest.

Image-4

There are two options here. First one is used for Build or Test. For development, you should select Develop. For additional Test or Build environments, you should use the option above.
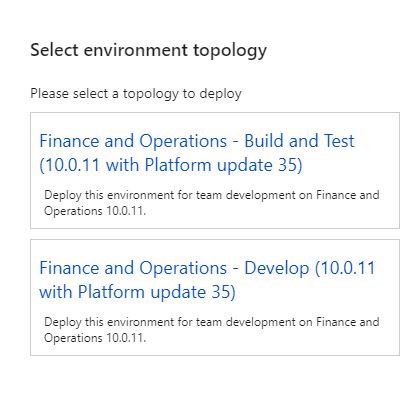
Image-5

Here you can adjust the environment settings. First give a name. This name is not virtual machine’s name. We will set it from the advanced settings. The most important option is D12 machines that are recommended for you, but if you want it to be a little faster and money is not an issue, definitely choose D13. Think of it like D13 is exactly twice as D12 in terms of money and configuration. You can view the advanced settings by clicking Advanced Settings.
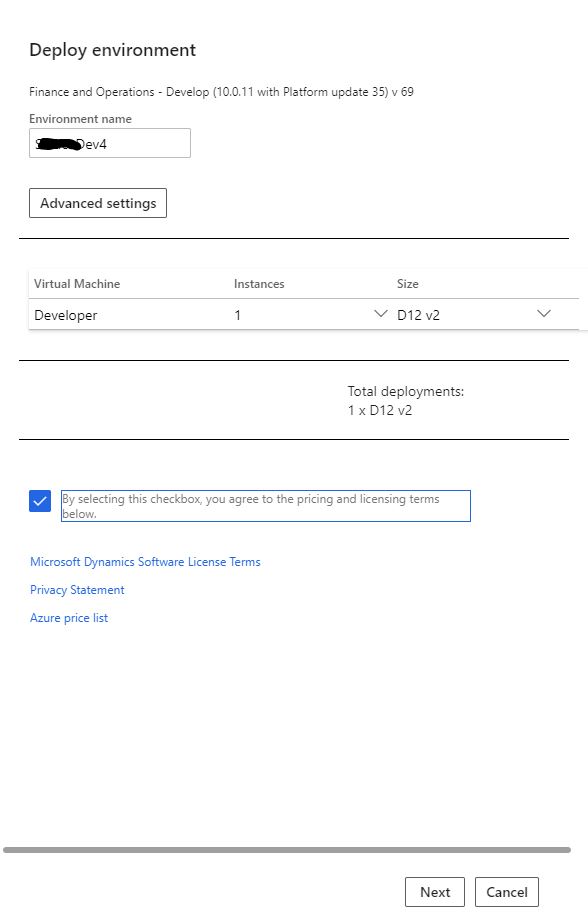
Image-6

You can make advanced settings from the screen that opens. You don’t need to change many settings.  I will talk about the important ones. Visual Studio Version has two options.  Pro and Enterprise, use whichever suits you best.
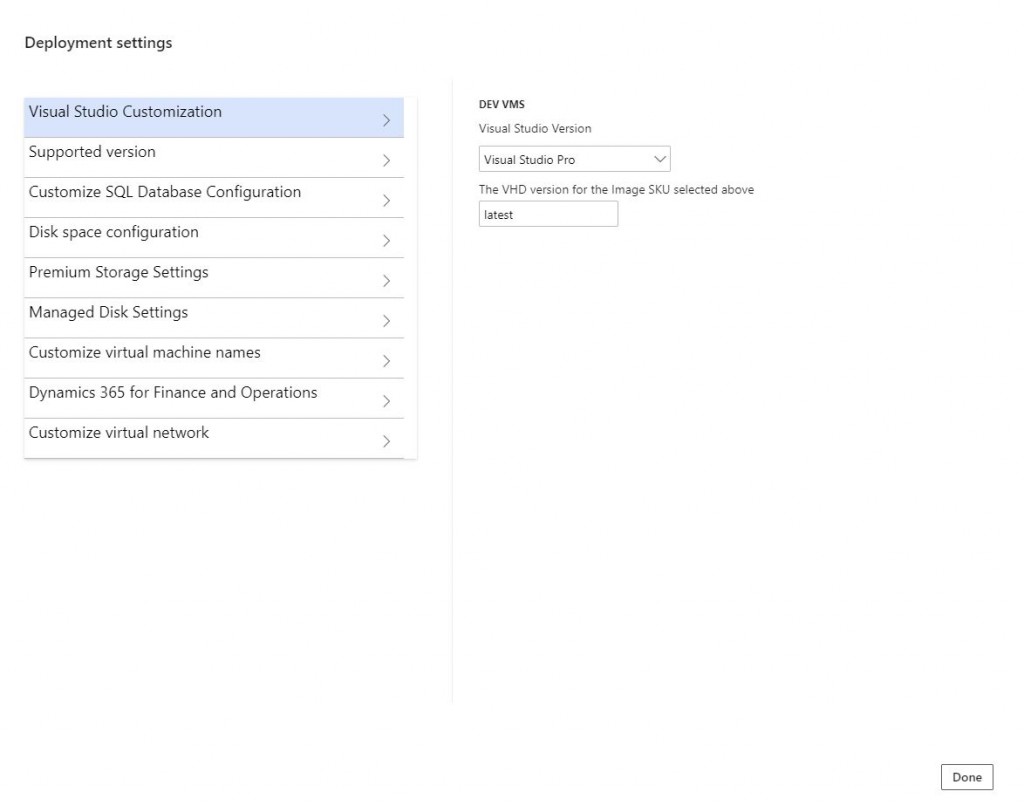
Image-7

Here you can find the details of the version. Generally, you need to keep all development versions the same.
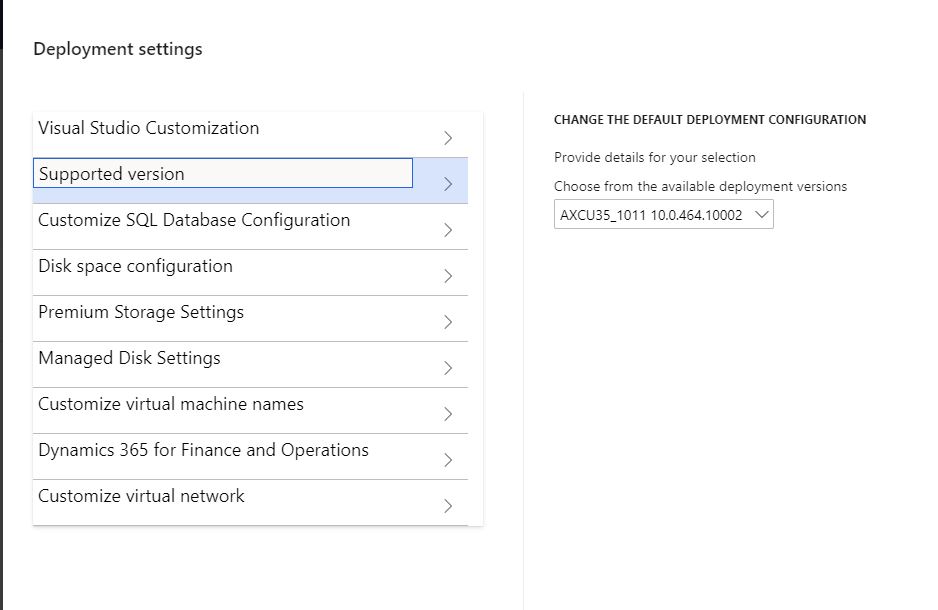
Image-8

Here you can choose whether you want Demo data in your environment. Generally, this is not necessary for the customer environment. If you are going to use Management Reporter, you can select demo data for it as well.

Image-9

In this section you can adjust the disk sizes. These settings are sufficient for general improvements.
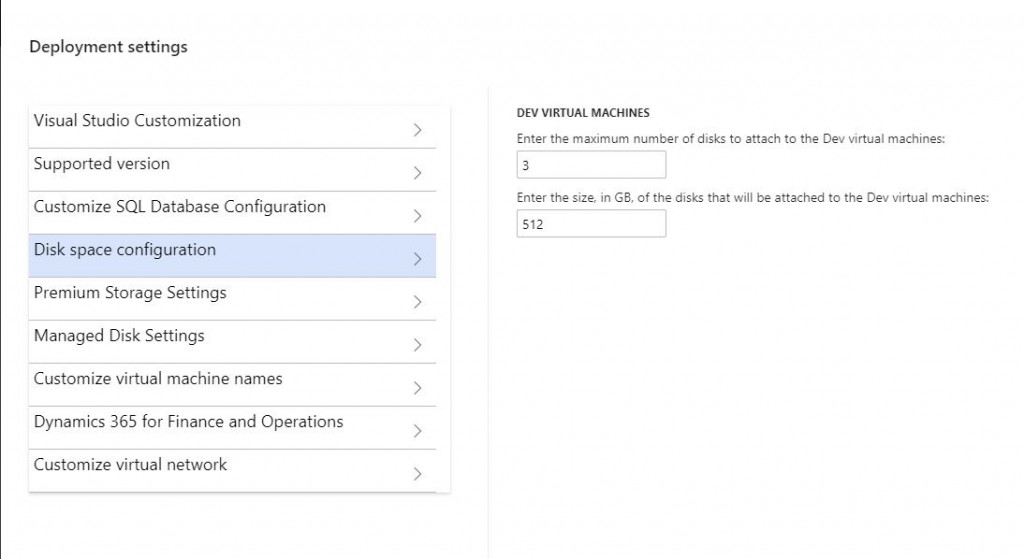
Image-10

You can enter the virtual machine name here. If you leave it blank, it automatically assigns a name, and it’s not a good one.

Image-11

After completing the settings, you can start the deploy process by clicking Next.
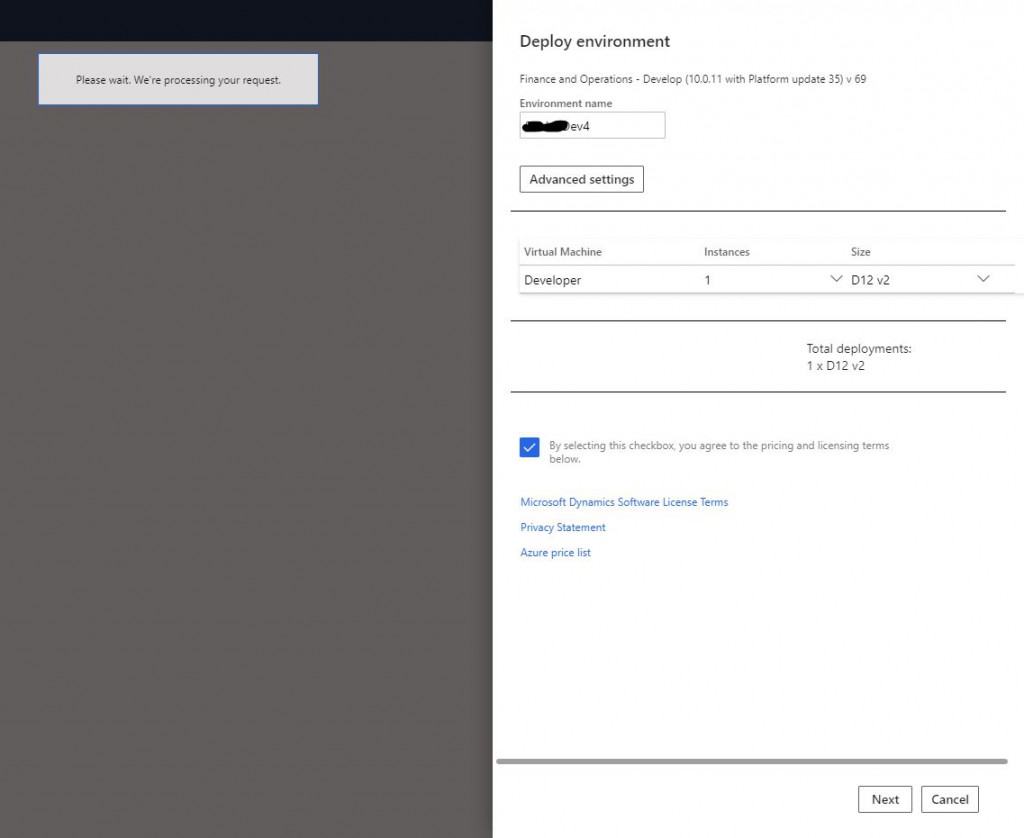
Image-12

You will then be able to see your new environment in Deploying status in the list below. It usually takes 3-4 hours to complete. I’ve seen it take less. I did not start Deploy because it was not needed for this environment.  When these steps are done, the virtual machine will be ready. Even if you see the virtual machine when you go to the Azure side, do not try to open it before the process is completed. In order to properly use the environment, this must be Deployed.

Image-13

In this article, I briefly explained how to deploy a new development machine and I will explain the necessary settings to start developing on this machine in my next articles.

Regards.

www.fatihdemirci.net

TAGs: Microsoft Life Cycle Services, LCS, Azure, Azure DevOps,X++, Project onboarding, Microsoft Dynamics 365, MsDyn365FO, MsDyn365CE, MsDyn365, Dynamics 365 Insights Power BI, Power Automate, Power Apss, Power Virtual Agents, what is Dynamics 365, Dynamics 365 ERP, Dynamics 365 CRM
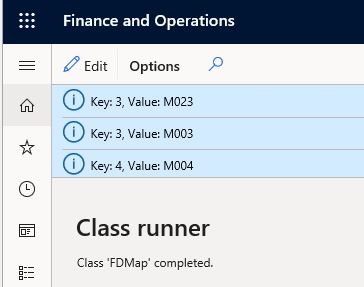
How to deploy a new Build environment for Dynamics 365 Finance and Operations?

In this article, I will try to explain step by step how to deploy a new Build type virtual machine for Dynamics 365 Finance and Operations.

Before you start, if you have a customer adaptation project, it is recommended to set the SandBox Develop And Test environment that appears here as Build. Because the admin login authorization to this environment will soon be removed and it will not be possible to use it for development. Therefore, it is useful to set it as Build. In addition, thanks to an Agent that will be released soon, we will be able to Build without allocating an entire VM.

In this example, you will see how to create a new Build machine via Cloud-hosted environment. It has the same steps as Sandbox, so it will be a post that will cover both. First, we log in to Lifecycle Services. Select your project and select Cloud-hosted environments from the hamburger menu.

Image-1

A page will open and list your environments. Here you can view the details and manage their status. For a new Build environment, click the + Add button.

Image-2

The first screen that opens has Application Version and Platform Version. You usually select the most recent one. Of course, you should select the version of your environment here. Click Next to proceed.

Image-3

Here you select the type of the environment. Available options are Demo and DevTest. For Build, you should choose DevTest.

Image-4

There are two options here. First one is used for Build or Test. For development, you should select Develop. We will choose the one above.

Image-5

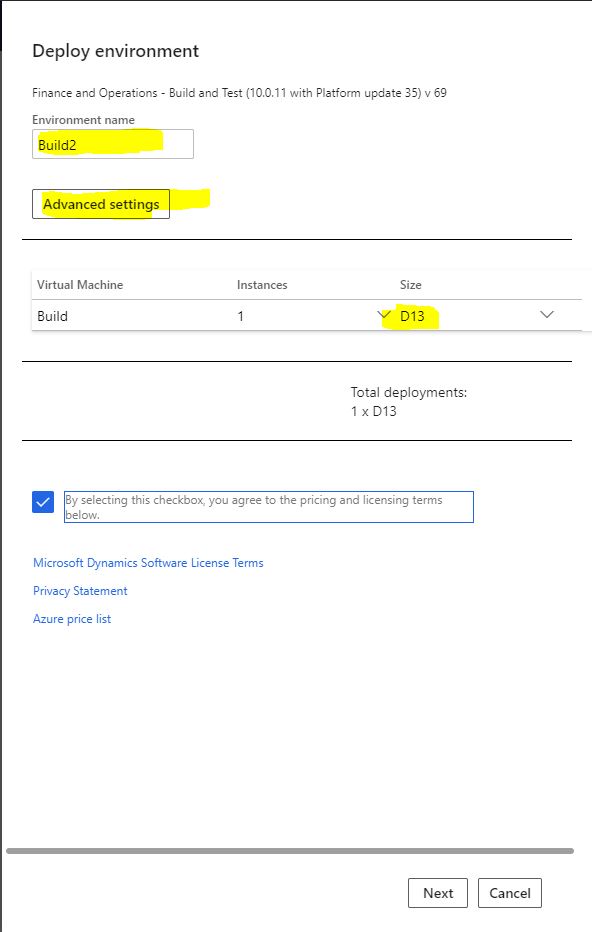
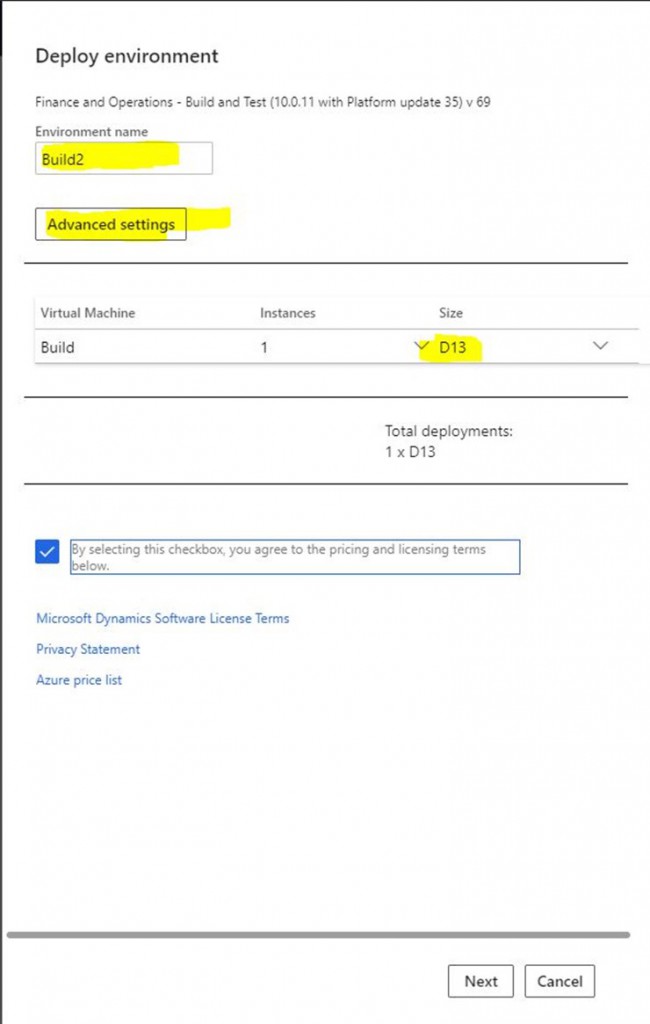
Here you can adjust the environment settings. First give a name. This name is not virtual machine’s name. We will set it from the advanced settings. The most important option is D12  or DS12 V2 machines that are recommended For you, but if you want it to be a little faster and money is not an issue, choose D13. You can view the advanced settings by clicking Advanced Settings.

Image-6

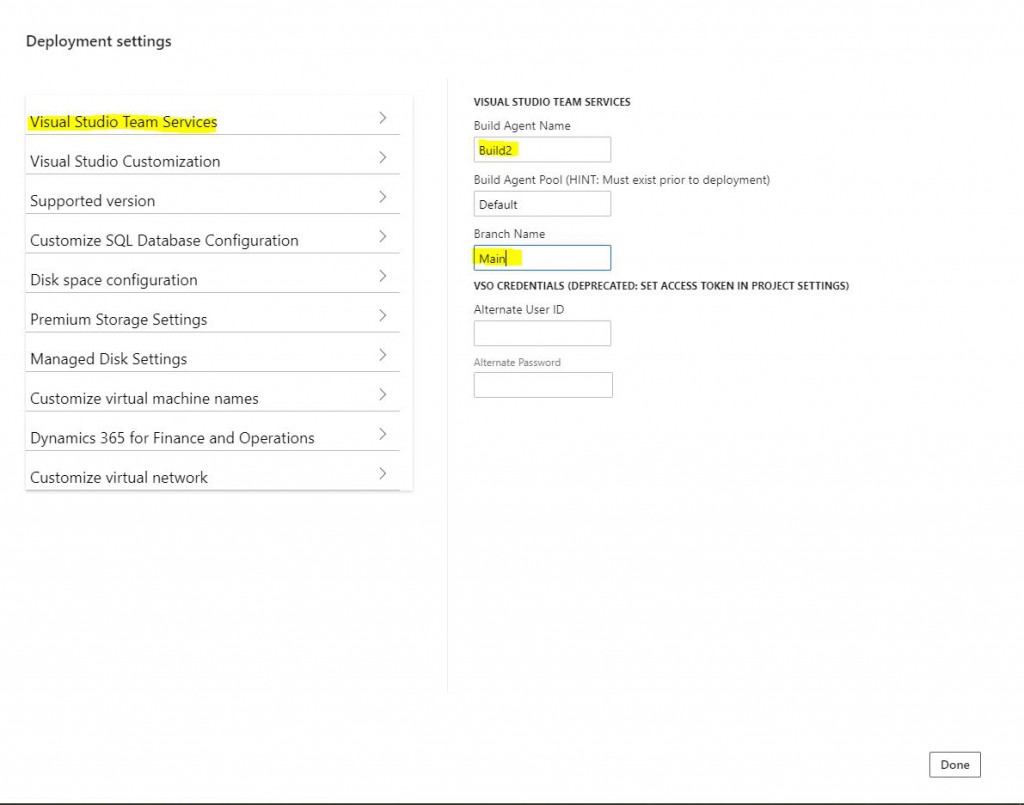
You can make advanced settings from the screen that opens. You don’t need to change many settings.  I will talk about the important ones. Build Agent Name is the name you will see in Azure DevOps. You should give it an appropriate name. The most important part is the Branch Name. I typed Main here. It is case sensitive, so it is necessary to type Branch name correctly.

Image-7

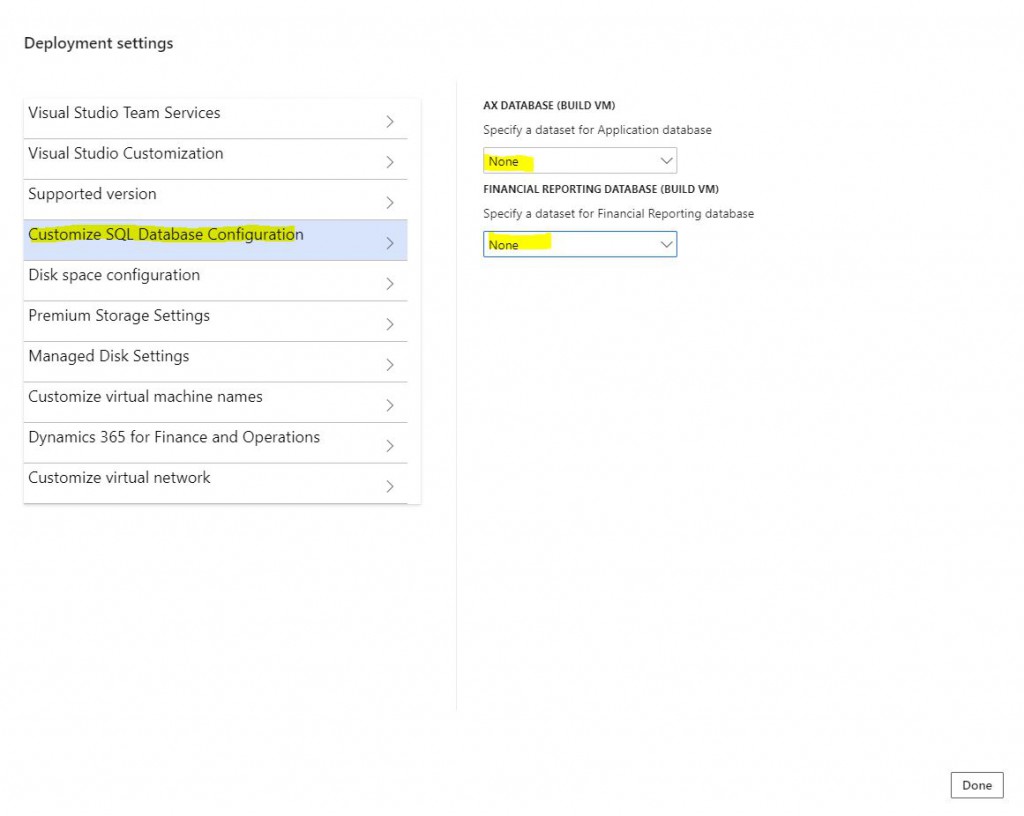
There is no need for Demo data for the Build environment, you can remove it from here.

Image-8

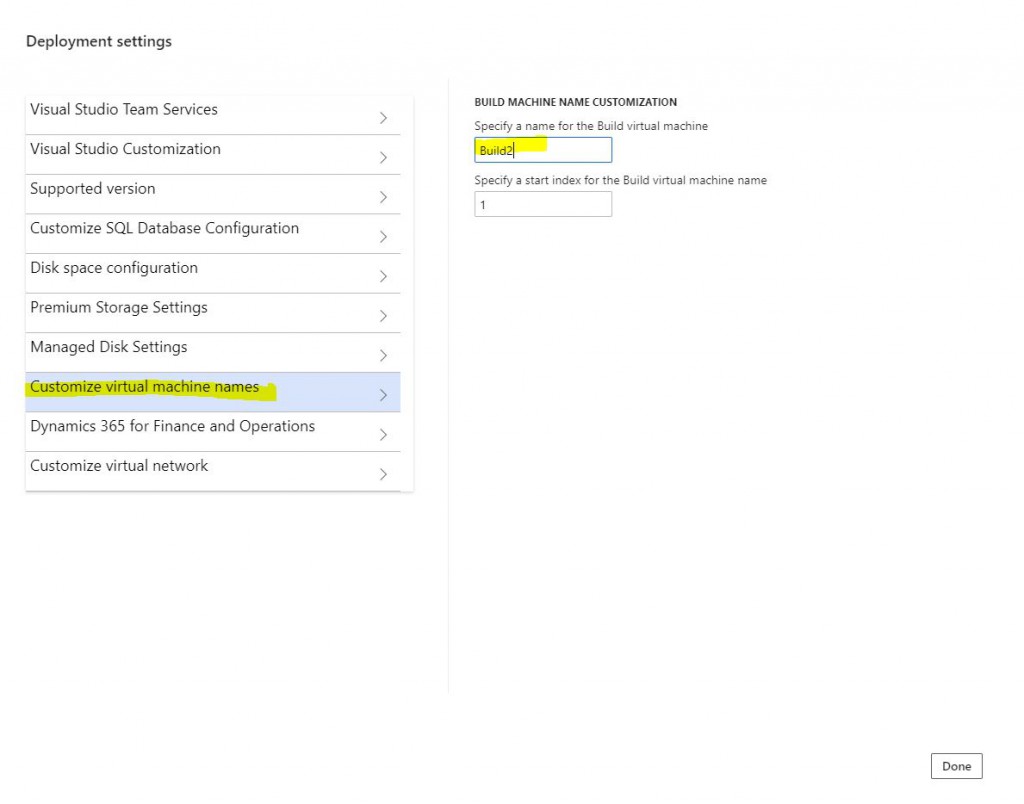
You can name your virtual machine in this section.

Image-9

Settings are done. Continue with Next. I selected D12 V2 for the For you. However the picture shows D13. Recommended dimension is D12 and its derivatives.

Image-10

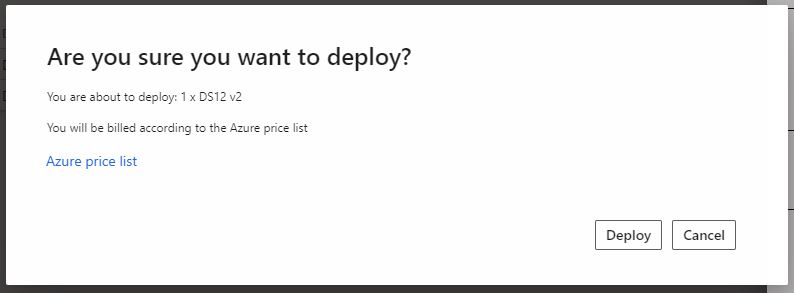
The confirmation screen will appear. When you click Deploy, the Build environment will be queued to be deployed. This process is completed in 3-6 hours.

Image-11

In this article, I tried to briefly explain how to deploy a new Build machine and I will explain how to Build in my next articles. I will try to explain how the resulting packages are transferred to the test and live. I hope it is useful for you.

Regards.

www.fatihdemirci.net

TAGs: Build VM, Lifecycle Services, LCS, Azure DevOps, X++, Microsoft Dynamics 365, MsDyn365FO, MsDyn365CE, MsDyn365, Dynamics 365 Insights Power BI, Power Automate, Power Apss, Power Virtual Agents, what is Dynamics 365, Dynamics 365 ERP, Dynamics 365 CRM
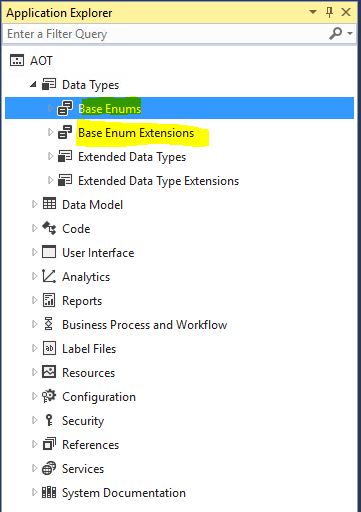
X++ :1- Extended Data Types Nedir?

Bu yazı ile yeni bir seriye başlıyorum. Bu seride X++ dilinin temel özelliklerinden bahsedeceğim. X++ C++ üzerinden geliştirilen bir nesne tabanlı dildir. Yazımı oldukça kolay olan bu dil özellikle veri yönetiminde çok güçlüdür. ERP temelde veriye dayandığı için X++ uygulamada çok kolaylık sağlıyor.

Temel veri tipleri şunlardır.

Anytype A placeholder for any data type.
Booleans Can only contain the values false and true.
Dates Contains day, month, and year.
Enums An abbreviation for enumerated text—a set of literals.
GUIDs A globally unique identifier.
Integers A number without a decimal point. To declare an integer, use the keyword int.
Reals Numbers with a decimal point; also called decimals.
Strings A number of characters. To declare a string, use the keyword str.
TimeOfDay Contains hours, minutes, and seconds. To declare a time, use the system type timeOfDay.
utcdatetime Contains year, month, day, hour, minute and second.

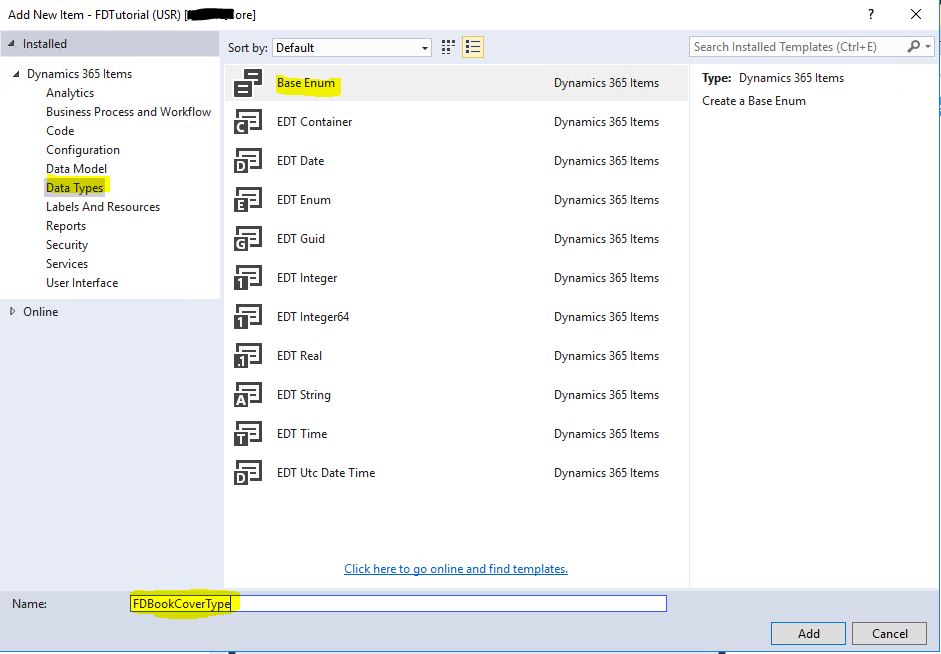
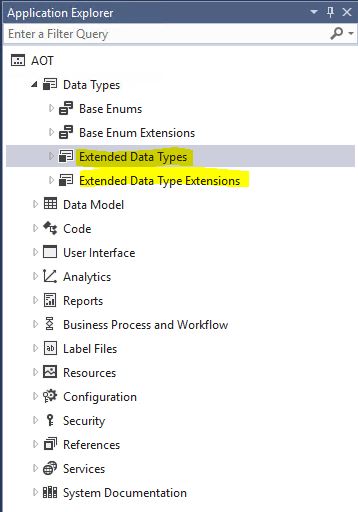
Bu tiplerin üzerin formatlı veri tipleri oluşturulur. Bunlara kısaca EDT diyoruz. EDT bize birçok avantaj sağlıyor. Bir örnek ile açıklamaya çalışacağım. AOT üzerinden sistemde olan EDT’lere bakabilir ve kullanabilirsiniz. Bu seride kullanmak üzere bir Kitap yönetimi projesi başlattım. FDBookTable ve ilişkili veri tiplerini oluşturacağım.

Resim-1

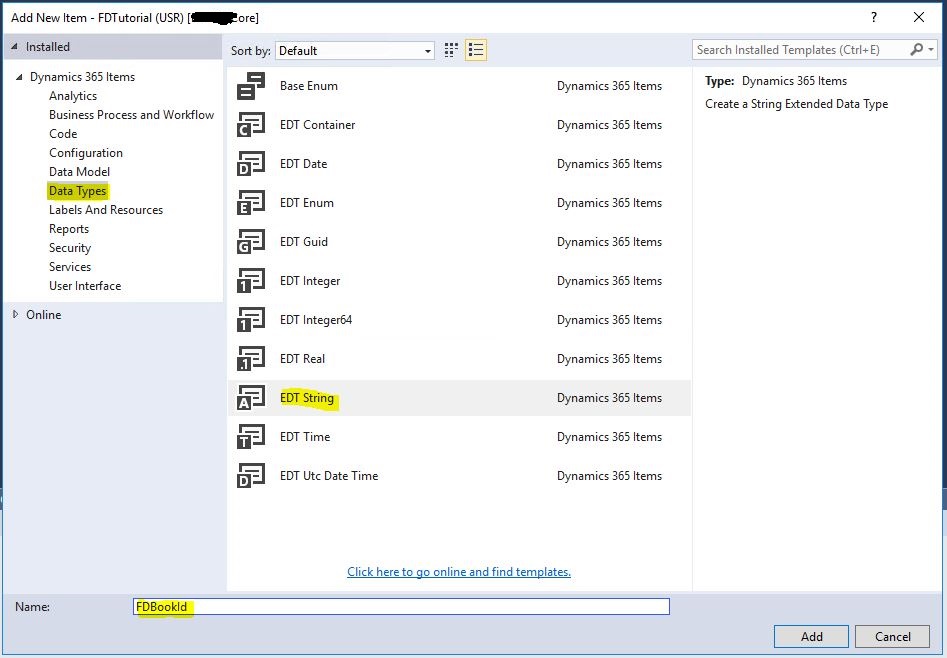
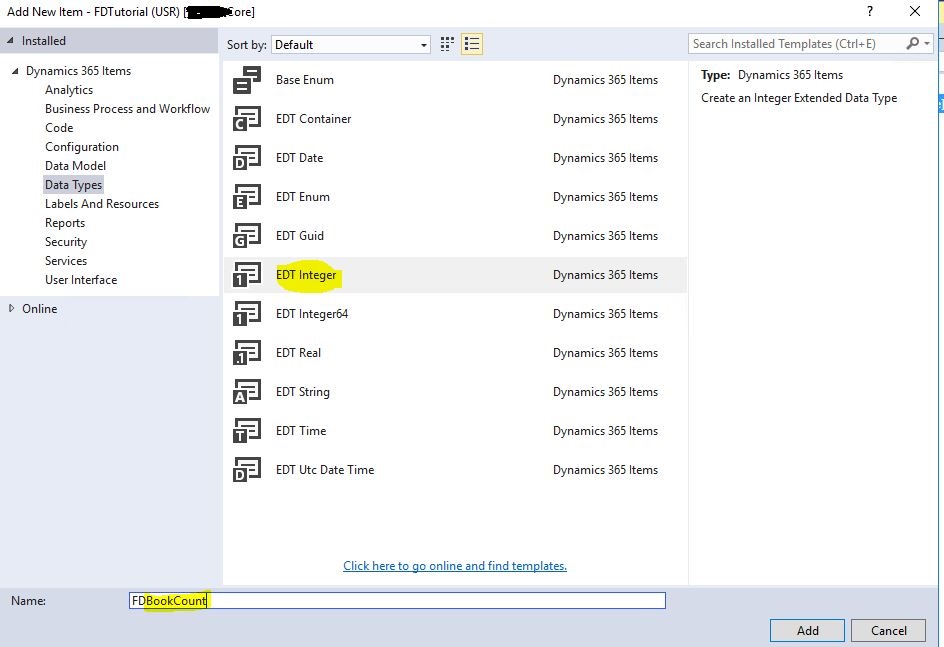
Yeni Bir element ekleme ekranını açıp Data Types -> EDT String seçiyoruz.

Resim-2

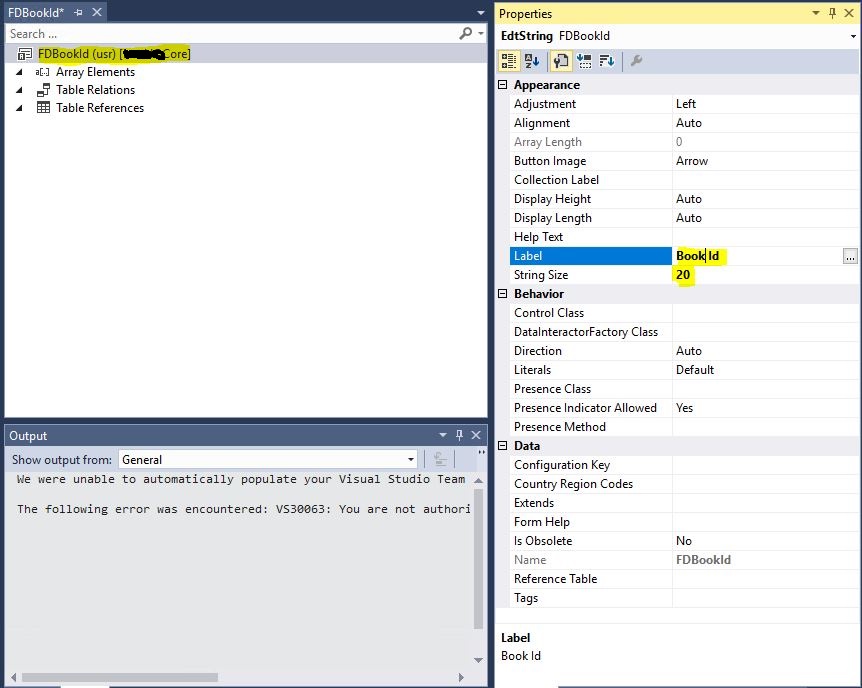
FDBookId adında bir kitap kodu EDT’si oluşturuyorum. String Size 20 olarak belirledim. Mutlaka Label tanımlamak gerekiyor. Her veri tipine göre EDT özellikleri değişiklik gösteriyor. Table Relations ve Table References EDT üzerinden ana tablo bağlantısı yapmak için kullanılıyor. İlerde örneklerini anlatacağım.

Resim-3

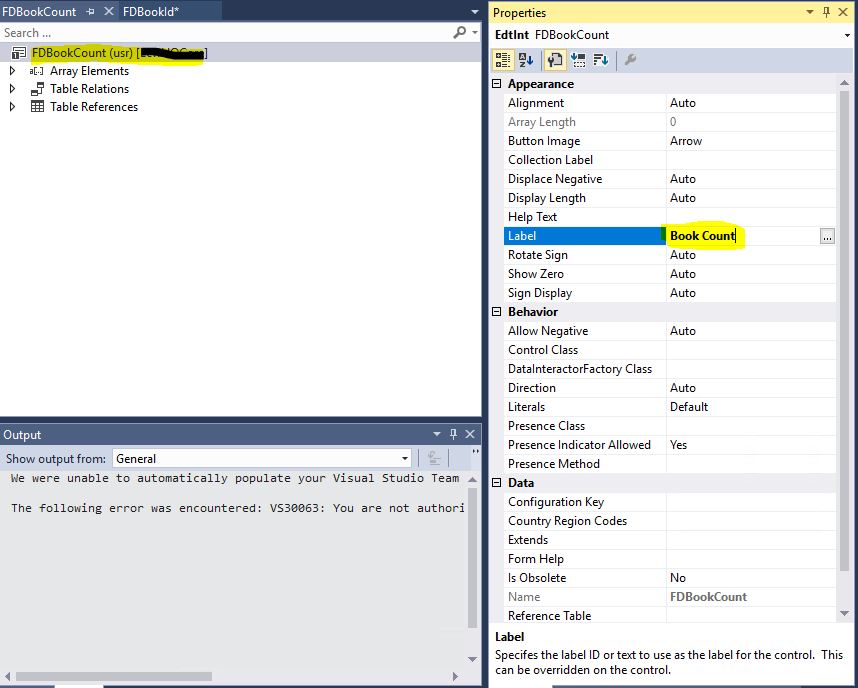
Şimdi bir tane de Integer tipinde bir EDT oluşturalım.

Resim-4

Yine Label tanımlamak lazım. Integer olduğunda birçok ilişkili özellik geliyor.

Resim-5

Bu sadeye iki tane farklı tipte EDT oluşturduk. Artık bu formatlı veri tiplerini kullandığımız tüm yerlerde aynı özellikler geçerli olacak. Örneğin FDBookId kullandığım yer yerde otomatik StringSize 20 olarak gelecek. Formlar dâhil. Ayrıca EDT’leri kodda da direk kullanıyoruz. Örneğin bir str tipinde değişken oluşturmuyoruz BookId için. Direk FDBookId tipinde değişken oluşturuyoruz.

Selamlar.

www.fatihdemirci.net

TAGs: X++, EDT, Microsoft Dynamics 365 Finance and Operation, Dynamics AX, MsDyn365FO, MsDyn365CE, MsDyn365, Power BI, Power Automate, Dynamics 365 ERP, Dynamics 365 CRM
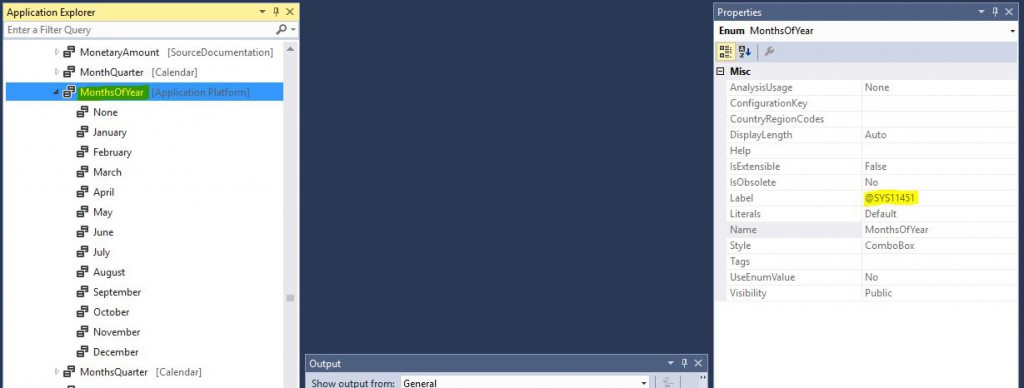
ExistsJoin ve NotExistJoin ile Lookup yazmak

Merhaba

Şöyle bir istek olsun.  Seçilecek vergi numarası ne müşteri nede satıcı tablosunda kullanılmış olsun. Bu gibi bir istekte notexistjoin kullanabiliriz. Eğer müşteride veya satıcıda  kullanılanlar listelensin denseydi existjoin kullanacaktık.

client static void lookupETGVATNum (FormStringControl ctrl, Common common)
{
    SysTableLookup          sysTableLookup = SysTableLookup::newParameters(tablenum(TaxVATNumTable), ctrl);
    Query                   query = new Query();
    QueryBuildDataSource    queryBuildDataSource = query.addDataSource(tablenum(TaxVATNumTable));
    QueryBuildRange         queryBuildRange = queryBuildDataSource.addRange(fieldnum(TaxVATNumTable, CountryRegionId));
    QueryBuildDataSource    qdbs;
    ;

// CustTable müşteri tablosunda olmayanları getiriyoruz
    qdbs  = queryBuildDataSource.addDataSource(tablenum(CustTable));
    qdbs.addLink(fieldnum(TaxVATNumTable , vatNum ),fieldnum(CustTable , vatNum ));
    qdbs.joinMode(joinmode::NoExistsJoin);

Read more

Axaptada bir formun hangi menuItem ile çağırıldığını bulmak

Merhaba,

Örneğin sizden LedgerJournalTable formunun kambiyo senetleri günlüğünden çağırıldığında  bazı ek işlemler yapmanızı istediler.

Kambiyo senetlerinden Kambiyo senedi günlüğünü (yani LedgerJournalTable formunu) açan  “LedgerJournalTableExchangeNote” isimli MenuItemdır.

Burada iki yöntem kullanılabilir.
Birincisi: MenuItem’ ın isminden ayırabilirsiniz.

if (element.args().menuItemName() == menuitemDisplaystr(LedgerJournalTableExchangeNote))
{
info(“Beni kambiyo senetlerinden çağırdılar.”);
}

İkincisi:ParmEnum ile ayırabilirsiniz ki bu daha şık olur.

Öncelikle MenuItem’ın EnumTypeParameter ve EnumParameter özelliklerini tanımlamalıyız.
Bizim kullandığımız LedgerJournalTableExchangeNote menuItem’mı için zaten  standartta tanımlamalar yapılmış olduÄŸunda aÅŸağıdaki ÅŸekilde kullanabiliriz.

if (element.args().parmEnum() == LedgerJournalType::ExchangeNote)
{
     info(“Beni kambiyo senetlerinden çağırdılar.”);  Â
}

Axaptada hiyerarşık bir tabloyu ağaç yapısıyla yönetmek

Merhaba

Bazı durumlarda hiyerarşık yapılar kurmak zorunda kalabilirsiniz. Bunu yönetmenin en iyi yolu ağaç(Tree) yapısını kullanmaktır. Axapta standardında bir çok yerde ağaç yapısını görebilirsiniz. Örneğin: LedgerRowDefDesigner formunda sürükle bırakla çalışan bir ağaç yapısı mevcut. Ayrıca  tutorial_Form_TreeControl örnek formu da size fikir verebilir.

Ben örneğimde bir hiyerarşi tablosunun form açıldığında ağaç yapısıyla görüntülenmesini ve  ağaç elemanlarının (Node)  bu form vasıtasıyla düzenlenmesinin (güncelleme , silme ve ekleme) nasıl yapılacağını anlatacağım.

Örnek olarak şöyle bir tablomuz  olsun :

ETGItemGroupTable :    ItemGroupId    ,    ItemGroupName    ,    ItemGroupLevel   ,    ItemGroupIdParent
ItemGroupId  ,   ItemGroupIdParent   =  EDT – DTItemGroupId

ItemGroupId  ,   ItemGroupIdParent   aynı EDT den oluşturuyoruz. Hiyerarşik yapıyı ItemGroupIdParent sayesinde kuracağız.

ItemGroupLevel   Burada  hiyerarşiyle pek ilgisi olmayan benim kurgumla alakalı olan bir seviye kodu var. Ben bu hiyerarşideki bütün elamanların birer seviye kodu olsun istiyorum ve bu kod 1-8 arasında olabilir. Formda gerekli kontrolleri buna göre yazıyorum.

Ulaşmak istediğim form görünümü şu şekilde

Yeni bir form oluşturup veri kaynağını ekleyip tasarımdada gerekli elemanları ekleyelim. Ağaç elemanımızı da ekledikten sonra bazı metodlar yazmamız gerekiyor onlara gecelim.

Read more

WinAPI::createDirectoryPath ‘de “$” iÅŸareti hatası

Merhaba

Örenğin şöyle bir adresimiz olsun:

filePath = \\10.34.32.21\axapta$\Ozluk;

WinAPI::createDirectoryPath(filePath);

Komutu ile klasor oluşturmaya çalışırsanız hata alırsınız. Çünki $ işaretinden kaynaklanan bir sorun var.
WinAPI::createDirectoryPath(filePath) metodunda kullanılan strlen(filePath) fonksiyonu $ işartetinden dolayı doğru sonuç döndüremiyor.

createDirectoryPath metodunun içeriğine bakalım:

Read more

Sevk İrsaliyesi Tasarımı

Merhaba

Ax üzerinde sevk irsaliyesi ve fatura tasarımı gibi işler çetrefilli işlerdir.  Axaptada tasarımsal işlemler genelde zordur.

Ancak belli bazı noktaları bilip mudahalelerinizi yaparsanız kolay bir şekilde istediğiniz güncellemeyi yapmış olursunuz.

Biz bu makalemizde Ax uzerinde matbu bir sevk irsaliyesi tasarımının nasıl yapılabileceğinden bahsedeceğiz.

Öncelikle Ax’ta standart Sevk Ä°rsaliyesi  “SalesPackingSlip”  raporudur. Denemek için  “CustPackingSlipJournal” formundan “Önizleme/Yazdır “  butonunda çıkan Kopya ve Orjinal butonundan  Sevk Ä°rsaliyesi bastırabilirsiniz.

Asıl olan “SalesPackingSlip” raporunda deÄŸiÅŸiklik yapmayalım. Çogaltip  “ETGSalesPackingSlip” ismini verelim. Ve MenuItem  oluÅŸturalım. OluÅŸturdÄŸumuz item için multiselect özelliÄŸini yes yapalım.

“ETGSalesPackingSlip” raporunda dizaynında “Generated Design” kısmında irsaliyemizin tasarımını görebilirsiniz.

Burada istenilen deÄŸiÅŸikler yapılabilir. Ä°stenmeyen alanlar çıkartılıp yeni alanlar eklenebilir. Ancak bizim yapacağımız matbu tasarım standarttan çok farklı olduÄŸu için ben “Generated Design” ‘da bulunan bütün alanaları siliyorum. Bu iÅŸlemden sonra raporu derleyip hata veren kısımları yorum satırı haline getiriyorum. Kendim 4 tane ProgramableSection açıyorum. Bunlar:

1.  Sct1 : Başlık bilgilerinin olacağı kısım.

2. Sct2 : İrsaliye satırlarının olacağı kısım.

3. Sperater : Satırlarda eksik kalan kısımları tamamlamak için kullacağım boş bir satır.

4. Sct3 : Toplam ve alt bilgilerin görüneceği kısım. 

Sct1 için örnek olarak iki tane display metod yazayım diğerlerini siz ihtiyacınıza göre ekleyebilirsiniz.

display name dispDeliveryName()
{
      return CustPackingSlipJour.DeliveryName;

}

Read more

Page 5 of 13« First...3456710...Last »