Posts Tagged ‘ LCS

Yeni bir Dynamics 365 Finance and Operations uygulama projesini Microsoft Life Cycle Services (LCS) üzerinden nasıl ayarlanır.

Bu yazıda size Dynamics 365 Finance, Dynamics 365 Supply Chain Management veya Dynamics 365 Commerce için yeni bir lisans satışından sonra uyarlama projeyi başlatmak için gerekli olan adımları anlatmaya çalışacağım.

Öncelikle firmanın Tenant Administrator hesabıyla Azure Active Directory (Azure AD) de aşağıdaki adımları takip ederek aktivasyon işlemi yapılmalı:

  1. InPrivate/Incognito olarak yeni bir oturum oluşturun ve Microsoft 365 Admin Center’ı açın.
  2. Tenant Administrator hesabıyla giriş yapın.
  3. Billing > Products & services gidin ve orada aldığınız ürünün olduğundan emin olun. Eğer yoksa iş ortağınızla iletişime geçin.
  4. Eğer ürün aboneliği (Subscription)  aktifse uygulama projesi (Implementation Project) oluşturmayı tetiklemek için LCS ye giriş yapın.
  5. Yeni bir sayfada LCS’e Tenant Administrator hesabıyla giriş yapın.
  6. Ekrana çıkan kutucukları onaylayın böylece proje oluşturulmuş olacak.
  7. Tenant Administrator otomatik olarak Project Owner rolüne atanır. Bundan sonra projeyi LCS de görebilirsiniz.

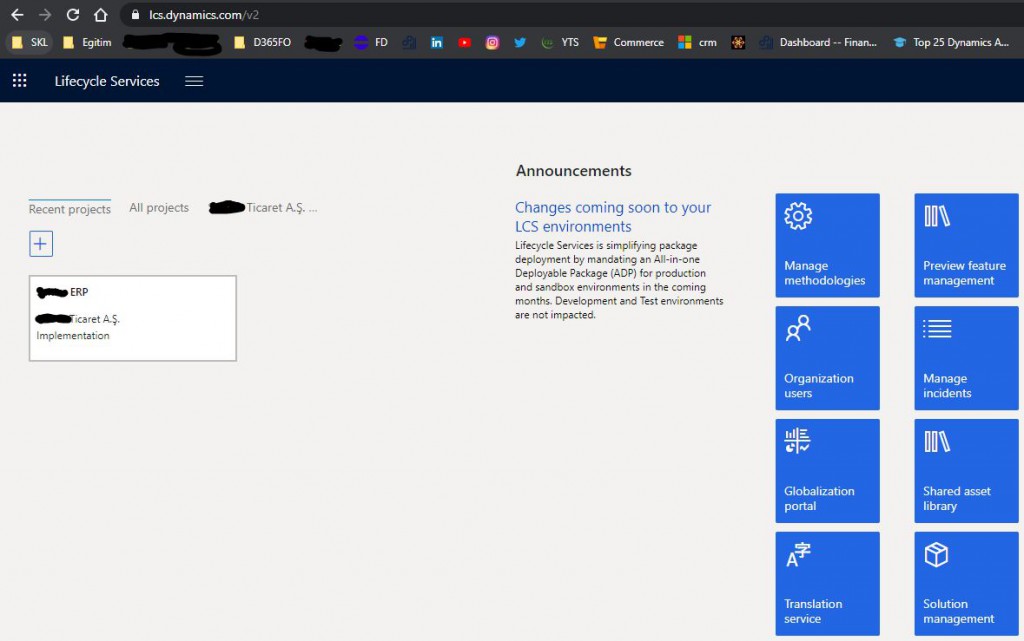
Yukarıdaki adımları tamamladıktan sonra eğer bir sorun yoksa Resim-1 de görünen uyarlama(Implementation) projesi oluşacak.

Resim-1

Read more

How to Define Privileges from Dynamics 365 Finance and Operations Interface?

In this article, I will explain how to create privilege objects from Dynamics 365 Finance and Operations interface. In my previous article, I explained how fatih.test user was created. I will show an example based on this user. I deleted all roles of the user except system user. I will define a new role and grant privilege a certain object.

Image-1

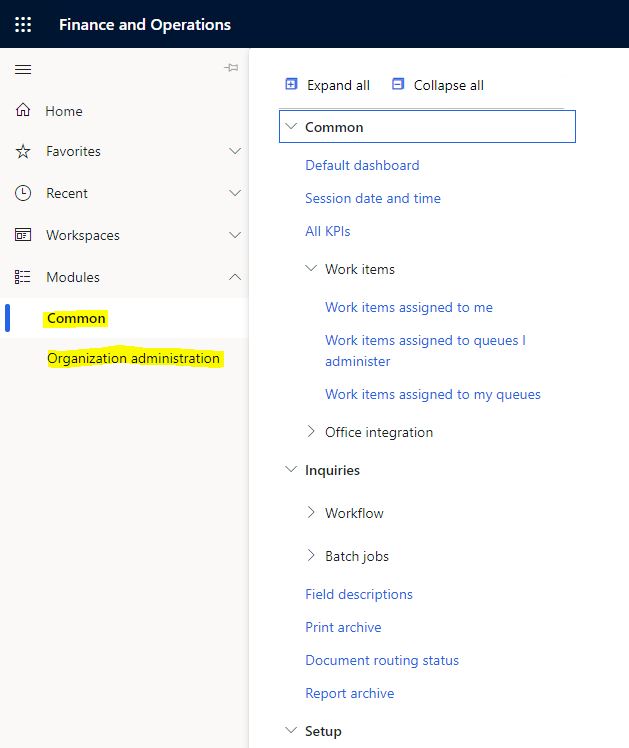
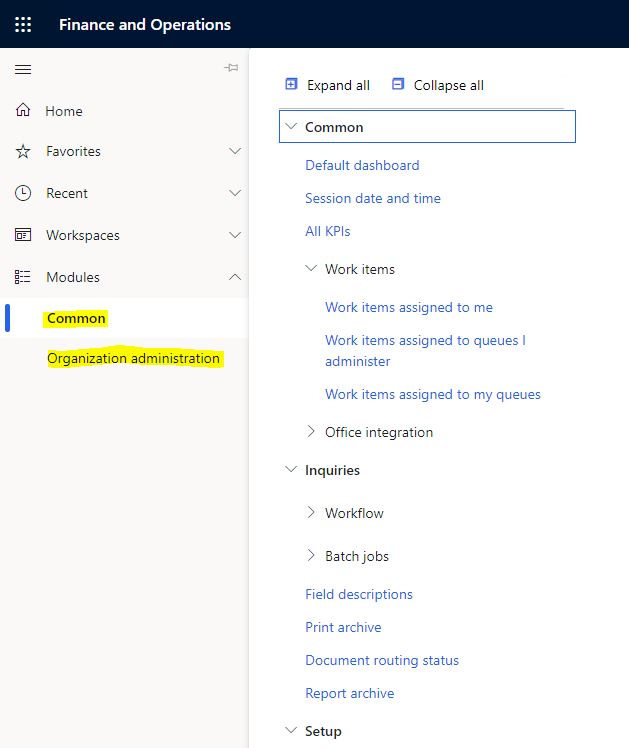
You can see the menus in Image-2 only when you enter the application with the System user role.

Image-2

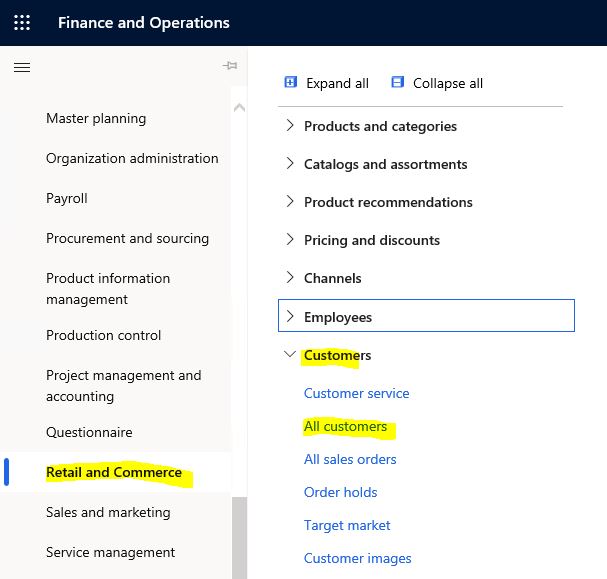
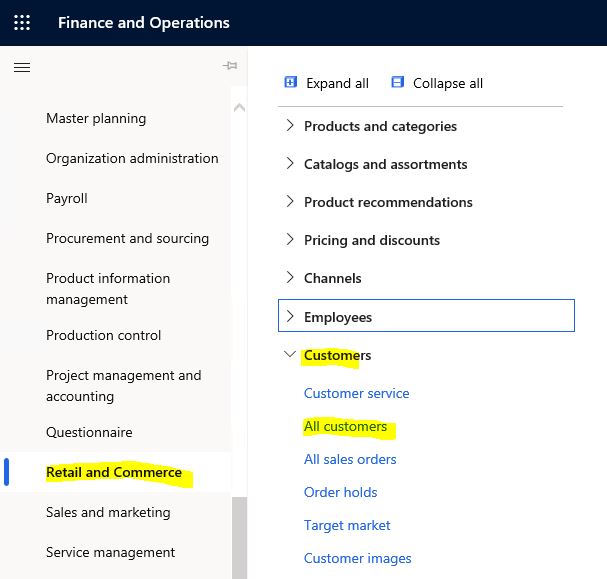
In this example, I will define a role that is authorized only for the All Customers form.

Image-3

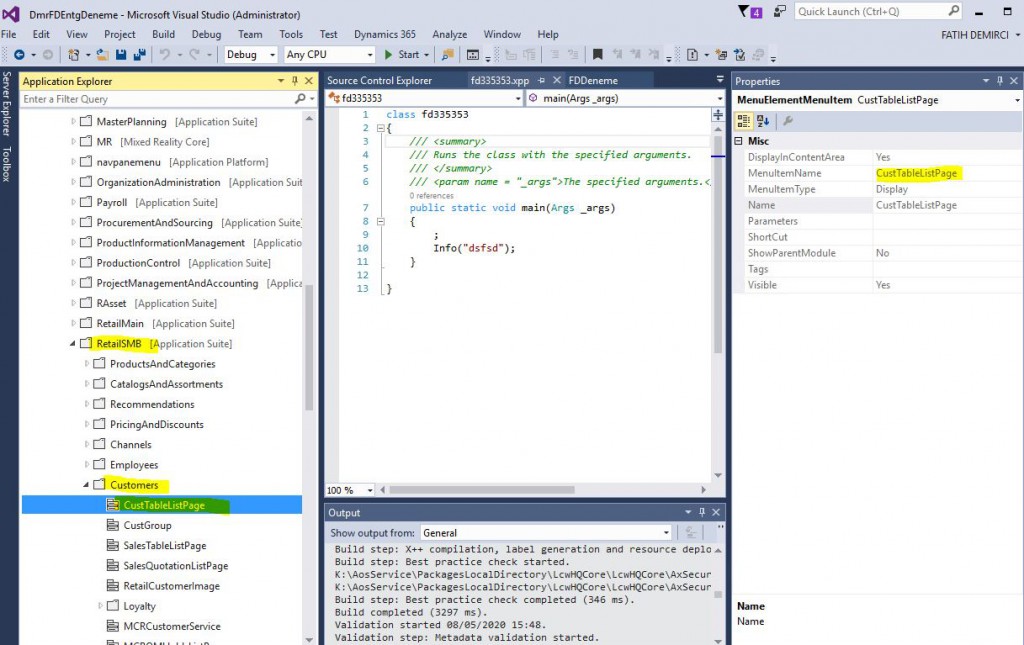
First, find the name All Cutomers MenuItem. I looked it up from the development environment. You can also see it on the form. CustTableListPage

Image-4

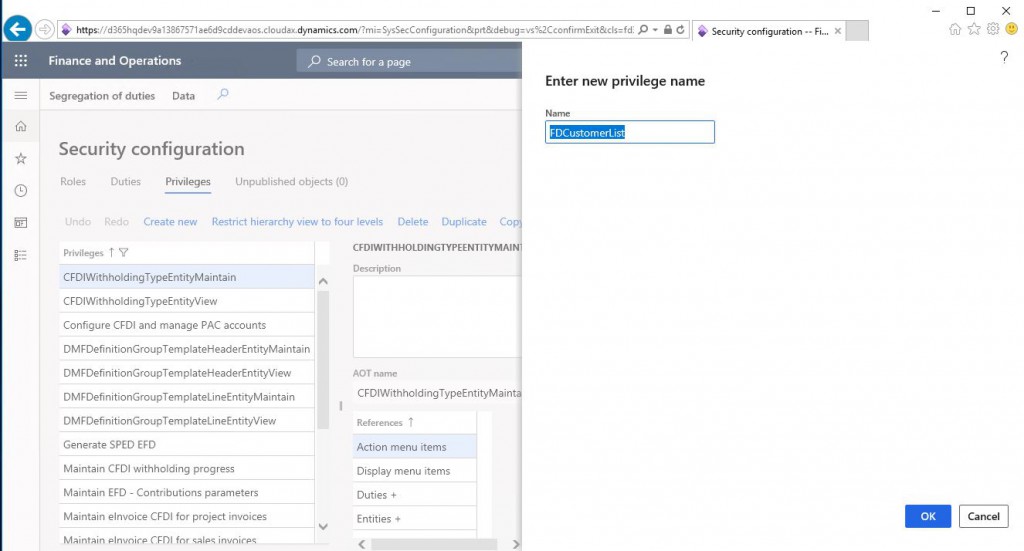
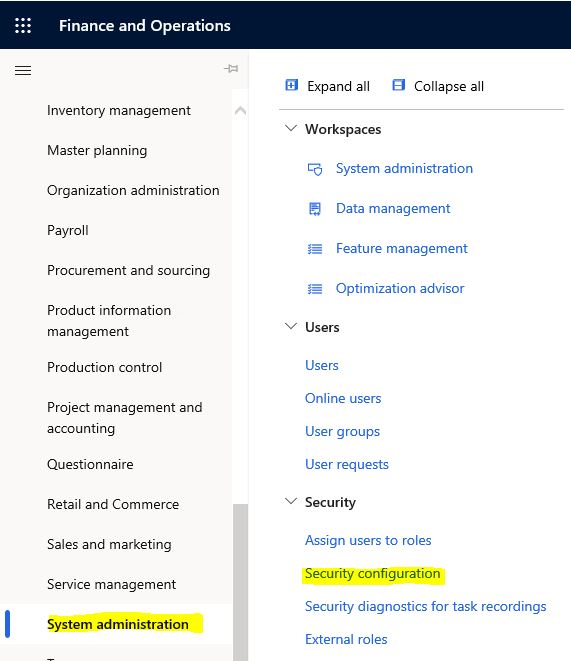
Open your application with a user that has admin privilege and open the System Administration -> Security Configuration form. Got to the Privileges tab and click Create new. Enter the name from the window that opens and click OK.

Image-5

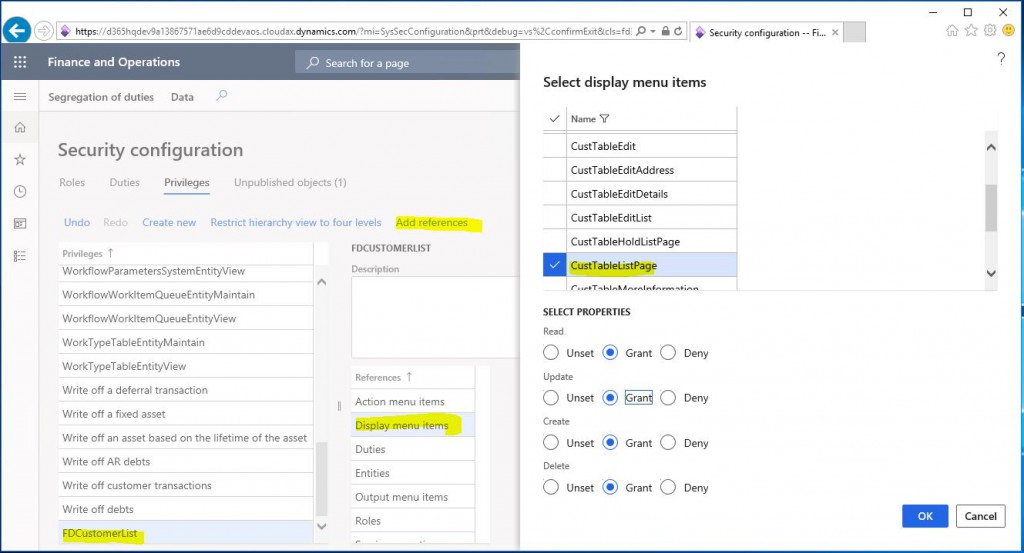
You must define the privilege for the privilege created. We want to authorize a Display menu Item. While on the Display menu Item record, click Add references. Filter and select CustTableListpage from the window that opens. Select Grant for all of them and click OK. We have defined the authorization.

Image-6

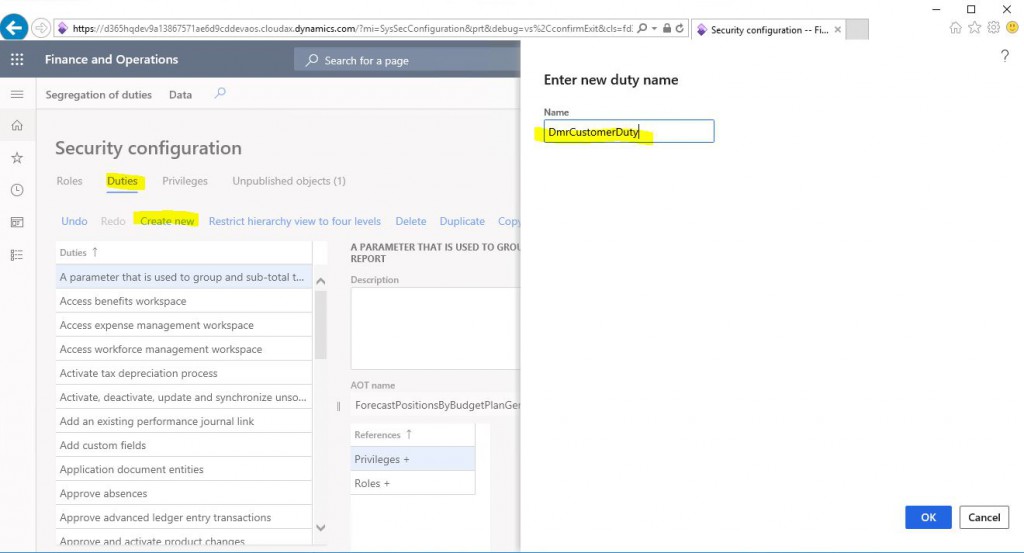
Go to the Duties tab and Click New. Enter a name and create.

Image-7

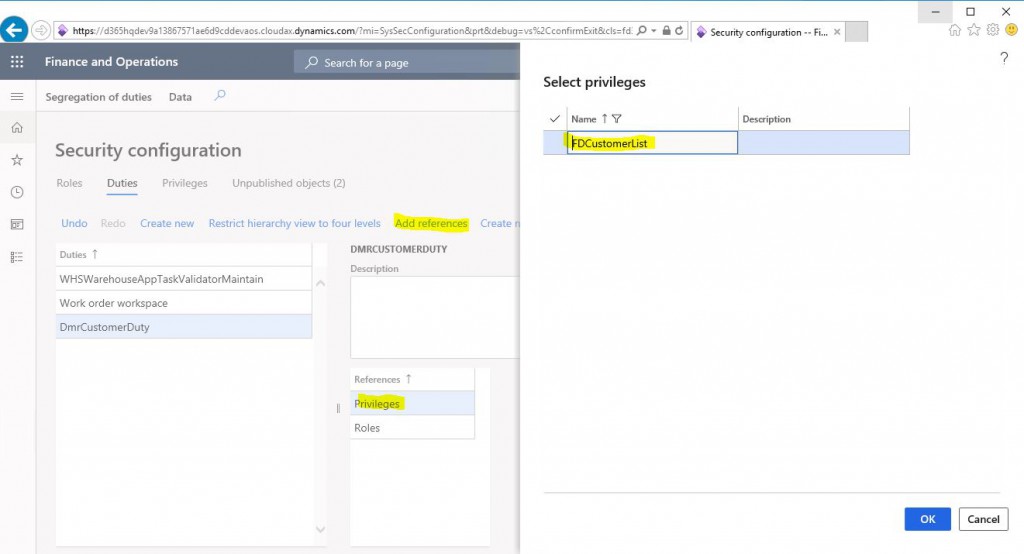
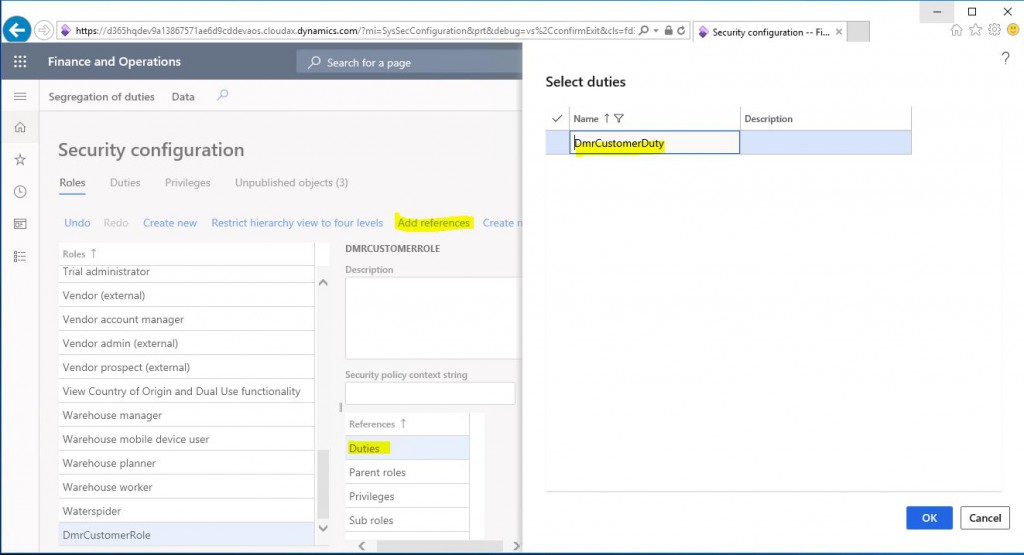
In order to add Privilege over the resulting Duty, we select the Privilege we created by clicking Add Reference.

Image-8

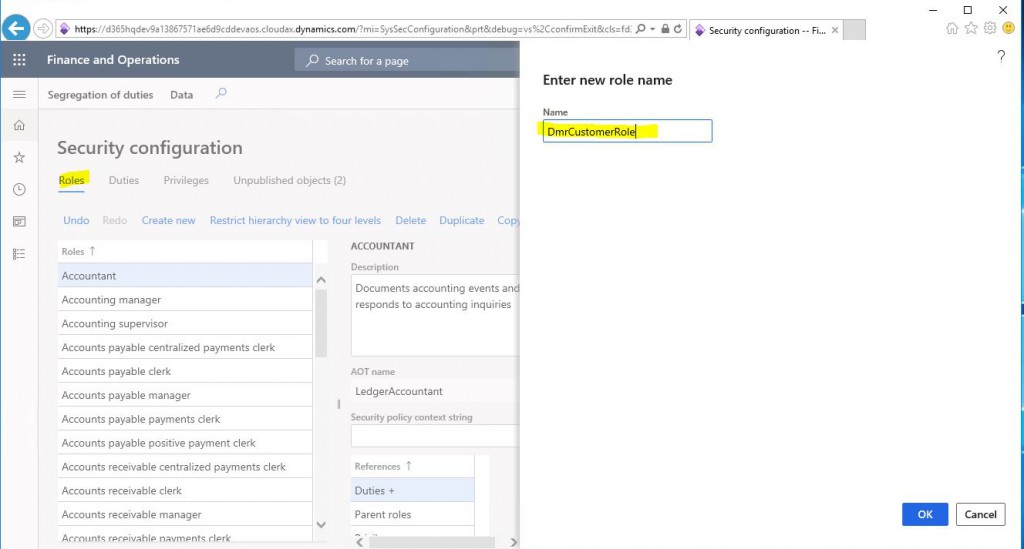
Go to the role tab and create a new role.

Image-9

Similarly, add the Duty you created previously as a reference.

Image-10

After these processes, the role privilege definition is finished. But first we need to Publish these objects.

Image-11

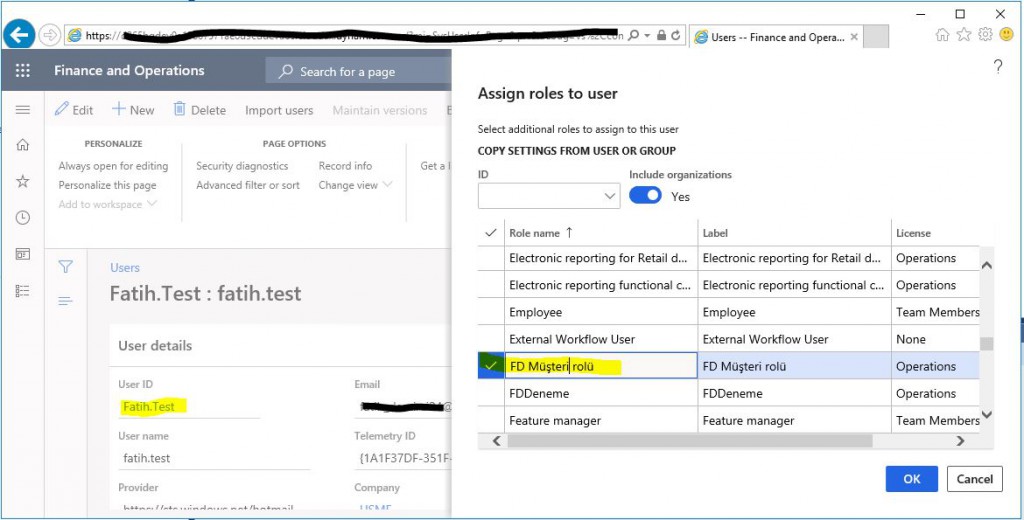
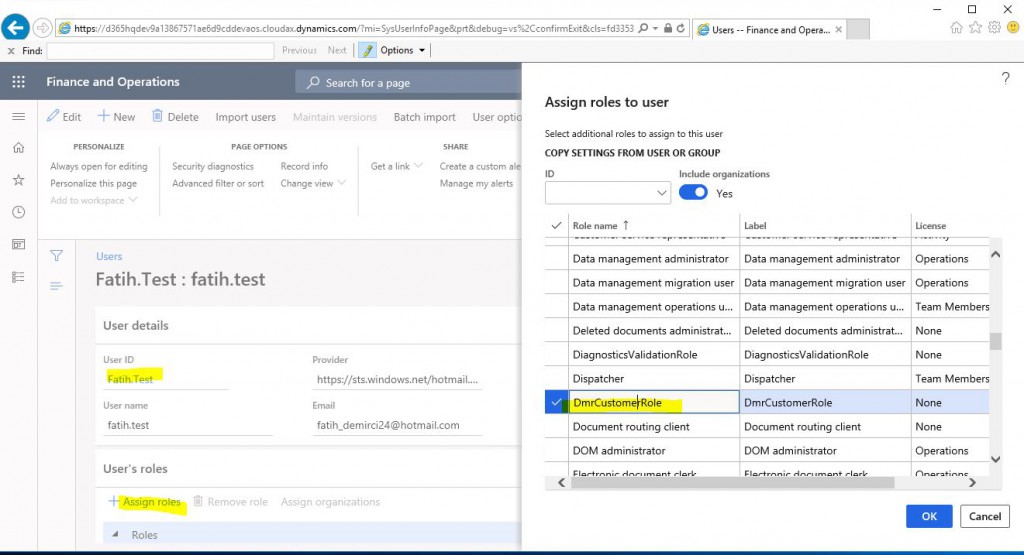
After publishing the privilge objects, go to your user, click Assign Roles and select the role you created from the screen that opens.

Image-12

When you log back into the system with your test user, you will see the menu you have authorized.

Image-13

In this article, I tried to explain how to create privilege objects in the simplest form through the application. Creating from the screen like this something I am not used to. I prefer to create it from the development environment. Also, objects are not created when you create them from the screen. Therefore you need to use Export-Import to move them to other environments. I will also talk about this feature. In addition, I will explain how to make privilege definitions through the development environment in my next article. Privilege is an extensive topic. I will try to talk about all the details.

Regards.

www.fatihdemirci.net

TAGs: Microsoft Life Cycle Services, LCS, Azure, Azure DevOps, Security, Microsoft Dynamics 365, MsDyn365FO, MsDyn365CE, MsDyn365, Dynamics 365 Insights Power BI, Power Automate, Power Apss, Power Virtual Agents, what is Dynamics 365, Dynamics 365 ERP, Dynamics 365 CRM

Dynamics 365 Finance and Operations Security Infrastructure?

In this article, I will try to explain the Dynamics 365 Finance and Operations security architecture. There is a docs article that I like very much, I will try to recap the topics by referencing it. It is very important to understand the security infrastructure. In today’s projects, managing security and authorization can be a very demanding process. In order to manage the needs correctly, it is necessary to know the infrastructure and the features, capabilities and constraints of security tools. In this article I will address the following topics. I did not translate them into Turkish. Sometimes there is a semantic shift, so I think explaning them is better.

•             Security architecture

•             Role-based security

•             Duties

•             Privileges

•             Permissions

•             Authentication

•             Authorization

•             Auditing

Finance and Operations application uses role-based security structure. Authorizations are given to roles, users are not directly authorized. Users are assigned roles. A user without any role has no authority in the system. The user assigned the admin role has full authorization. More precisely, they are not subject to any restrictions. Role-based security is a hierarchical structure as seen in Image-1.
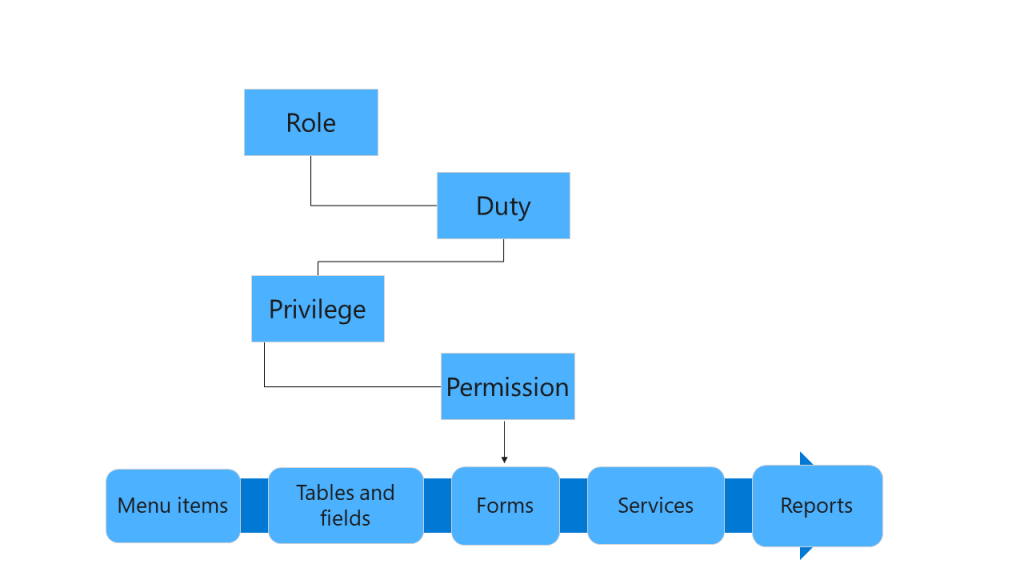
Image-1

Role-based security

Role-based security has actually been created parallel to the work of business units. Role is the structure in which the necessary authorizations are gathered for a position with certain duties to fulfill those duties. The role is actually parallel to the employee’s actual job in the company. It does not mean that every employee has a role. In some cases, a single person may be managing different business processes. So they must have multiple roles. It is essential to organize roles according to the job, not the person. At least one role is required to log into the system. Generally, everyone is given the role of System User.  You can use the System administration > Users > Assign users to roles form to assign the role.

Role assignment is made by admin accounts. Basically, roles consist of Duties and Privileges.
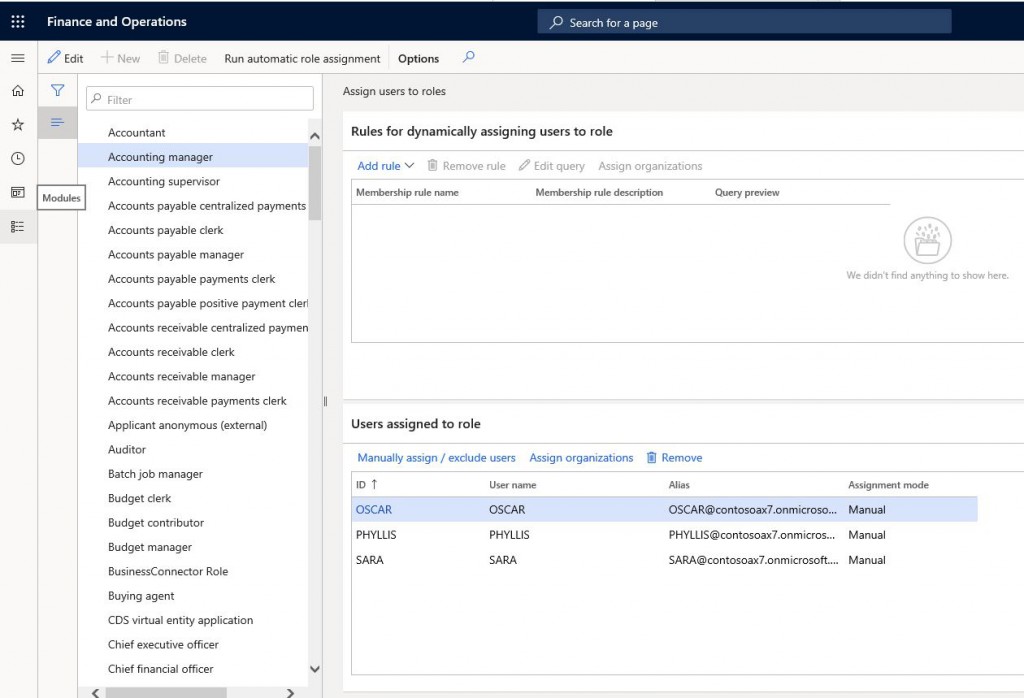
Image-2

Duties

Duties are where the necessary authorizations are gathered to carry out a certain work process. A task can be assigned to multiple roles. Therefore, a change you make to the duty automatically affects the assigned roles. The role can be assigned directly in Privilege, but for a more manageable infrastructure, it is necessary to create and use the duties.

Image-3

Privileges

It is the structure where the authorizations required to do a certain job are gathered. For example, the payment cancellation privilege only has the authorization required to do this job. You can give this privilege directly to the role, but as I said above, it would be a better approach to collect them in duties and assign them to roles. Security and authorization objects are defined for all objects in the system. You can find and replace the ones you need and add new ones. Especially in new developments, it is absolutely necessary to create Privilege. Duty may not be required for every development. It may be enough to grant this authorization with a specific duty, but not without Privilege.

Image-4

Permissions

Permissions refers to the level of authorization to access a specific object. This can be a MenuItem or any object. Generally, authorization is given through the entry point. And these are usually MenuItems. In some cases we also use it to directly define authorization for an object of the form.

Authentication

This is my favorite feature in the new version. I can use all tools with a single email. One of them, of course, is the Finance and Operations application. To enter the application, your user login must be created. I explained it in my previous article. Usually users are expected to be in Microsoft Azure Active Directory (AAD), but you can also add external users. You can set up 2-step verification.

Authorization

Authorization controls access to the Finance and Operations application. Security permissions are used for this. Security permissions determine how certain objects of the application are accessed. These objects are: menus, menu items, action and command buttons, reports, service operations, web URL menu items, web controls and fields.

Finance and Operations application uses a context-based security, so we define the level of access to a certain object. When you associate a privilege with an entry point, you also define an access level. Such as Read, Delete, update.

Auditing

User login and logout times are recorded. You can access these records from the admin account. (System administration > Inquiries > User log).

In this article, I tried to introduce you to the security infrastructure. It is a very extensive and detailed topic. Generally, projects have a person or team responsible only for these processes. When not designed correctly, maintenance costs and problems can be annoying. It is imperative to place the due importance and test well during the project phase. Generally, since consultants have admin privileges, they can skip tests with the required roles. Here it is recommended that key users do tests with the relevant role, not as an admin. I will continue to address security-related issues.

Regards.

www.fatihdemirci.net

TAGs: Microsoft Life Cycle Services, LCS, Azure, Azure DevOps, security architecture, Microsoft Dynamics 365, MsDyn365FO, MsDyn365CE, MsDyn365, Dynamics 365 Insights Power BI, Power Automate, Power Apss, Power Virtual Agents, what is Dynamics 365, Dynamics 365 ERP, Dynamics 365 CRM
Dynamics 365 Finance and Operations Segregation of Duties Nedir?

Segregation of Duties görev ayrılığı olarak çevriliyor. Şöyle izah etmeye çalışayım. İki kritik görevi(Duty) aynı kişide toplanmasın istiyorsunuz örneğin fatura işleme ve ödeme çıkma gibi iki görevin aynı kişide olmaması gerekiyor. Binlerce kişinin çalıştığı bir firmadasınız ve bunu takip etmek belli bir aşamada mümkün olmuyor işte tam burada SoD devreye giriyor. Duty üzerinden yaptığınız bir tanım size bu tip durumlar için uyarı veriyor ve kontrol etme imkânı sağlıyor.

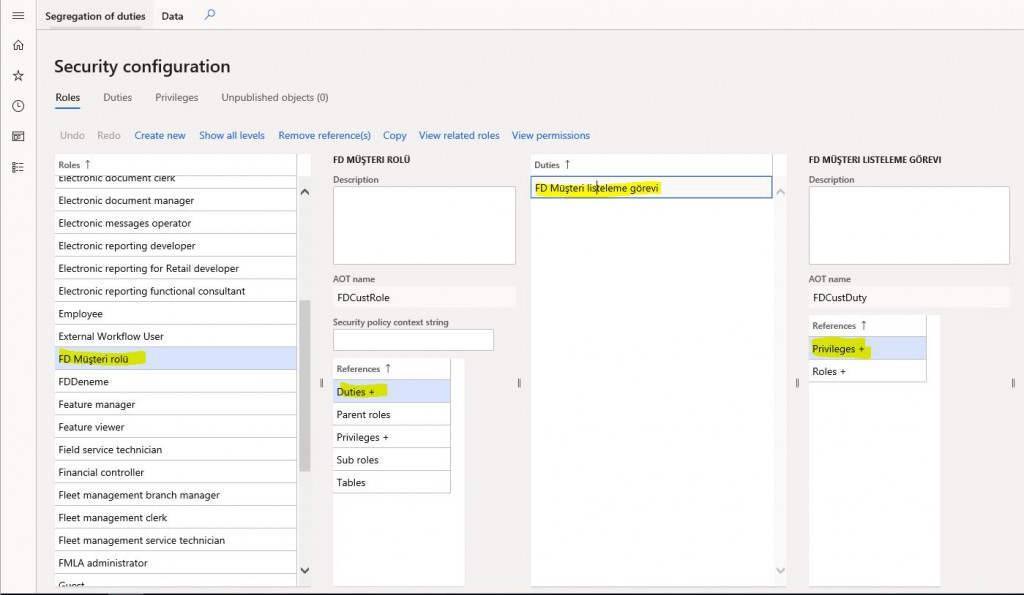
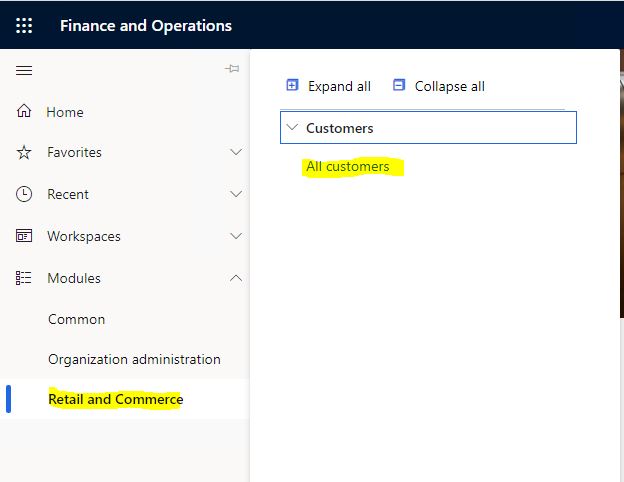
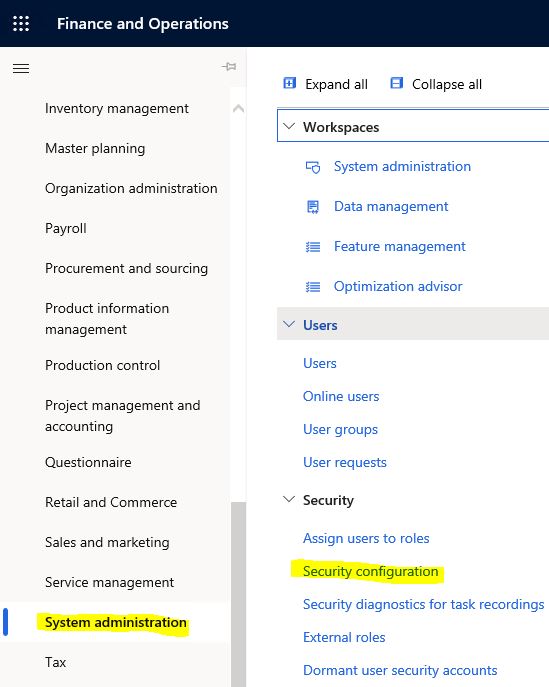
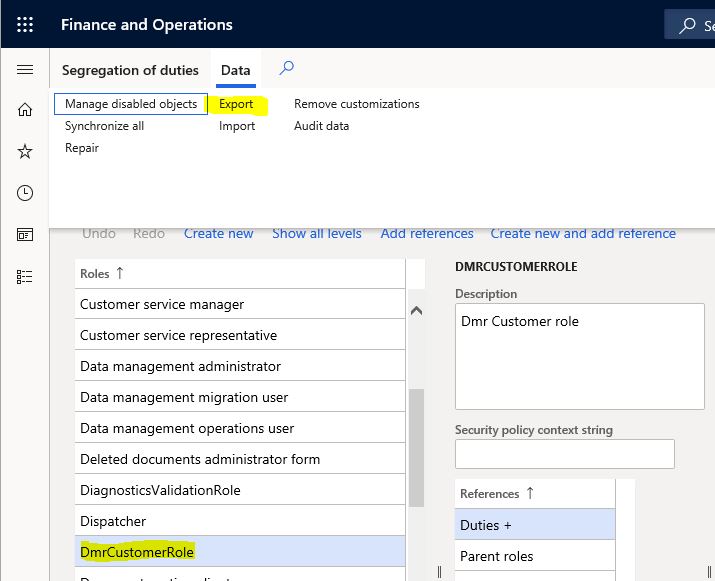
Önceki yazılarda kullandığımız güvenlik nesnelerini kullanarak bir örnek yapalım. Security Configuration formunu açıyoruz.

Resim-1

Read more

What is Dynamics 365 Finance and Operations Due Date Alerts?

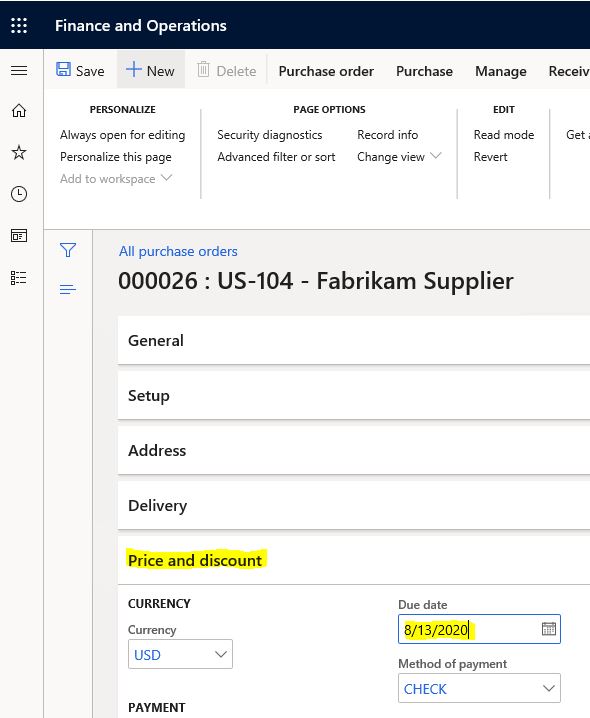
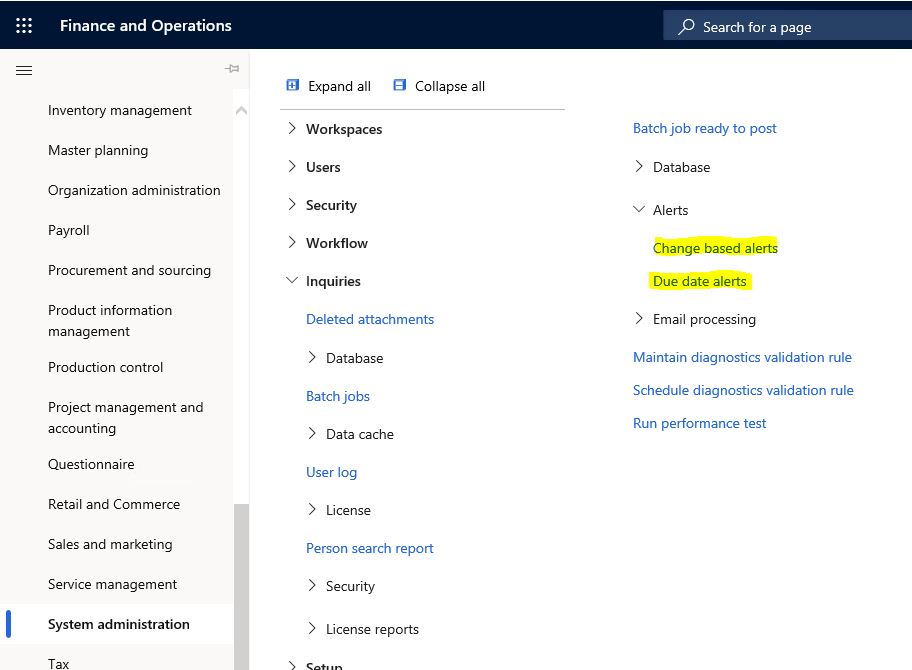
In this article, I will try to explain what Dynamics 365 Finance and Operations Due Date Alert is and how to set it up. In my previous article I talked about Change based alerts. Some action on the data must be performed for those alerts to trigger. Here, there is no need for an action. The progress of time allows this alert to occur. Let me give you an example. For example, if you have an order and you want to be notified when the due date is over, you can set up Due Date Alert.

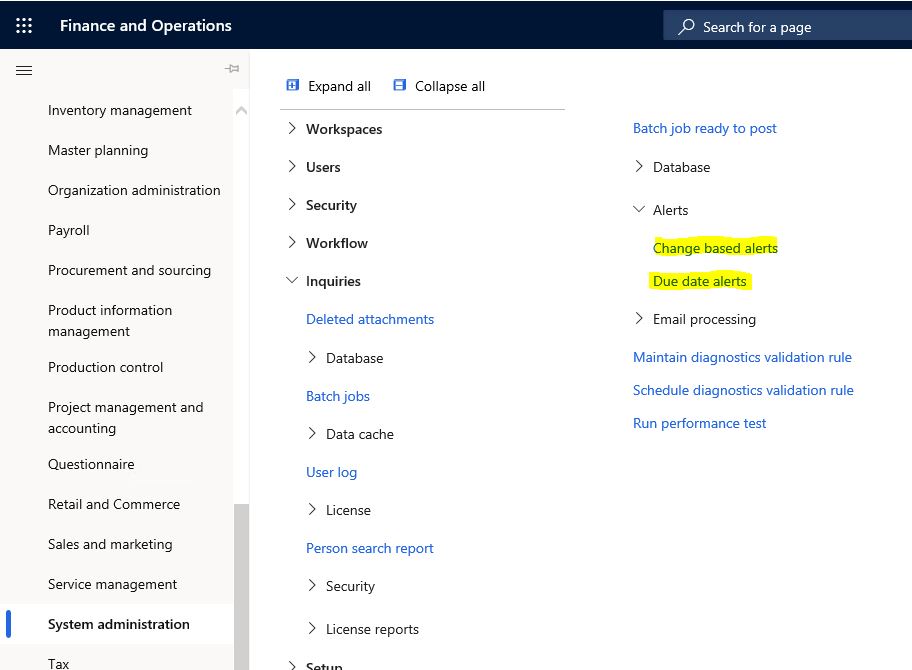
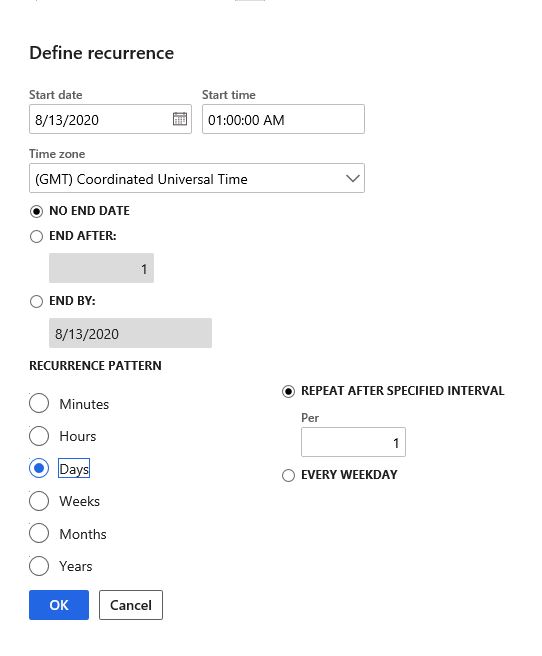
First, you need to set up the Due Date Alerts batch job.

Image-1

I set it up to run once a day. Usually this will be enough. I will trigger it manually once after our example. In order not to wait a day.

Image-2

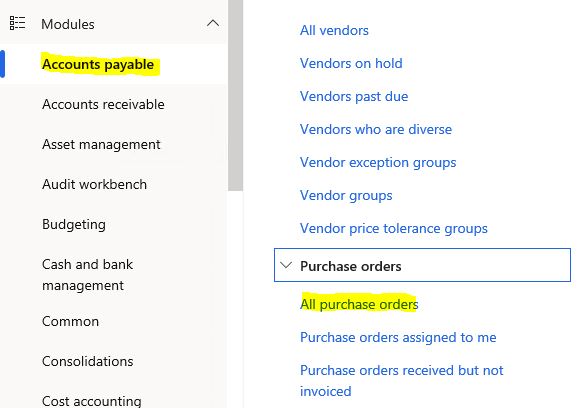
Now I open the purchase orders to make a sample setup.

Image-3

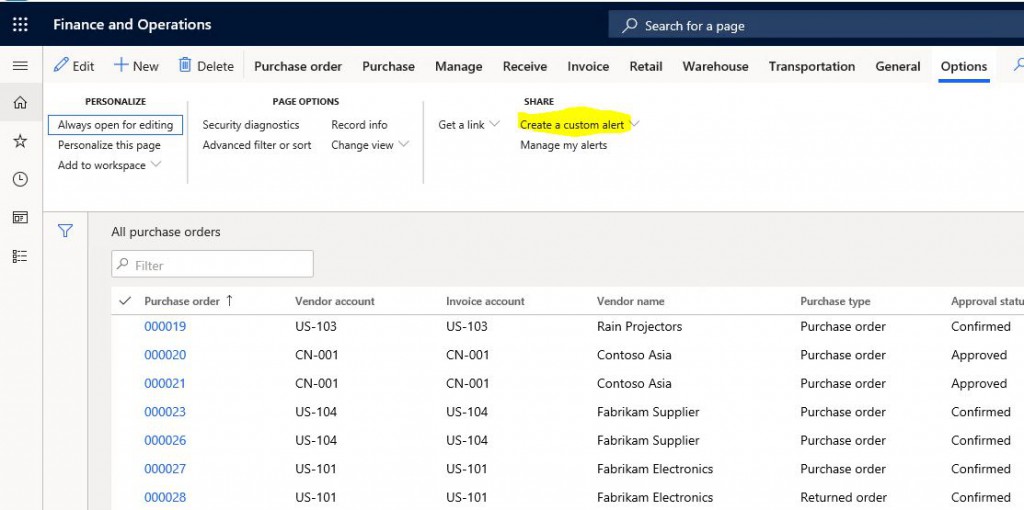
Click Options->Create a custom alert.

Image-4

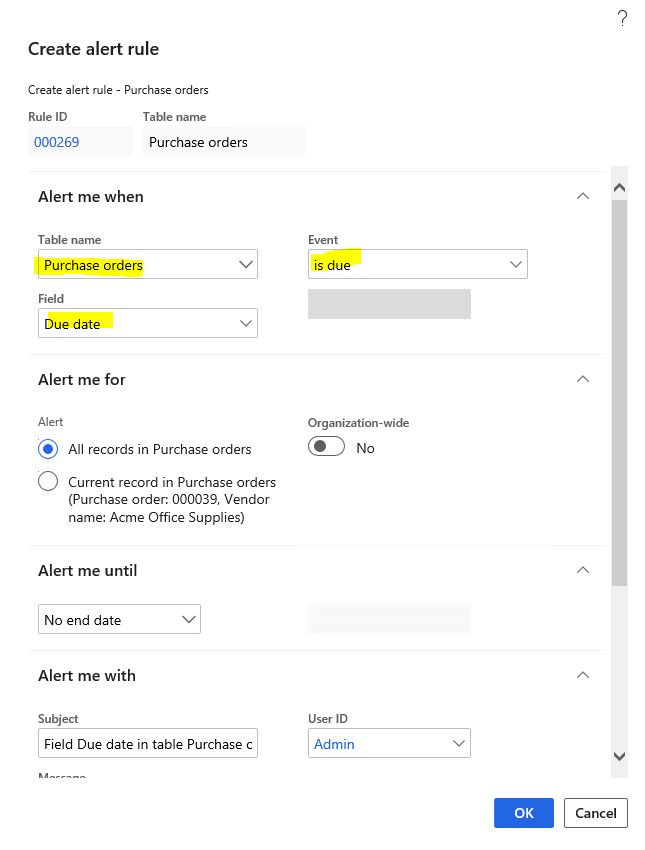
Here, I set it to send notifications for those which are due. I click OK to complete the alert setup.

Image-5

Now let’s create a posting with today’s due date. The batch that normally runs every day will look at them and alert. I’ll manually trigger it to show the alert.

Image-6

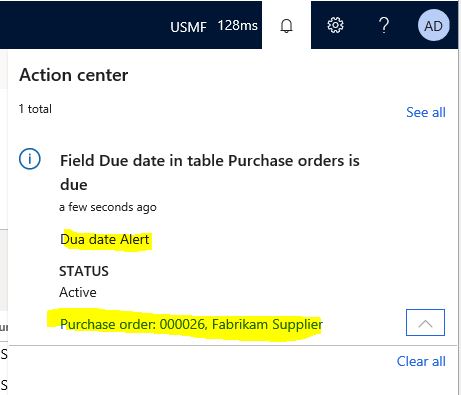
Warning message appears after manually triggering batch.

Image-7

In this article, I tried to explain how to create a date-based warning rule. It’s a very simple and useful feature. These features should be thoroughly explained to the end users. It is necessary to avoid additional development for jobs that can be solved with these.

Regards.

www.fatihdemirci.net

TAGs: Microsoft Life Cycle Services, LCS, Azure, Azure DevOps, Due date alerts, Microsoft Dynamics 365, MsDyn365FO, MsDyn365CE, MsDyn365

Dynamics 365 Finance and Operations Optimization Advisor Nedir?

Bu yazıda Dynamics 365 Finance and Operations Optimization Advisor ne olduğunu ve ne işe yaradığını anlatacağım. Optimization Advisor iş analisti ve danışmanların modül yapılandırmasındaki ve iş verilerindeki sorunların tespitine olanak tanıyan bir araçtır. Optimization Advisor modül yapılandırması için en iyi uygulamaları(Best practices) önerir ve eski veya yanlış kurulum ve iş verilerini belirler ve aksiyon almak için bilgi verir.

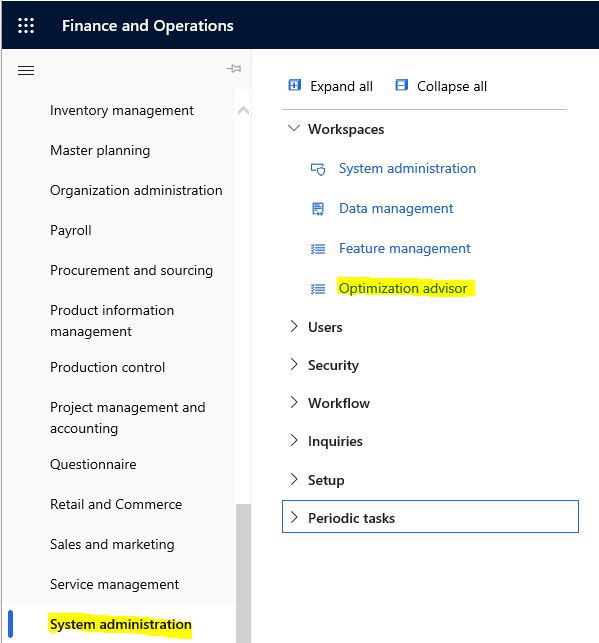
Modules > System administration > Workspaces > Optimization Advisor yolunu kullanarak çalışma alanını açıyoruz.

Resim-1

Read more

Dynamics 365 Finance and Operations Due Date Alerts Nedir?

Bu yazıda Dynamics 365 Finance and Operations Due Date Alert nedir ve nasıl ayarlanır anlatmaya çalışacağım. Bir önceki yazımda Change based alerts’ten bahsetmiştim. Orada uyarı için veride herhangi bir işlem olması gerekiyordu. Burada ise bir işlem olması gerekmiyor zamanın ilerlemesi bu uyarının oluşmasını sağlıyor. Şöyle bir örnek verelim. Örneğin bir siparişiniz var ve vade tarihi geçtiğinde uyarı almak istiyorsunuz işte tam bunun gibi durumlarda Due Date Alert kurulumu yapabilirsiniz.

Öncelikle Due Date Alerts toplu işini kurmalıyız.

Resim-1

Read more

What is Dynamics 365 Finance and Operations Segregation of Duties?

Segregation of Duties görev ayrılığı olarak çevriliyor. Let me explain it with an example. Let’s say you want two critical Duties not to be assigned to the same person. For example, two duties such as invoice processing and payment should not be assigned to the same person. You are in a company where thousands of people work and it is not possible to track at a certain stage. Here SoD comes into play. A definition you make through Duty gives you a warning for such situations and allows you to control them.

Let’s see an example using the security objects we used in previous articles. Open the Security Configuration form.

Image-1

From the Segregation of duties tab, click on the Segregation of duties rules button. This form is also available directly on the menu. You can see it in Image-9.

Image-2

There are no records yet in the form that opens. Let’s create one by clicking New.

Image-3

Specify a name and select two Duties. I have chosen two sample Duties. The only thing I pay attention to is, I know which roles these two Duties are used in. I will need it to show the example. Of course, you will make this definition according to your business needs.

Image-4

After saving, it comes to my test user. FD Customer listing task is attached due to its current role. I add a new role and select one that includes Customer Invoicing. When I click add, there is a warning saying that a conflict occurred. If I click Yes, it will create a solution record for me.

Image-5

The record created includes information about this operation. I can accept assignment with the Allow Assignment option.

Image-6

Accepting means overriding the rule, so it asks for an explanation. After providing one, we have added the role. We could have blocked it if we wanted to.

Image-7

When you create a new SoD, you can check if there are anything that does not follow this rule. There is something that doesn’t follow my rule, but since we created an override record it didn’t appear here.

Image-8

You can follow the created records from the menu in Image-9.

Image-9

In this article, I have tried to explain briefly what Segregation of Duties is. Although it is a very nice feature, it still has many deficiencies. For example, it only works with Duty, but there is no solution for direct Privileges assigned to a Role. It asks when adding it to the role, but it does not have a mechanism that controls the changing duty contents afterwards. It is possible to use it. Especially if you do not define authorization other than Duty and create your Duties with the right logic, you can use it very easily. Investments are still being made in this feature, I think it will become much more developed in a short time.

Regards.

www.fatihdemirci.net

TAGs: Microsoft Life Cycle Services, LCS, Azure, Azure DevOps, Segregation of Duties, Microsoft Dynamics 365, MsDyn365FO, MsDyn365CE, MsDyn365, Dynamics 365 Insights Power BI, Power Automate, Power Apps, Power Virtual Agents, what is Dynamics 365, Dynamics 365 ERP, Dynamics 365 CRM

Dynamics 365 Finance and Operations Data Management 2. How to Transfer Data Again Using Old Projects?

Dynamics 365 Finance and Operations Data Management 1. How to Import Data? Dynamics 365 Finance and Operations Data Management 1. How to Import Data? Now I will try to explain how we can transfer data over and over again using the project we created in that article.

We had created a transfer project for VendGroup. Currently, the data is as in Image-1.

Image-1

This is the CSV file I just created. I will use this for import.

Image-2

Open Data managament. In the All projects section, we click on our project and open it.

Image-3

Click Re-import from the Import Options tab.

Image-4

Click Upload file on the page that opens.

Image-5

Select the import file and click Upload. Then click OK.

Image-6

You have uploaded your file. Now you can click Import.

Image-7

The information screen will appear. Close it and wait for a while.

Image-8

If there is no problem, you will see a screen like the one below. If there is an error, you can see its details on this screen as well.

Image-9

I renew my form to see if it really worked and see the data is there.

Image-10

In this article, I tried to show how you can transfer data over and over again through a project that we have created and established before. These very useful features are generally used by consultants, but it is necessary to provide good training to the users and ensure that they benefit from these features.

Regards.

www.fatihdemirci.net

TAGs: Microsoft Life Cycle Services, LCS, Azure, Azure DevOps, Import, DMF, Microsoft Dynamics 365, MsDyn365FO, MsDyn365CE, MsDyn365, Dynamics 365 Insights Power BI, Power Automate, Power Apss, Power Virtual Agents, what is Dynamics 365, Dynamics 365 ERP, Dynamics 365 CRM
How to Move Developments to Dynamics 365 Finance and Operations Test and Live Environments? 3- Build

How to Move Developments to Dynamics 365 Finance and Operations Test and Live Environments? 3- Build

In this article, I will talk about how to perform the Build operation required to move the developments we made from Visual Studio for Dynamics 365 Finance and Operations to Test and Live environments. Build needs to be performed on a certain Branch. When Build is complete, if there is no error, it will generate a Deployable Package for us. We need this package for code migration.

You have to perform Build through Azure DevOps, not from Visual Studio. After logging in as a user with admin rights, open the Pipelines tab. Unified Operations platform – Build Main will be created automatically when you set Azure DevOps settings via LCS. We will take this as basis. Since our environment is only Main Branch, I continue without making any changes in the basic settings.  First let’s see how we can run it, then we will examine the other settings.

Image-1

Click the Edit button from the ellipsis menu.

Image-2

Build steps are listed.

Image-3

If you want to build a different Branch, you need to change the Server path. We are making a change here.

Image-4

You can right click and Disable steps that are not required at this time. I disabled the Deploy Reports step because I do not have a report development.

Image-5

The main step is Build the solution. Our Branch path is here again. If you want to build a different Branch, you should change this as well.

Image-6

Click Queue. Whn you click Run in the popup window, Build operation starts.

Image-7

You can follow the Build steps.

Image-8

If it completes with no errors, it will look like the following. If it gives errors, it is necessary to examine the logs and errors. Generally there are not very complex problems. There are cases such as missing reference, incorrect Check-in, but there may be situations that need to be further examined. You can open it by clicking on the record.

Image-9

When you enter, all your previous Builds will be listed. You can view their status and information. The first record is our last Build, completed without error. Click to open it.

Image-10

You can see details about the Build here. Click and open the relevant part (3 published).

Image-11

Under Packages, Deployable Package starting with AxDeployableRuntime is created. We need to download it from here and upload it to the LCS. I will explain this in my next article.  At this stage, the Build operation is done. Now let’s look at how you can create a new Pipeline.

Image-12

Main Pipelines are created by default. If you want to create them in other Branches, you either make all the definitions manually, which is very demanding, or you can use the Clone or Export features. For both cases, do not forget to change the path settings for the new Pipeline.

Image-13

You can Import the Exported file from the following path again. Generally code is transferred to live environment from Main or Release Branch, and to test environment from Dev Branch. Of course, these are approaches that vary depending on the project and the team.

Image-14

In this article, I tried to explain how Build is triggered through Azure DevOps. A machine is required for Build right now, but we will soon be able to do this thanks to an agent. It will be a faster and inexpensive solution. By completing this stage, we have reached the final stage in code migration. In my next article, I will explain how we deploy code over LCS.

Regards.

www.fatihdemirci.net

Microsoft Life Cycle Services, LCS, Azure, Azure DevOps, Build, Microsoft Dynamics 365, MsDyn365FO, MsDyn365CE, MsDyn365, Dynamics 365 Insights Power BI, Power Automate, Power Apps, Power Virtual Agents, what is Dynamics 365, Dynamics 365 ERP, Dynamics 365 CRM
Page 10 of 13« First...89101112...Last »