Creating a New Model in a UDE Environment and First X++ Development
Creating a New Model in a UDE Environment and First X++ Development
Introduction
In the previous article of the series, we connected Visual Studio 2022 to the developer-enabled UDE environment we created on Power Platform. We covered the distinction between the Environment URL and the Finance and Operations URL, the Connect to Dataverse step, the Finance & Operations assets download process, the metadata configuration check, and how to verify that Application Explorer opens correctly.
In this article, we are now taking one step further. In a UDE environment where the connection has been completed, we will create a new model, position this model in the correct package structure, open an Operations Project in Visual Studio, and do our first simple X++ development.
For developers coming from the classic development VM model, there are both familiar and different points here. Model, package, project, Application Explorer, and build concepts are familiar. However, because the development tier and the execution tier are separated with UDE, some habits need to be reconsidered. Code and metadata are prepared on the local computer; execution, deploy, and test take place on the Finance & Operations runtime in the cloud.
Understanding this distinction correctly is one of the basic requirements for healthy development on UDE. Because creating and building an X++ object on the local computer does not mean that it will automatically run in the cloud runtime. To run and test it, the related model must be deployed to the online UDE environment. In this article, I will focus on the model, project, and first build side; I will cover the deploy and debug side with a short introduction and connect it to the next article.
What will we do in this article?
The purpose of this article is to understand the first development flow end to end on Visual Studio connected to a UDE environment. Especially in the first attempt, instead of choosing a very complex scenario, it is better to proceed with a simple and controlled example.
In this scope, we will cover the following steps:
- We will briefly recall the distinction between the development tier and the execution tier in UDE.
- We will position the model, package, and project concepts from the UDE perspective.
- We will create a new model.
- We will evaluate whether a new package or an existing package should be used for the model.
- We will explain the referenced packages selection through a simple example.
- We will create an Operations Project in Visual Studio.
- We will associate the project with the model we created.
- We will add the first runnable X++ class object.
- We will write a simple X++ code and take a build.
- We will check the build result through the Output window.
- We will create a checklist before moving to the deploy/debug side.
In this way, we will have given a practical answer to the question “I connected, what do I do now?” for someone doing X++ development on UDE for the first time.
Pre-start checklist
Before starting this article, the connection steps in Part 5 must have been completed. Otherwise, different errors may be encountered in the model creation or project opening steps.
- Visual Studio 2022 must be able to open.
- The Power Platform Tools for Visual Studio extension must be installed.
- The Finance & Operations Visual Studio extension must be installed.
- You must be connected to the correct UDE environment with Connect to Dataverse.
- Assets and metadata download processes must be completed.
- The active metadata configuration must appear correctly on the Configure Metadata screen.
- The custom metadata folder must point to the correct local folder or Git repo folder.
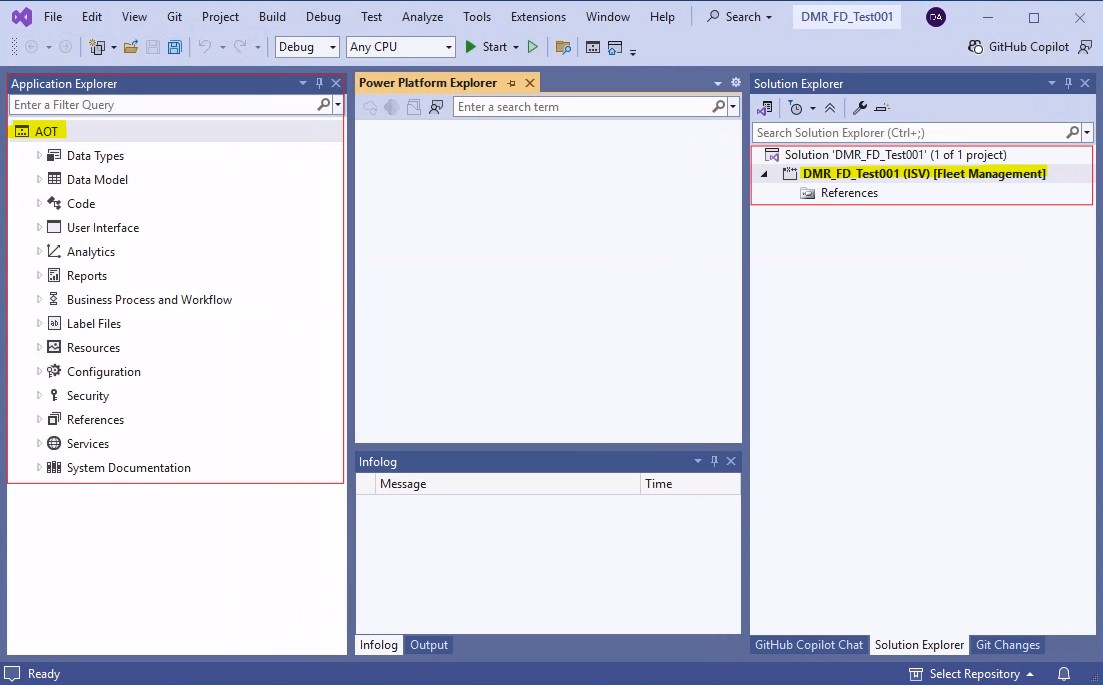
- Application Explorer must open and AOT objects must be visible.
- There must be no critical error left from the previous setup in the Output window.
The distinction between local development and cloud execution in UDE
The most important difference between UDE and the classic development VM is the separation of the development and execution layers. In Microsoft’s UDE documentation, this distinction is also expressed as the development tier and execution tier. The development tier contains metadata and X++ source code on the local computer; the execution tier is the Finance & Operations environment in the cloud.
This structure changes the following: The model and X++ objects we create in Visual Studio are first created in the local metadata structure. The build process is also performed with local development tools. But when we want to actually run the code, the related model must be deployed to the cloud runtime.
Therefore, it is useful to divide the first development flow on UDE into three parts:
- Metadata preparation: Creating the model, package, project, and X++ objects in the local metadata folder.
- Build check: Compiling the project or model with local development tools and clearing errors.
- Cloud runtime stage: Deploying the prepared model to the online UDE environment, running it, and debugging it.
This article mainly focuses on the first two parts. Deploying to the cloud runtime and debugging can be covered in more detail in the continuation of the series.
Correctly positioning the model, package, and project concepts
Before starting a new development, the model, package, and project concepts need to be positioned correctly. Although these concepts are familiar from the classic Dynamics AX / Dynamics 365 Finance & Operations development world, they should be handled more carefully together with UDE and Git usage.
What is a model?
A model is the logical group of the metadata and X++ objects we develop. A model can contain objects such as tables, classes, forms, menu items, EDTs, enums, and security artifacts. The model also determines which package it is located in, which publisher it belongs to, which layer it is positioned in, and which references it needs.
What is a package?
A package is a physical and buildable structure that can contain one or more models. In general, the main packaging unit in terms of development and deployment is considered through the package. When creating a new model, it is necessary to decide whether it will be added into an existing package or whether a new package will be created.
What is a project?
A project is the workspace in Visual Studio where we organize the model elements we work on. Operations Project is the project type used for Finance & Operations development. The elements in the project are tied to a model. Therefore, it is critically important that the Model field in the project properties is selected correctly.
Model / package / project relationship
In practical terms, we can think of it this way: the model represents the development scope, the package represents the physical distribution and build boundary, and the project represents the work organization in Visual Studio. Keeping these three concepts simple in the first UDE trials helps progress in a more controlled way in Git and pipeline processes later.
| Field | Recommendation / Explanation |
|---|---|
| Model | The logical group of the metadata and X++ objects developed. |
| Package | The package structure in which the model is physically located and which is used in build/deploy processes. |
| Operations Project | The project type used in Visual Studio to organize model elements, build them, and start the test flow. |
| Custom metadata folder | The local folder where our own developments are stored. If working with a Git repository, this folder should point to the metadata folder inside the repo. |
Naming decision before creating a new model
For the first trial, it is useful not to choose the model name too generally. In real projects, model names can be determined according to the customer, product, module, or development area. For a UDE trial, however, it is enough to choose a name that is both easy to understand and can be tracked on Git later.
Example names:
- DMRAITest
- DMRCustomizations
- ProjectXCustomizations
- ProjectXIntegration
- ProjectXReports
In the examples in this article, I will use DMRAITest as the model name. You can choose a name suitable for your customer or project standard in your own environment.
Creating a new model in Visual Studio
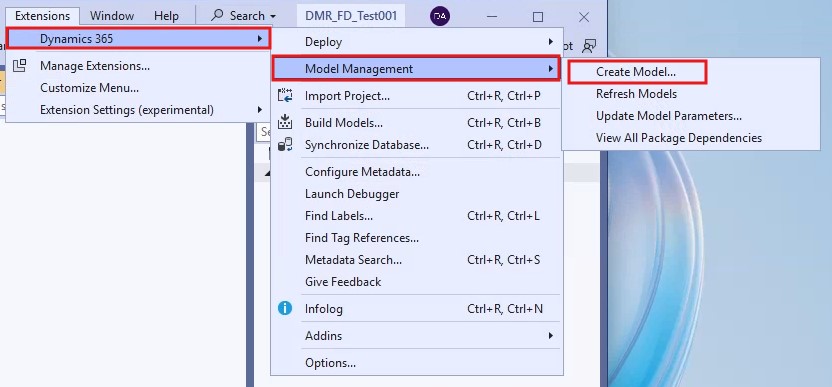
To create a new model in Visual Studio, we use the model management tools under the Dynamics 365 menu. After opening Visual Studio and making sure that the correct UDE metadata configuration is active, go to the following menu:
If this menu is not visible, the Finance & Operations Visual Studio extension installation may not have been completed or Visual Studio may not have been restarted. In this case, the extension and metadata configuration steps in Part 5 should be checked again first.
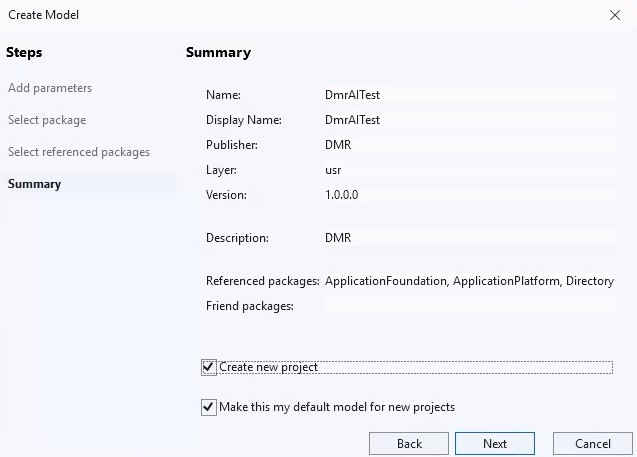
Model parameters
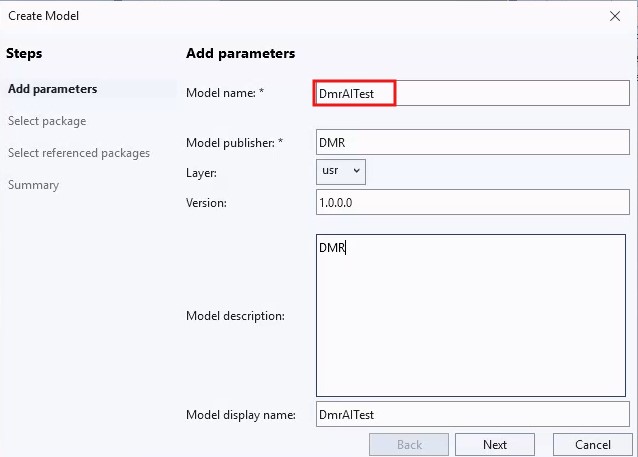
When the Create model wizard opens, some basic information is requested for the model. This information determines the identity of the model and how it will be organized.
| Field | Recommendation / Explanation |
|---|---|
| Model name | A short, spaceless, and meaningful technical name such as DMRAITest can be used. |
| Model publisher | DMR Consulting, the customer name, or the product owner company name can be entered. |
| Layer | In most customer projects, the cus or var layer is preferred. It is no longer as critical a structure as in older versions. |
| Model display name | A descriptive name that will be more readable for the user or developer can be used. |
| Description | A short text explaining for what purpose the model was created can be entered. |
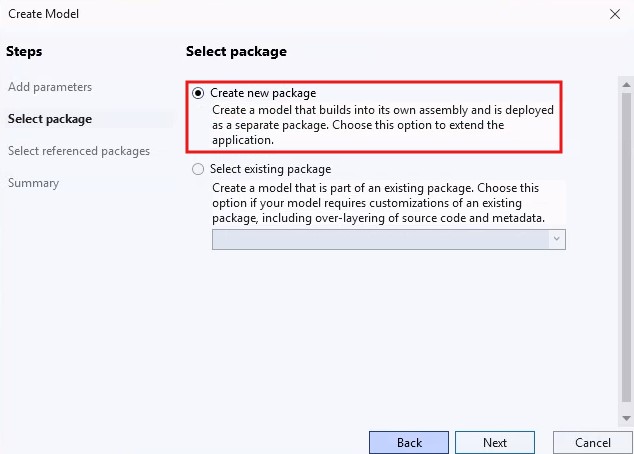
New package or existing package?
One of the most important decisions in the model creation step is whether the model will be created in a new package or added into an existing package.
In the first UDE trial and in a newly starting development set, creating a new package is generally a cleaner approach. This makes the physical boundary of the model, the build scope, and the Git repository structure clearer.
In an existing project, if there is a previously defined package strategy, the new model can be taken into the same package. However, the point to pay attention to here is the correct management of package-based dependencies and deployment scope.
- A new package may be cleaner for a new and independent development area.
- If there is an existing customer custom package structure, adding the new model into the same package may be preferred.
- In ISV or product development scenarios, the package boundary should be designed separately.
- The pipeline and deployment strategy affects the package decision.
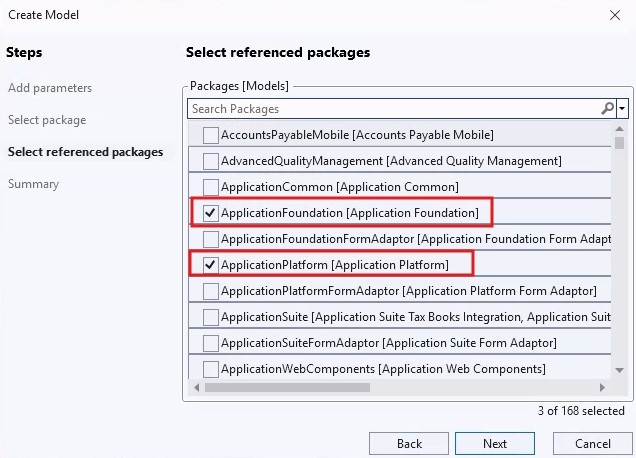
Referenced packages selection
When creating a model, the packages to be referenced are selected. This selection determines which existing metadata and code components the new model can use.
For a simple runnable class example, in most cases, Application Platform and Application Foundation references may be enough. In more advanced scenarios, Application Suite or other ISV / custom package references may be required.
It is important not to add unnecessary references here. Each reference increases the dependencies of the model. Especially in large projects, unnecessary dependencies can increase build time, deployment scope, and maintenance cost.
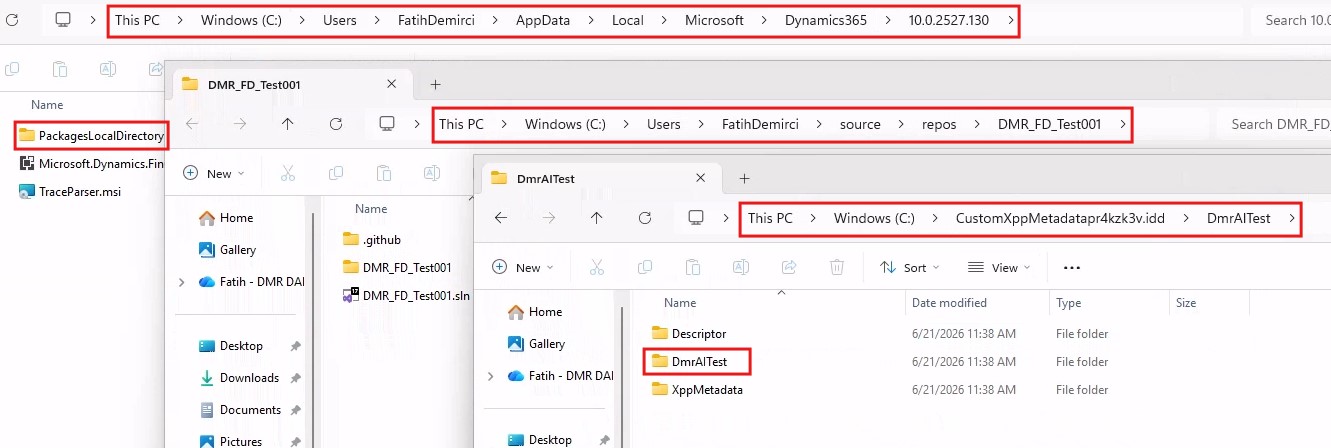
Checks after the model is created
When the wizard is completed, Visual Studio creates the new model and package structure. At this point, it is useful to make a few short checks before starting development immediately.
- Was the model creation process completed without errors?
- Is there any error or warning in the Output window?
- Was the new package folder created under the custom metadata folder?
- Does the new model appear when model view is opened in Application Explorer?
- Is the model’s referenced packages information as expected?
Right-clicking the AOT root in Application Explorer and using the Model view option is a practical method to check the visibility of the new model.
Creating an Operations Project
After the model is created, we need to prepare the workspace where we will develop by creating an Operations Project in Visual Studio. Application Explorer is used to see objects and examine existing objects; creating new objects, editing, and build operations are done through a Finance & Operations project.
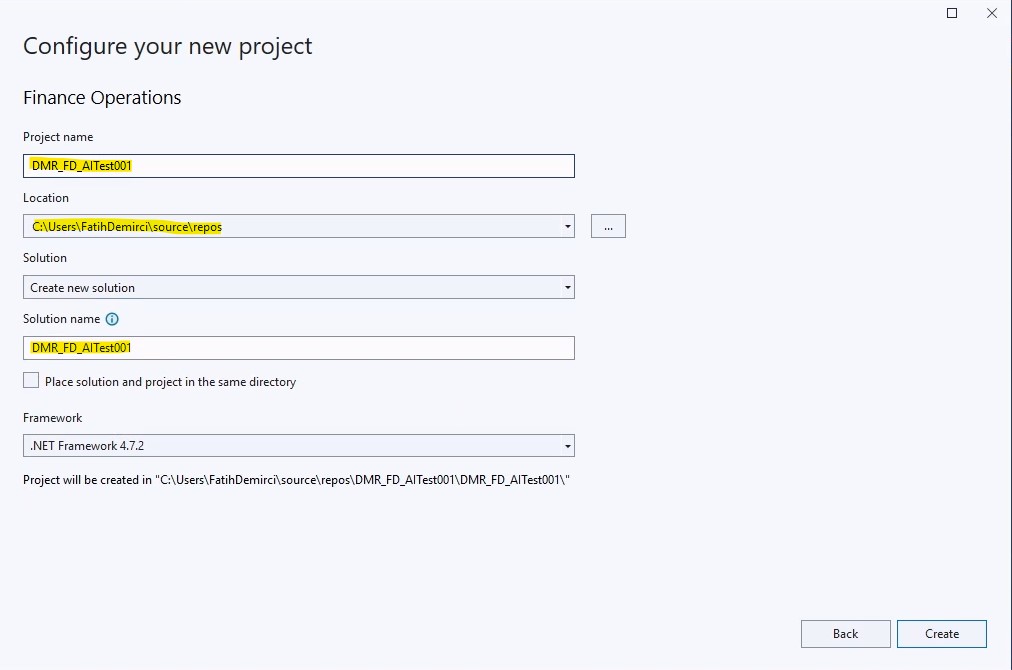
The following steps can be followed to create a new project:
- In Visual Studio, go to the File > New > Project menu.
- Select the Finance and Operations / Dynamics 365 category in the project template list.
- Select the Operations Project template.
- Give a meaningful name for the project. For example, DMRAITestProject.
- Set the project location as a folder suitable for the Git repo structure.
- Create the project with the Create option.
After the project is created, the project appears in Solution Explorer. At this stage, the model relationship must be checked from the project properties screen.
The Model field is especially important in the project properties. This field determines which model the new elements in the project will belong to. If the wrong model is selected, the newly created class, table, or other objects may be written to another model instead of the expected model.
First X++ object: Runnable class
For the first trial, creating a runnable class instead of a table or form is a safer start. Because when we create a table, the database synchronization topic comes into play. When we develop a form, additional steps such as menu item, security, and execution scenario may be required.
A runnable class, on the other hand, is a good starting example for compiling, deploying, and debugging a small piece of X++ code. In this article, we will create a very simple class and write a message to Infolog.
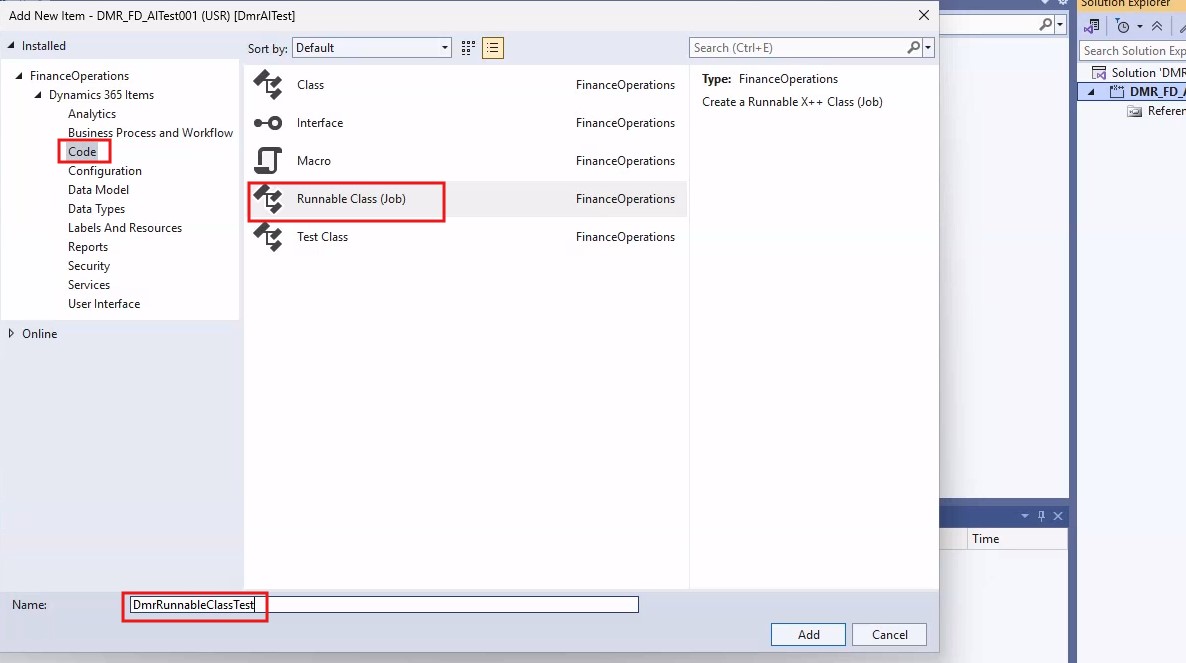
Let’s add a new item by right-clicking on the project:
In the screen that opens, select Runnable Class from the Code category under Dynamics 365 items. The following example can be used as the class name:
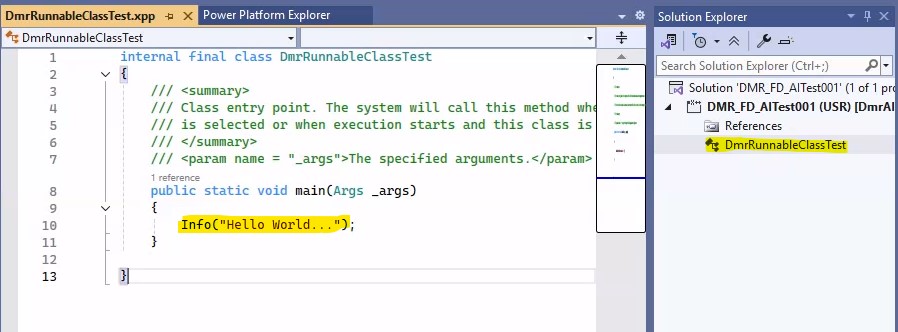
Sample X++ code
When Visual Studio creates the runnable class template, the basic class structure containing the main method comes. In this example, we can add only a simple info message to the main method. I also added an entry to the menu so that it can be tested from the interface.
The purpose of this example is not to do something big functionally. The main purpose is to see that the model was created correctly, the project is tied to the correct model, the X++ editor works, and the build process proceeds without errors.
class DMRRunnableClassTest
{
    /// <summary>
    /// Class entry point. The system will call this method when a designated menu
    /// is selected or when execution starts and this class is set as startup object.
    /// </summary>
    /// <param name = "_args">The specified arguments.</param>
    public static void main(Args _args)
    {
        info("Hello from Dynamics 365 F&O UDE");
    }
}
Taking a project build
After the class is created, the first operation to be performed is to take a project build. The build process is the basic check for validating the X++ code and metadata.
To take a project build, right-click the project in Solution Explorer and select Build, or use the Build option from the top menu:
During the build, the Visual Studio Output window must be open. The Output window shows the build steps, compile errors, best practice warnings, and metadata validation issues, if any.

After the build is completed successfully, an addition was made to the menu to visually verify that the deployment was successful. Since the runnable class cannot be seen directly in the menu, this method provides a practical approach for deployment control.
What should be checked during build?
When the build is successful, there is usually no error in the Output window and the project build completed message is seen. However, especially in the first UDE trials, it is necessary to look not only at the “successful” message but also at the warnings.
- Was the class created under the correct model?
- Is there any compile error?
- Is there any metadata validation error?
- Is an error received due to missing referenced package?
- Are there any best practice warnings?
- Is there a path- or permission-related error in the Output window?
- Is there a warning that another build process is in progress during the build?
If a missing reference error is received during the build, the referenced packages selection of the model should be evaluated again. If the class does not appear in the expected model, the Model field in the project properties should be checked.
Synchronize database on build setting
There is no database synchronization need in the runnable class example. However, when objects that affect the database structure, such as tables or views, are developed in the following steps, the synchronization database topic comes up.
There is a Synchronize database on build setting in the Operations Project properties. When this setting is enabled, the database synchronization process can also run after the build. It may be useful in small trials; however, since it can extend the build time in large projects, it should be used in a controlled way.
Will the code run at this point?
If we look at it with the classic development VM habit, we may expect the code to run immediately after taking the build. In UDE, however, the situation is a little different. The code has been compiled on the local development tier, but execution takes place on the cloud execution tier. Therefore, to run and debug the code, the model must be deployed to the online UDE environment.
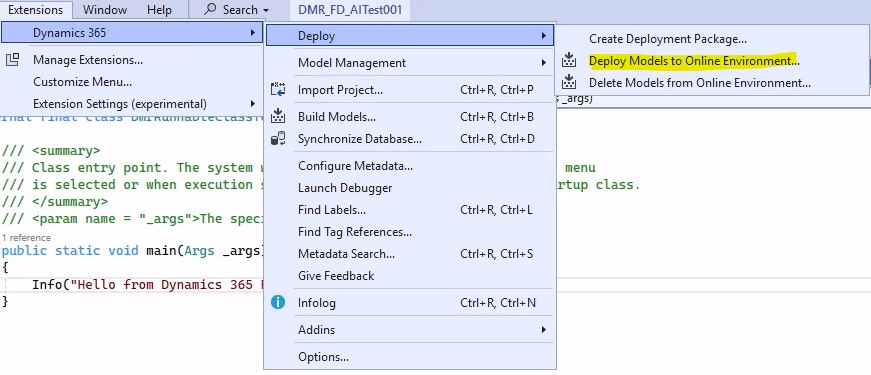
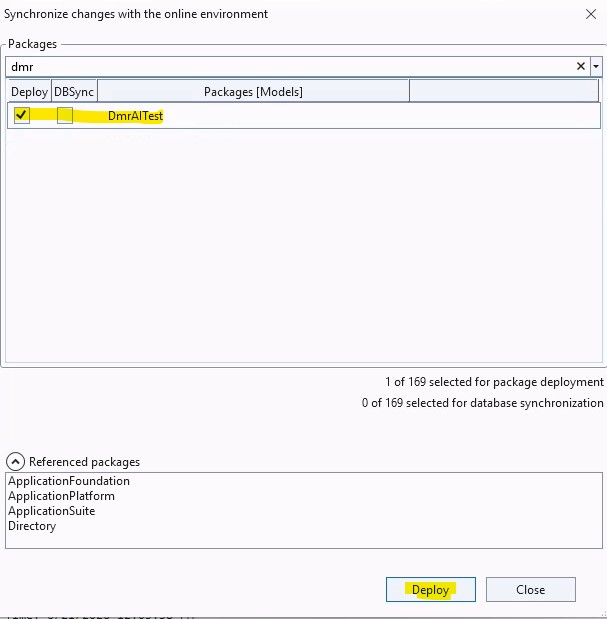
In Visual Studio, the deploy option under the Dynamics 365 menu is used for this:
On this screen, the package/model to be deployed is selected and the process is sent to the UDE environment in the cloud. After deploy, the runnable class can be run and the debug process can be started.
However, it would be better to cover this step in more detail in a separate article. Because on the deploy and debug side, there are additional topics such as authentication, package selection, symbol loading, breakpoint behavior, browser URL structure, and the test flow on the runtime.
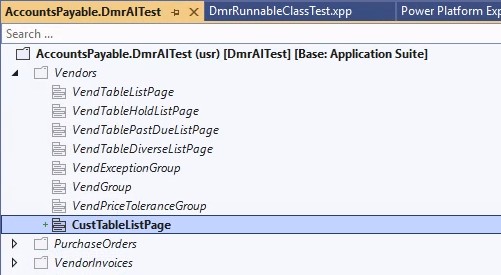
When we open the application and go to the menu, we can see the development we made.

Checklist after the first development
After the steps in this article are completed, the following checks can be made:
- Was the new model created successfully?
- Is the model in the correct package?
- Were the referenced packages selected correctly?
- Does the model appear in Application Explorer?
- Was the Operations Project created?
- Is the project tied to the correct model?
- Was the runnable class created under the correct model?
- Does the X++ code compile?
- Is the project build successful?
- Is there any critical error or warning in the Output window?
- Are the files in the custom metadata folder in the expected location?
- If Git is used, are the new files tracked correctly?
- Is the model ready to move to the deploy/debug step?
Common mistakes
Developing under the wrong model
If the Model field in the project properties is not checked, the newly created class or other objects may be added to another model instead of the expected model. This creates confusion very often, especially in environments where multiple models are used.
Adding unnecessary referenced packages
Referencing packages that are not needed when creating a model increases dependencies. Instead of adding too many references at the beginning by saying “it will probably be needed anyway”, it is healthier to proceed in a controlled way as the need arises.
Creating a model without thinking about the package strategy
Whether the model will be created in a new package or in an existing package affects build, deploy, and pipeline processes later. Therefore, in real projects, this decision should be made according to the team standard.
Thinking that the code will run in the cloud environment when the build is successful
In UDE, the build takes place in the local development layer. To run the code on the online UDE runtime, the model must be deployed.
Closing
In this article, we covered creating a new model on Visual Studio connected to a UDE environment, package and reference selections, Operations Project preparation, and the first simple X++ runnable class development.
In Part 5, we had established the connection between Visual Studio and the UDE environment. In this article, we have now moved to the development side. Creating the new model, tying the project to the correct model, and taking the first build form the foundation of the development setup in UDE.
The most critical point here is to understand the distinction between local development and cloud execution in UDE correctly. The code is written and built on the local computer; however, for execution and debugging, it needs to be deployed to the online UDE environment. This distinction changes the habits coming from the classic development VM model.
In the next article, I will touch on Azure DevOps and Git.


No comments yet.