Posts Tagged ‘ Security

Dynamics 365 Finance and Operations Segregation of Duties Nedir?

Dynamics 365 Finance and Operations Segregation of Duties Nedir?

Segregation of Duties görev ayrılığı olarak çevriliyor. Şöyle izah etmeye çalışayım. İki kritik görevi(Duty) aynı kişide toplanmasın istiyorsunuz örneğin fatura işleme ve ödeme çıkma gibi iki görevin aynı kişide olmaması gerekiyor. Binlerce kişinin çalıştığı bir firmadasınız ve bunu takip etmek belli bir aşamada mümkün olmuyor işte tam burada SoD devreye giriyor. Duty üzerinden yaptığınız bir tanım size bu tip durumlar için uyarı veriyor ve kontrol etme imkânı sağlıyor.

Önceki yazılarda kullandığımız güvenlik nesnelerini kullanarak bir örnek yapalım. Security Configuration formunu açıyoruz.

Resim-1

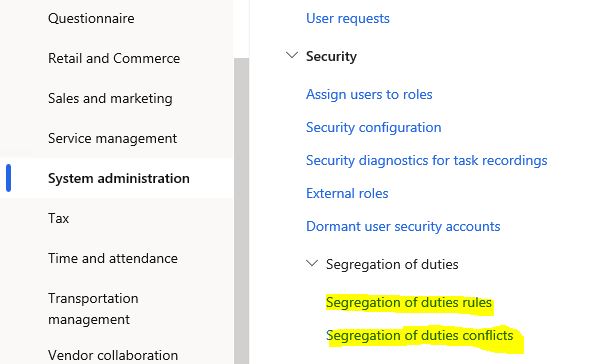
Segregation of duties sekmesinden Segregation of duties rules butonuna tıklıyoruz. Bu form direk menüde de var. Resim-9’da görebilirsiniz.

Resim-2

Açılan formda henüz kayıt yok New ile bir tane kayıt oluşturalım.

Resim-3

Bir isim veriyoruz ve iki tane Duty seçmemiz gerekiyor. Ben örnek iki Duty seçtim. Dikkat ettiğim tek konu bu iki Duty hangi rolde kullanılıyor biliyorum. Örneği gösterebilmek için ihtiyacım olacak. Tabi siz iş ihtiyacına göre bu tanımı yapacaksınız.

Resim-4

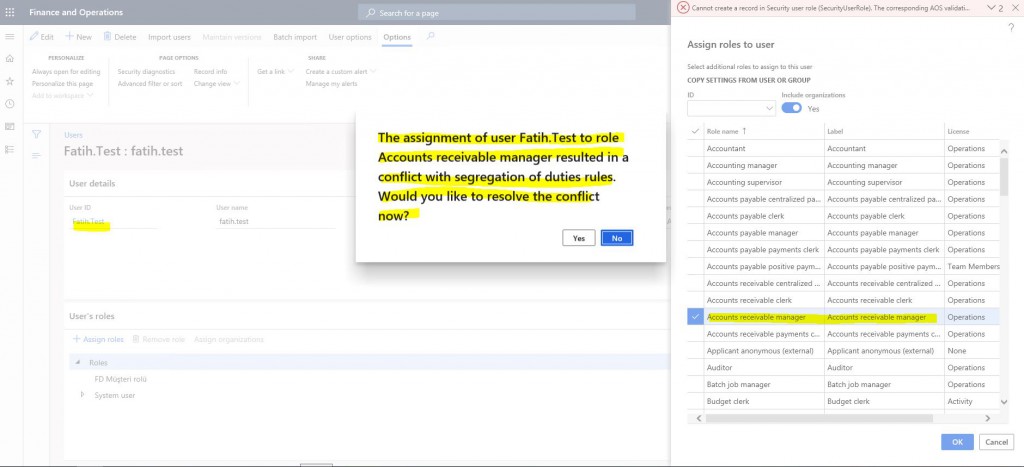
Kaydettikten sonra test kullanıcıma geliyor. Şu anda olan rolden dolayı FD Müşteri listeleme görevi ekli. Yeni bir rol ekleyip Customer Invoicing içeren bir rol seçiyorum. Ekle dediğimde bir çakışma oluştuğu uyarısı geliyor. Eğer Yes dersem benim için bir çözüm kaydı oluşturacak.

Resim-5

Oluşan kayıtta bu işlemin bilgileri var. Allow Assigment ile atamayı kabul edebilirim.

Resim-6

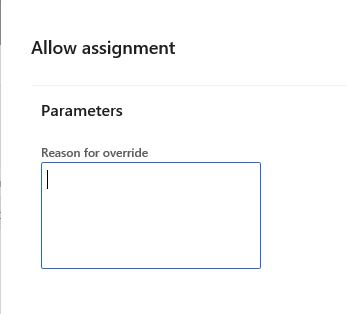
Kabul edersem aslında kuralı ezmiş oluyoruz bu yüzden bir açıklama soruyor. Girdikten sonra rolü eklemiş olduk. İstersek engelleyebilirdik.

Resim-7

Yeni bir SoD oluşturduğunuzda bu kurala uymayan durumlar var mı diye kontrol edebilirsiniz. Benim kurala uymayan bir durum var ama ona bir ezme kaydı oluşturduk bu yüzden burada gelemdi.

Resim-8

Oluşan kayıtları Resim-9’daki menüden takip edebilirsiniz.

Resim-9

Bu yazıda Segregation of Duties nedir kısaca anlatmaya çalıştım. Çok güzel bir özellik olmakla birlikte hala çok eksiği var. Örneğin sadece Duty ile çalışıyor ama Role atan direk Privilege’lar için bir çözüm yok. Role eklerken soruyor ama sonrasında değişen görev içeriklerini kontrol eden bir mekanizması yok. Kullanmak mümkün özellikle Duty haricinde yetki tanımı yapmaz Duty’lerinizi doğru bir mantıkta oluşturursanız çok kolay kullanabilirsiniz. Bu özelliğe hala yatırım yapılmaya devam ediliyor kısa sürede çok daha gelişmiş bir hala geleceğini düşünüyorum.

Selamlar.

www.fatihdemirci.net

TAGs: Microsoft Life Cycle Services, LCS, Azure, Azure DevOps, Segregation of Duties, Microsoft Dynamics 365, MsDyn365FO, MsDyn365CE, MsDyn365, Dynamics 365 Insights Power BI, Power Automate, Power Apss, Power Virtual Agents, Dynamics 365 nedir, Dynamics 365 ERP, Dynamics 365 CRM

Dynamics 365 Finance and Operations Alt Seviye Form Nesnelerine Yetki Nasıl Verilir?

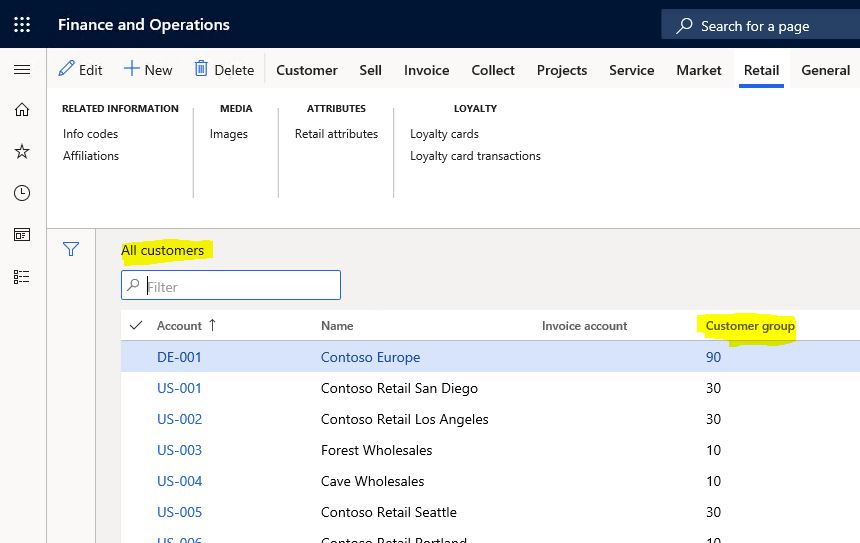
Bu yazıda Dynamics 365 Finance and Operation uygulamasında herhangi bir nesneye nasıl yetki tanımı yapılır anlatmaya çalışacağım. Bunu çok kullanmanızı tavsiye etmiyorum. Ne kadar çok ayrıntıya girerseniz güvenliği yönetmek o kadar zor olacaktır. Ancak tabi bazı durumlarda bu ihtiyaç olacaktır. Bu durumlarda gördüğüm bir yanlışta bunu güvenlik altyapısıyla değil de kodla çözmek oluyor. Kesinlikle güvenlikle ilgili işler için kod yazmayın ilk etapta hızlı çözümmüş gibi görünür ama ilerde çok baş ağrısı olur. Desteği ve sonra gelen taleplerin karşılanması çok zorlaşır. Bu yazıda önceki yazılarımda kullandığım proje ile devam edeceğim. Bir test kullanıcısına Müşteriler formu yetkisi vermiştik. Artık formu açıp verilerini görebiliyor. Varsayalım Customer group alanı bu kullanıcıda görünmesin istendi. Bunu nasıl yapabiliriz görelim.

Resim-1

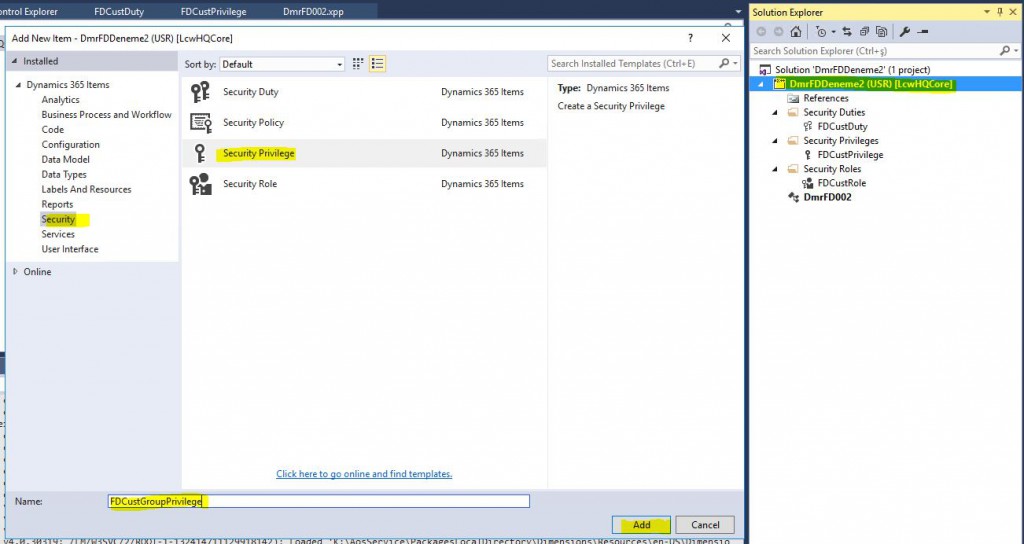
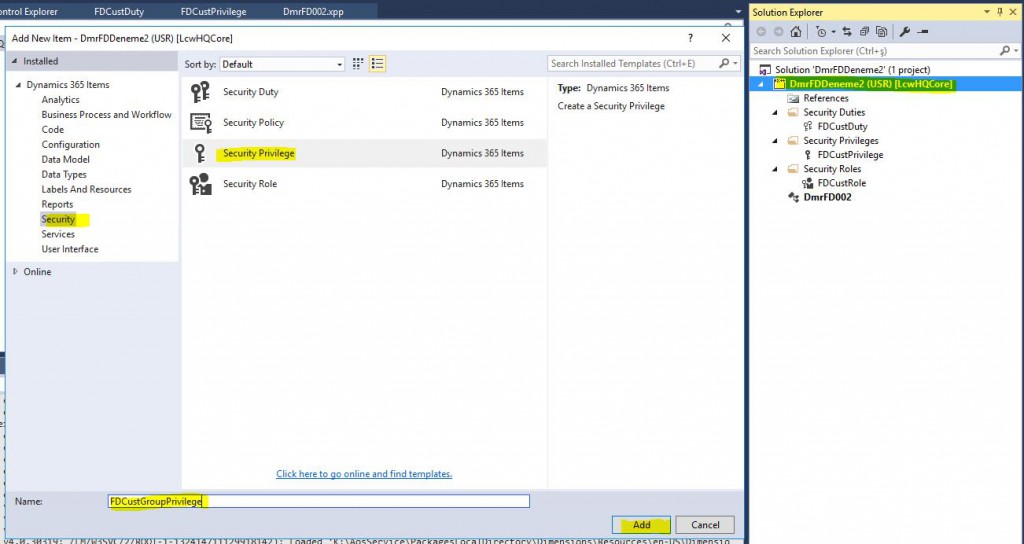
Yeni bir Privilege ekliyorum.

Resim-2

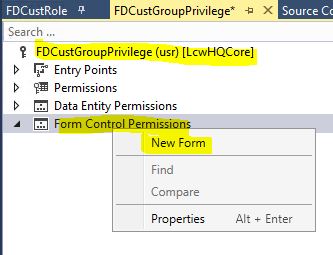
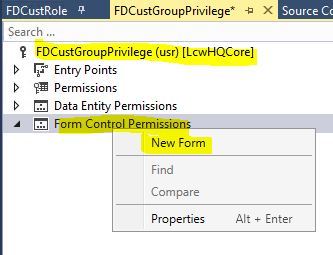
Privilage altında Form Control Permissions kısmı sağ tıklayıp New Form diyoruz.

Resim-3

Name kısmından CustTable formunu seçiyoruz.

Resim-4

CustTable’a sağ tıklayarak yeni nesne oluştur diyoruz ve yetki vermek istediğimiz nesnenin adını yazıyoruz. Grant asıl işi yapan yer No Access ile bu Privilege’e sahip olanların bu nesneyi görmemelerini sağlıyoruz. Burada lookup ta çıkmayabilir önemli değil direk ismi yazabilirsiniz. Bu tanımlar yeterli olmayacak yetki tanımı yapacağımız nesnenin bir özelliğini değiştirmemiz gerekiyor.

Resim-5

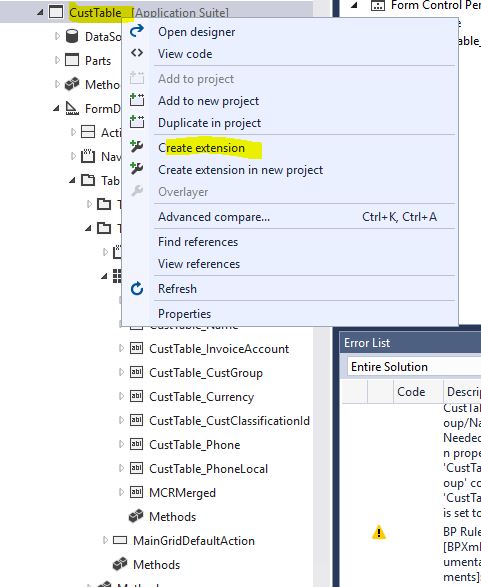
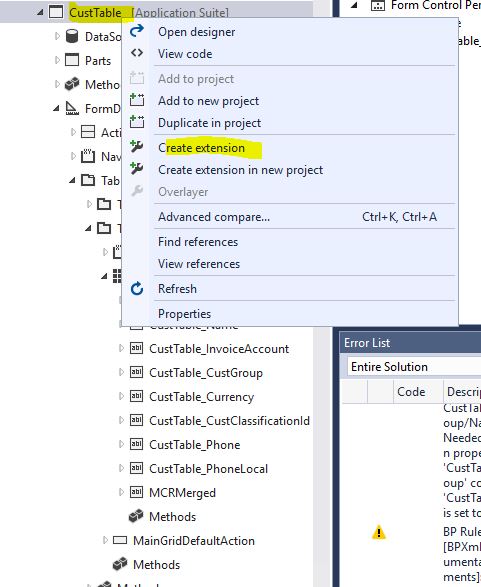
Bu değişikliği yapabilmek için nu aşamada formumuz için bir extension oluşturmamız gerekiyor.

Resim-6

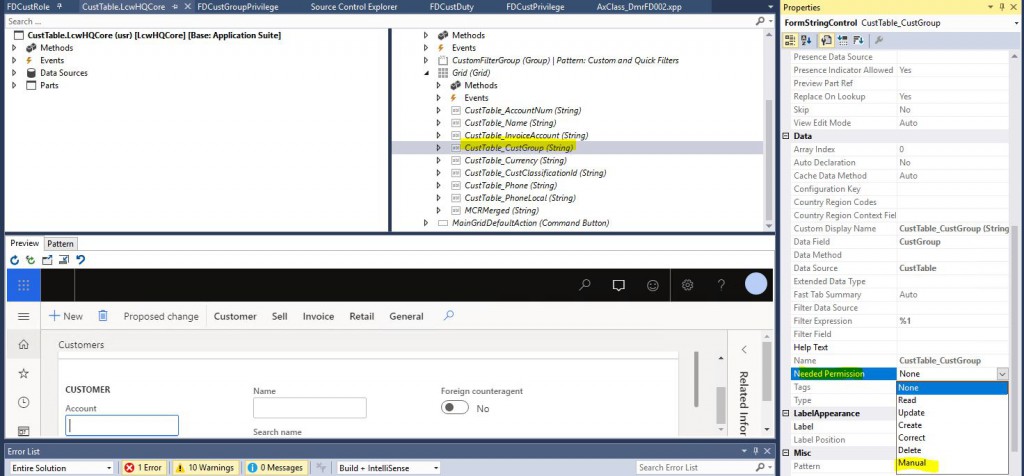
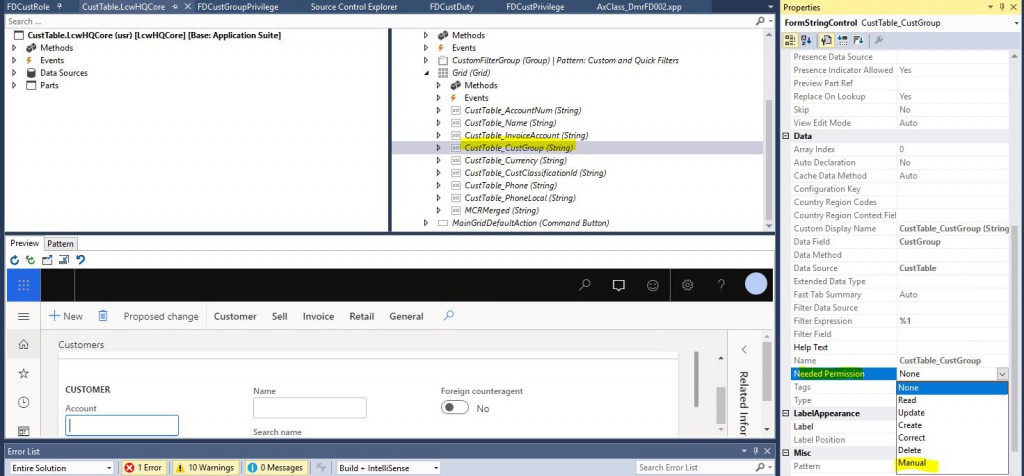
Oluşturduğumuz Extension’ı açıyoruz. Yetki vermek istediğimiz nesneyi bulup özelliklerinden NeedPermission’ı Manuel’e çekiyoruz. Yani bu nesnenin yetkisini biz yöneteceğiz demiş oluyoruz. Extension’ı ilk adım olarak yapmak daha mantıklı aslında.

Resim-7

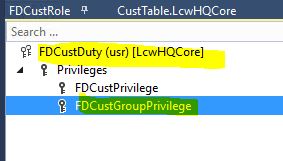
Sonrasında önceki yazılarımızda kullandığımız Duty’e Privilege’i ekliyoruz.

Resim-8

Projemizi kaydedip derliyoruz ve sadece projemiz için DB senkronizasyonunu çalıştırıyoruz. Bundan sonra test kullanıcımızla giriş yapıp Müşteriler formunu açtığımızda Customer Group alanının görünmediğini göreceksiniz.

Resim-9

Bu yazıda alt seviye bir nesneye nasıl yetki verilir anlatmaya çalıştım. Çok basit halledilebiliyor ama çok fazla alt seviye yetki tanımı yaparsanız işin içinden çıkmak çok zor oluyor mümkün olduğunca giriş noktasından yetki vermeye çalışın.

Selamlar.

www.fatihdemirci.net

TAGs: Microsoft Life Cycle Services, LCS, Azure, Azure DevOps, Security, Microsoft Dynamics 365, MsDyn365FO, MsDyn365CE, MsDyn365, Dynamics 365 Insights Power BI, Power Automate, Power Apss, Power Virtual Agents, Dynamics 365 nedir, Dynamics 365 ERP, Dynamics 365 CRM

Dynamics 365 Finance and Operations Geliştirme Ortamından Yetki Tanımı Nasıl yapılır?

Bu yazıda Dynamics 365 Finance and Operations geliştirme ortamı üzerinden yaznı Visual Studio2dan nasıl yetki nesneleri oluşturulur anlatmaya çalışacağım. Bir önceki Dynamics 365 Finance and Operations Arayüzünden Yetki Tanımı Nasıl yapılır? isimli yazımda arayüzden yetki nesnelerinin nasıl oluşturulduğunu anlatmıştım. O yazıda da söylediğim gibi benim tercihim yetkinin geliştirme ortamından oluşturulması. Birkaç sebebi var en önemlisi geliştirme ortamından oluşturulan nesneler versiyon kontrole dahil edilebiliyor bu sayede direk paketinizde olacaklar ve istediğiniz ortama taşınası geliştirmenizle birlikte olacak yönetmesi daha kolay diye düşünüyorum.

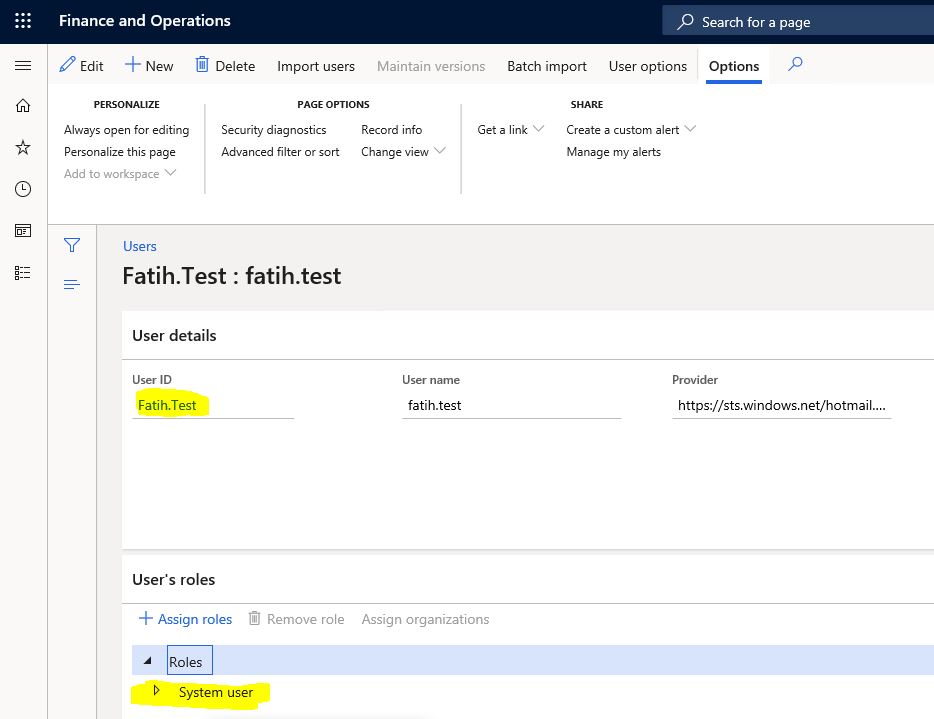
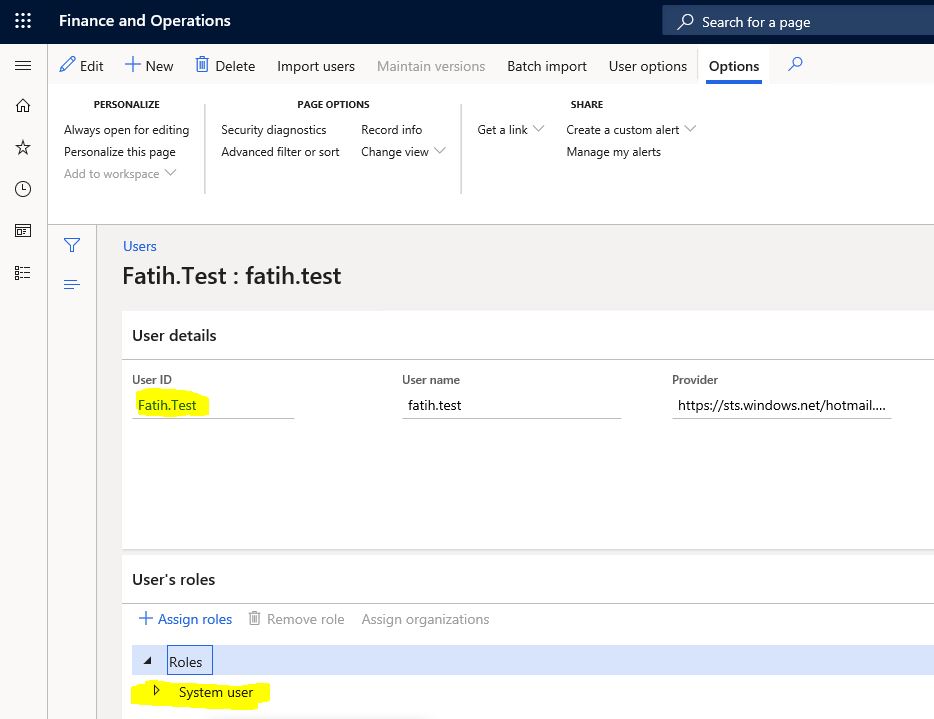
Bir önceki yazımda yaptığım örneğin aynısını şimdi Visual Studio üzerinden yapacağım. Test kullanıcımda sadece System user rolü var.

Resim-1

Read more

Dynamics 365 Finance and Operations Arayüzünden Yetki Tanımı Nasıl yapılır?

Bu yazıda Dynamics 365 Finance and Operations arayüzünden yetki nesnelerinin nasıl oluşturulduğunu anlatacağım. Önceki yazımda fatih.test kullanıcısının nasıl oluşturulduğunu anlatmıştım. Bu kullanıcıyı baz alarak bir örnek yapacağım. Kullanıcının system user hariç tüm rollerini sildim. Yeni bir rol tanımı yapıp belli bir nesneye yetki vereceğim.

Resim-1

Read more

How to Define Authorization from Dynamics 365 Finance and Operations Development Environment?

In this article, I will try to explain how to create authorization objects from Visual Studio through the Dynamics 365 Finance and Operations development environment. In my article named How to Define Authorization from Dynamics 365 Finance and Operations Interface? I explained how the authorization objects are created from the interface. As I said in that article, my preference is to create the authorization from the development environment. There are several reasons. Most importantly, objects created from the development environment can be included in version control. In this way, they will be directly in your package and the transfer to the desired environment will be made with your development. I think it’s easier to manage.

I will now do the same example that I did in my previous article through Visual Studio. My test user only has the System user role.
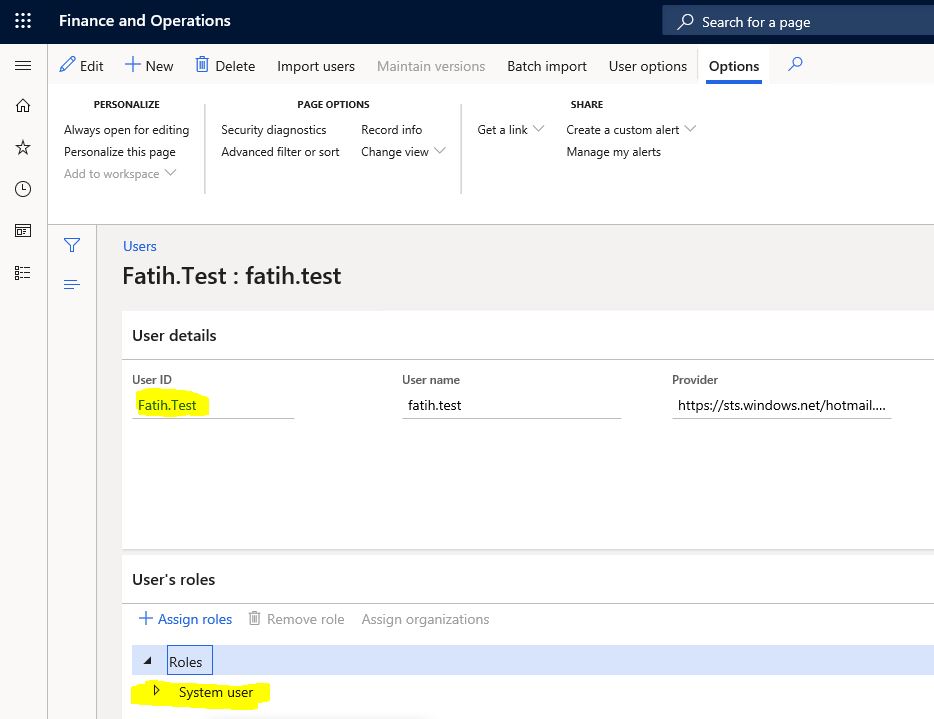
Image-1

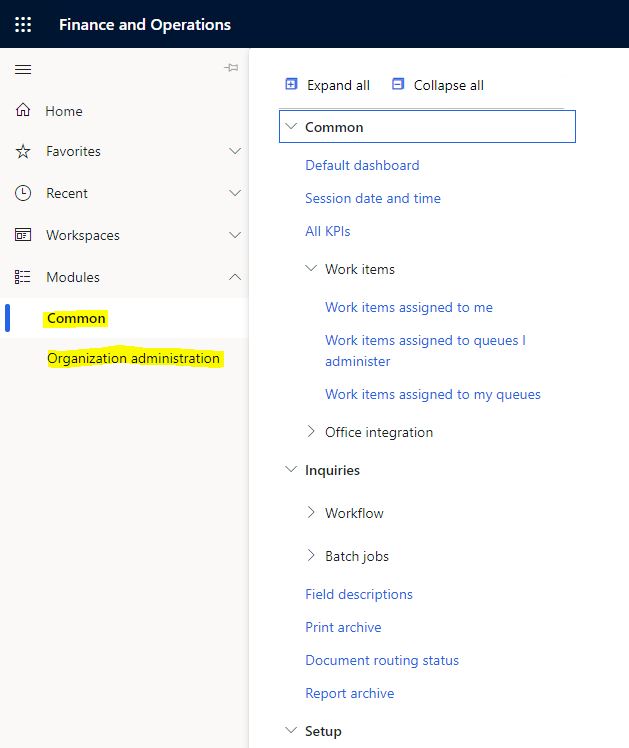
My test user can only see two modules in these roles.
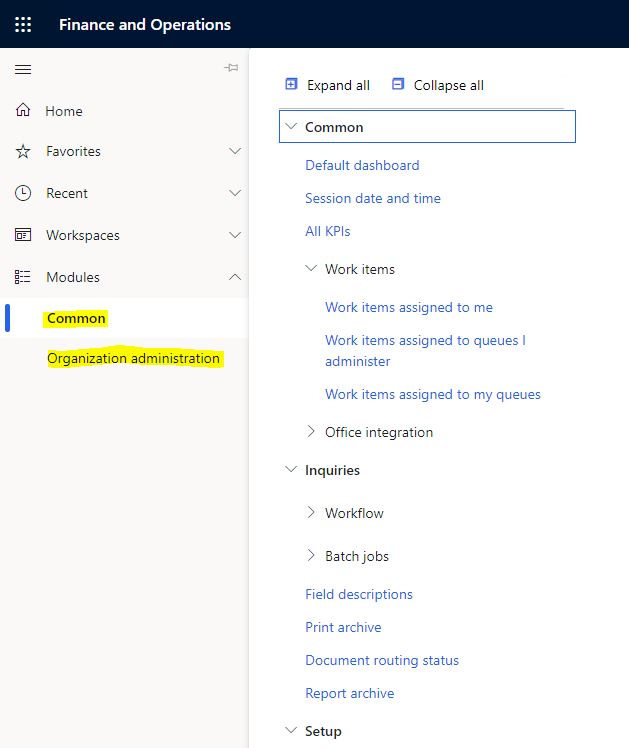
Image-2

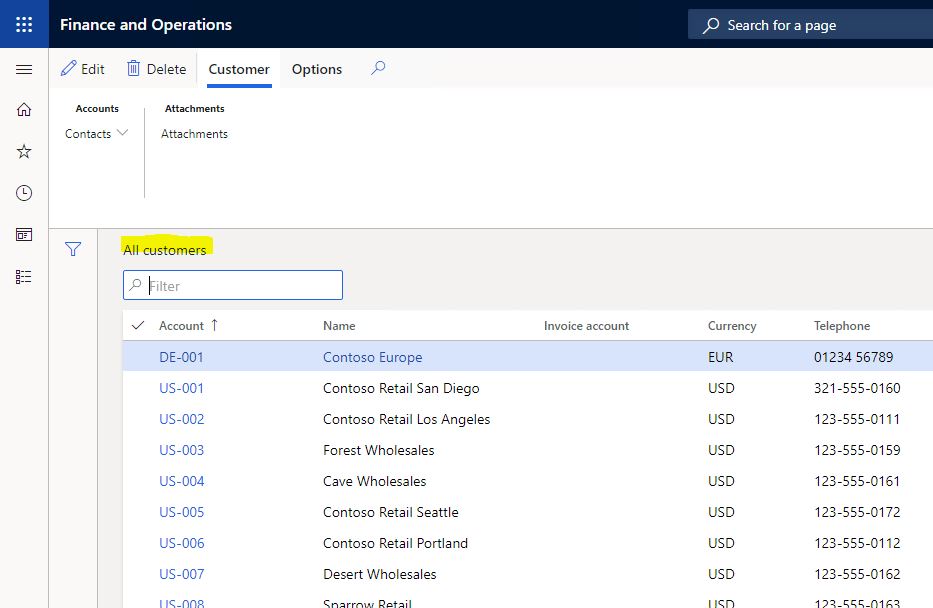
I want to authorize the All customers form.
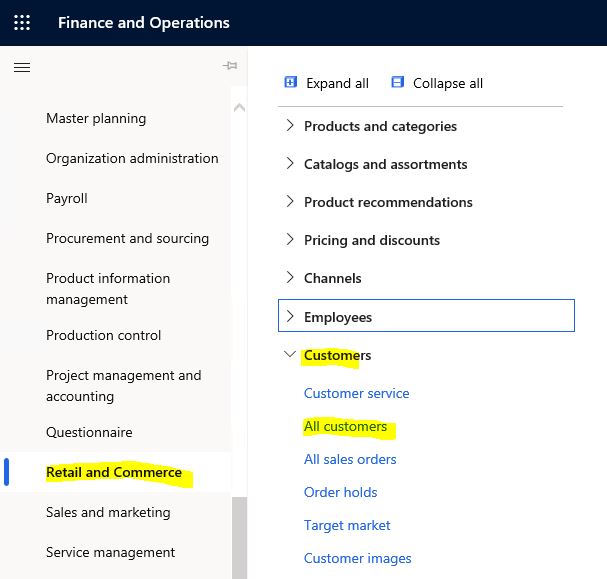
Image-3

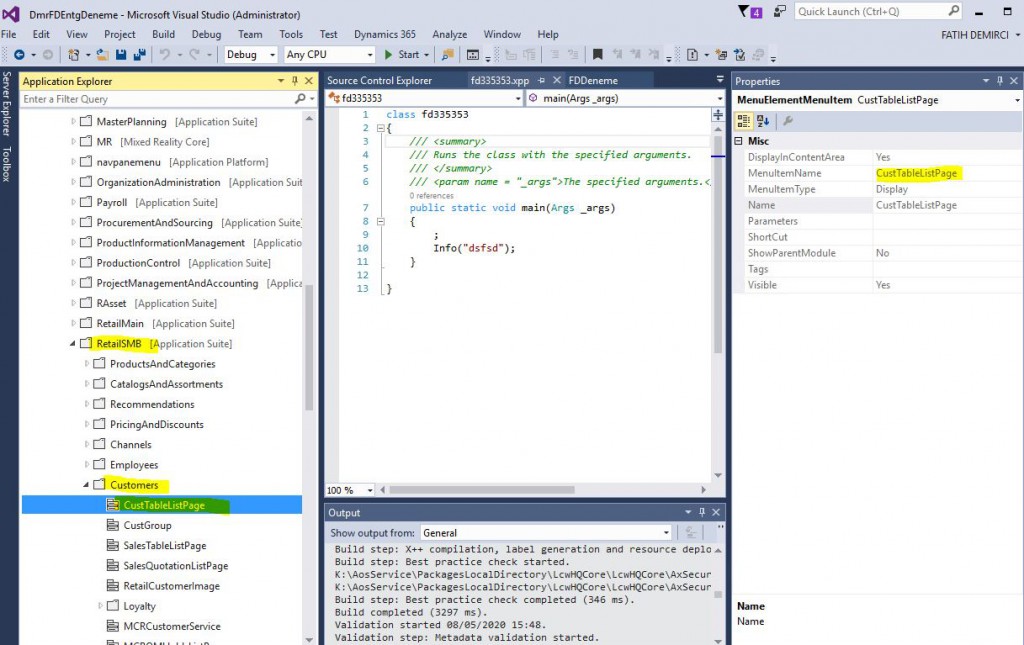
I find the relevant MenuItem on VS. This will be my entry point (EntryPoint) and all authorization assignments will be done through this entry point.
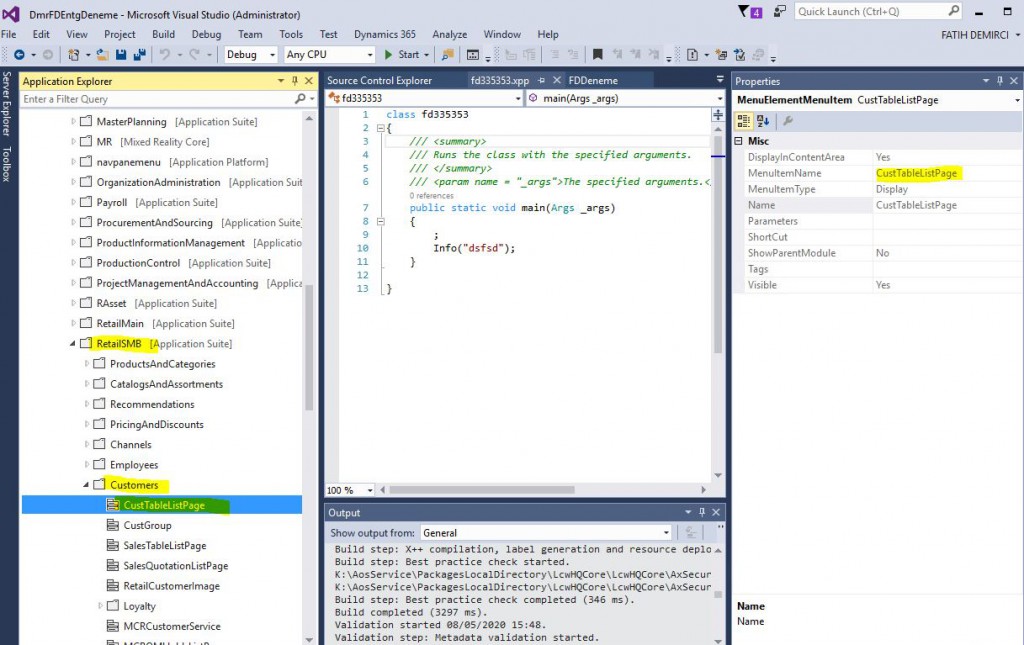
Image-4

I go to my project and add a new object.
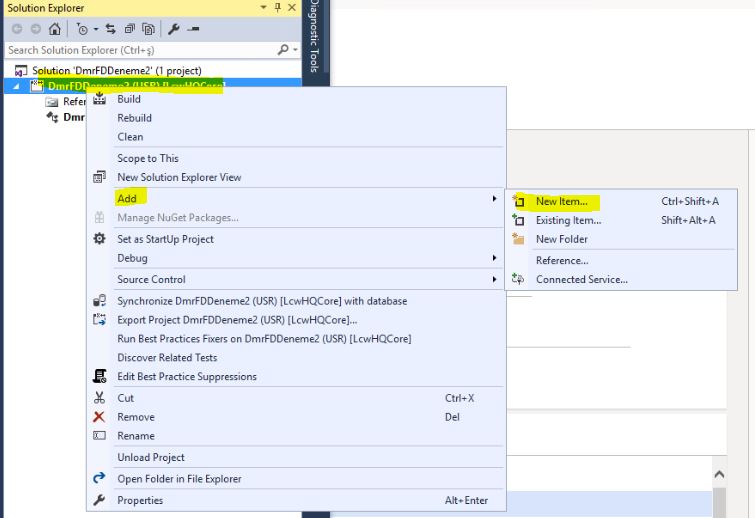
Image-5

First, we will create a Privilege. I select and name it, and click add.
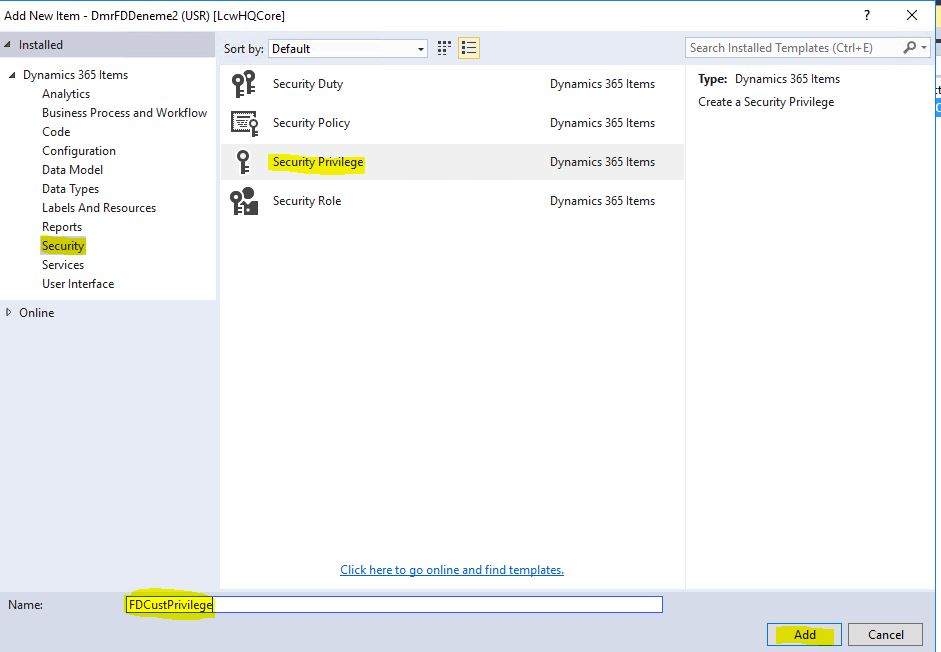
Image-6

Drag and drop the CustTableListPage MenuItem to the Entry Points tab of the Privilege created. Entry point is created. From its properties, select delete as the Access Level. Delete means full authorization. You can choose the level you want from here. Update and Correct might be confusing for you. Update is the data update authorization. Correct is used in tables with Valid Time State property.  Valid Time State is a mechanism that allows you to perform automatic date checks. I will prepare an article about this later.
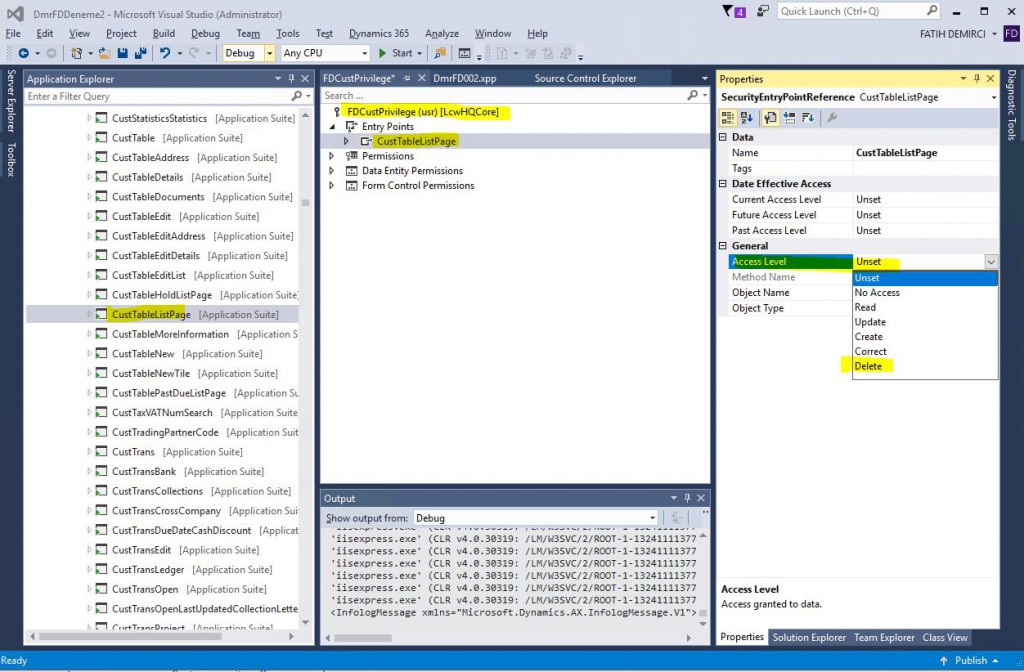
Image-7

Now create a Duty.
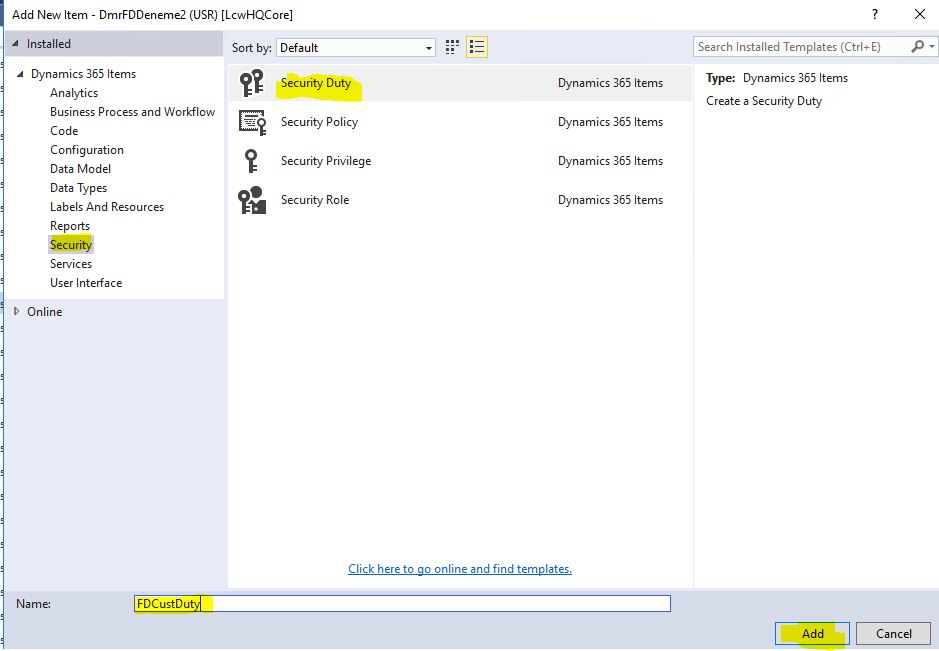
Image-8

Drag and drop the Privilege to the Duty you created.
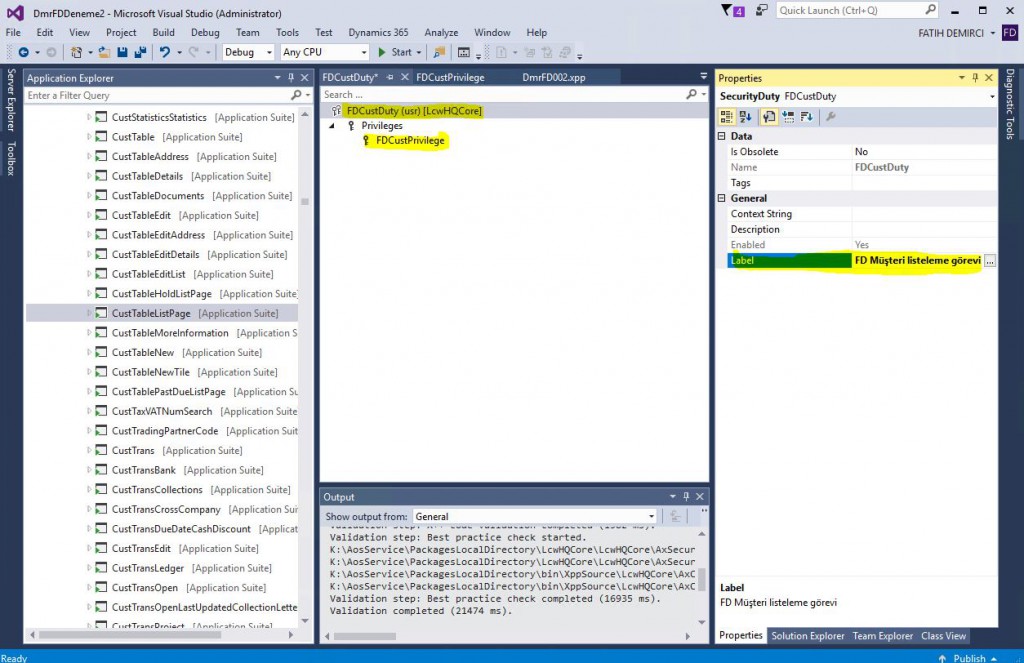
Image-9

Next step is creating a role.
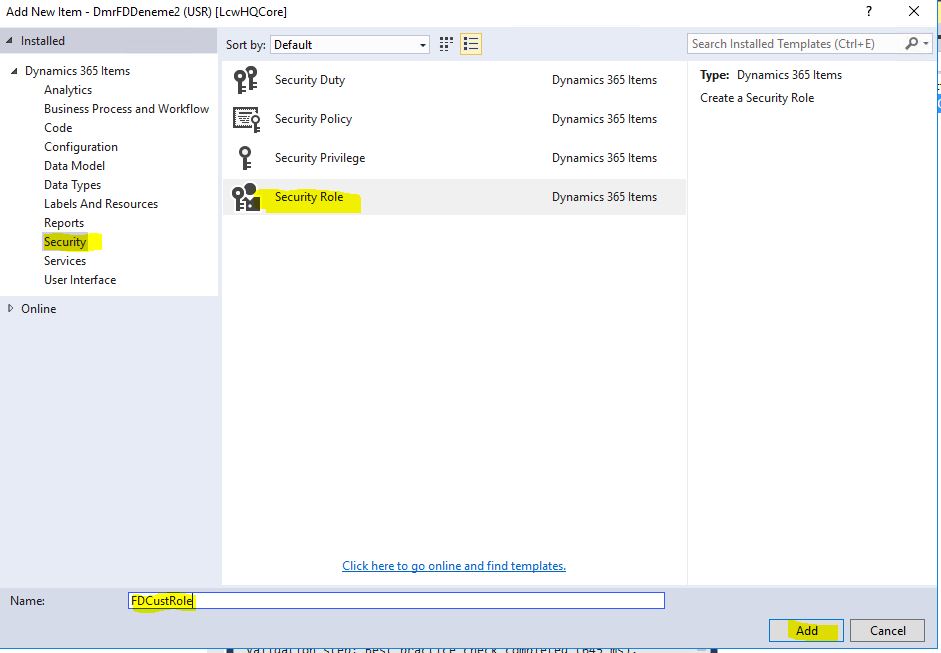
Image-10

If you want, you can grant Privilege directly to the role you created, but it’s best to follow the steps. That’s why we used Duty. You can drag and drop it. The new role is created.
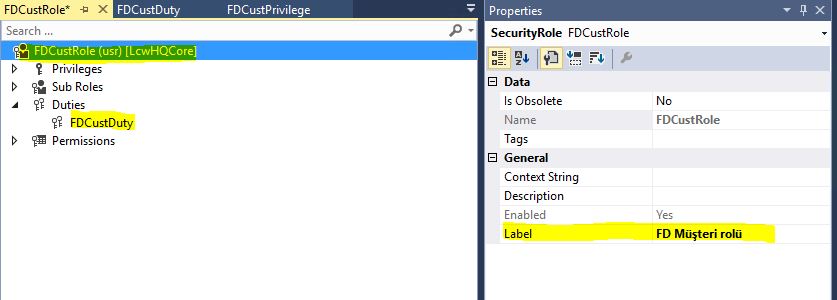
Image-11

In some cases, it may be necessary to clear the Caches. You can call the SysFlusData class as shown in Image-12.
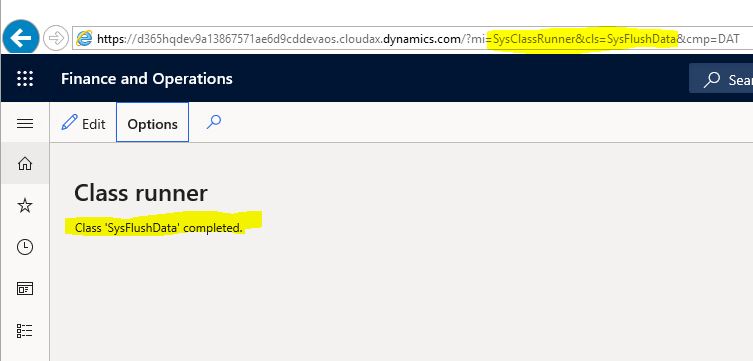
Image-12

Objects you create via VS will not appear directly in the application. I’m not so sure why but they are visible after DB sync. This is actually data. I don’t know why it needs that.
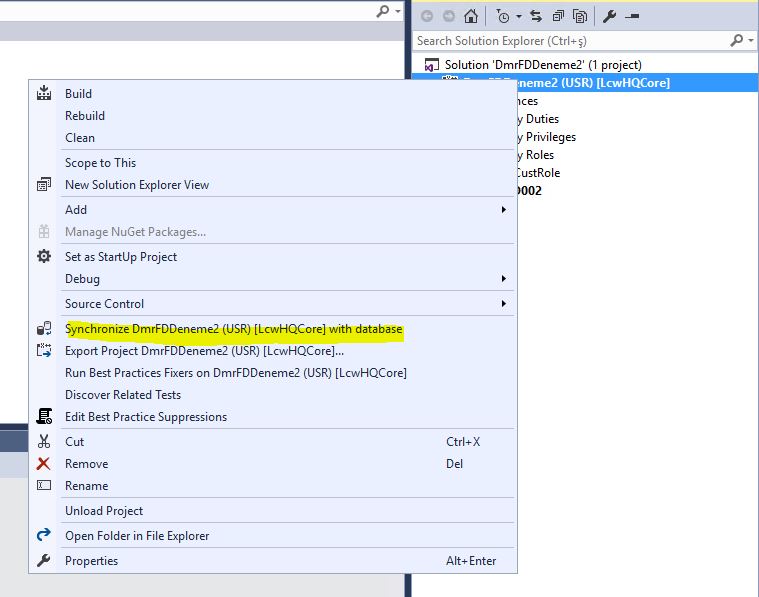
Image-13

After these operations, you will see the objects you have created when you open the application.
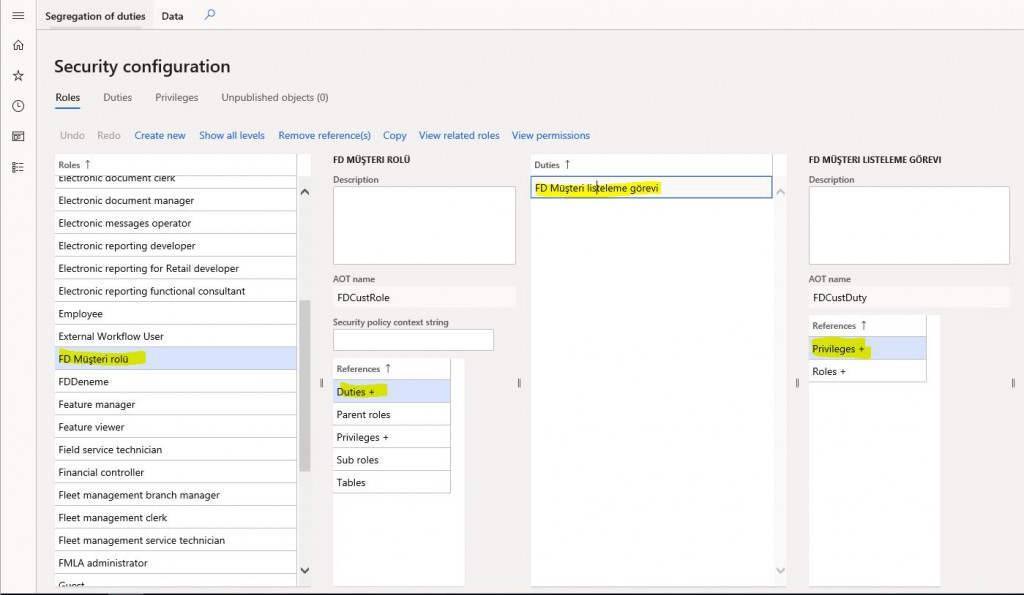
Image-14

You assign roles to our test user.
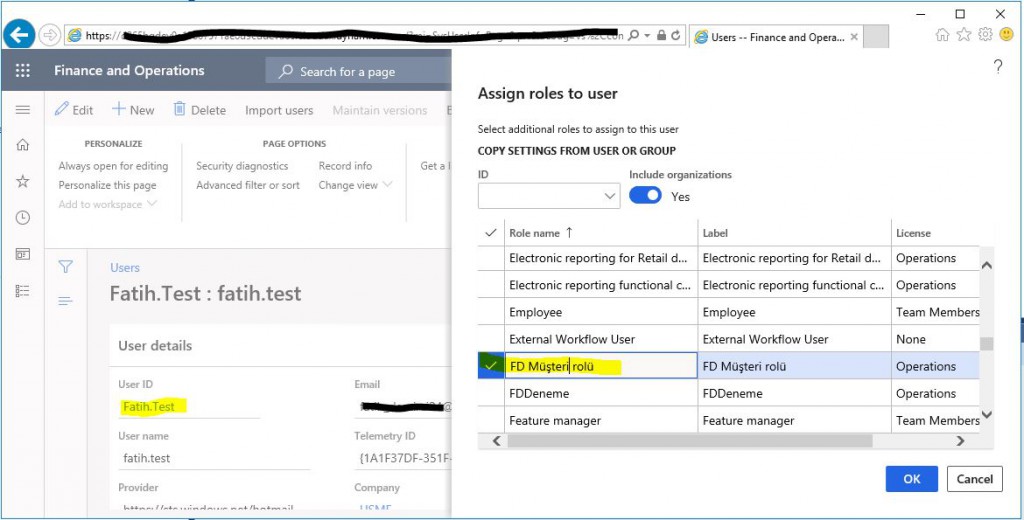
Image-15

When you log in to the application, you can see the All Customers form.
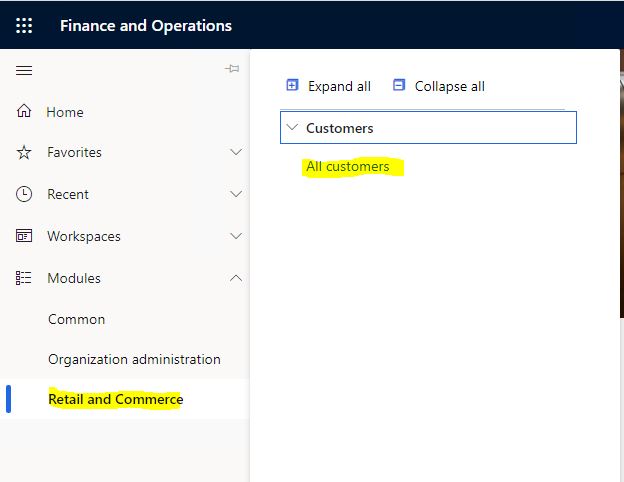
Image-16

In this article, I tried to explain how to create security objects via VS. You must take the security and authorization very seriously. If not set up correctly, it can get messy. Try to manage it from the highest level possible. If you go deep into details, it becomes very difficult to manage. Do it if the new role is really required. Use Duty to get things done as much as possible. Do not assign more than 3-5 roles to a user. Too many roles can lead to performance issues.

Regards.

www.fatihdemirci.net

TAGs: Microsoft Life Cycle Services, LCS, Azure, Azure DevOps, Security , Microsoft Dynamics 365, MsDyn365FO, MsDyn365CE, MsDyn365, Dynamics 365 Insights Power BI, Power Automate, Power Apss, Power Virtual Agents, what is Dynamics 365, Dynamics 365 ERP, Dynamics 365 CRM
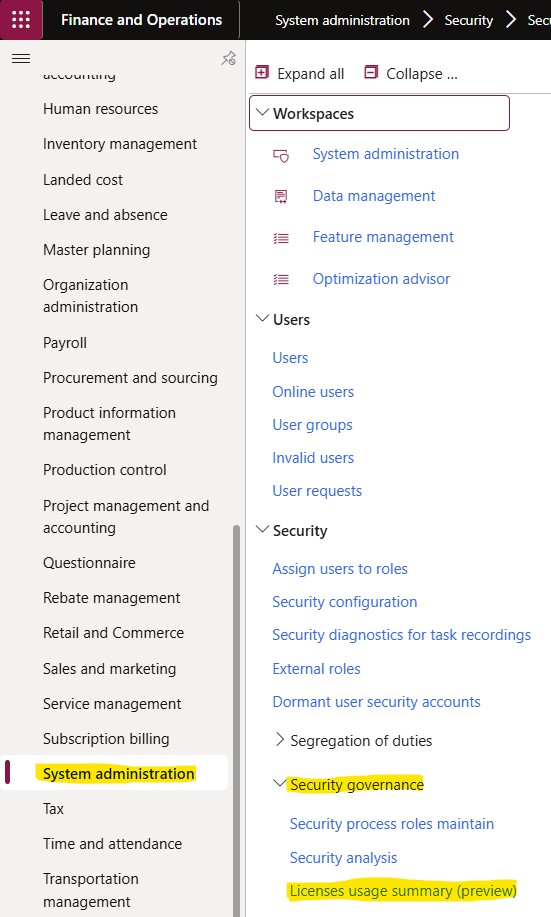
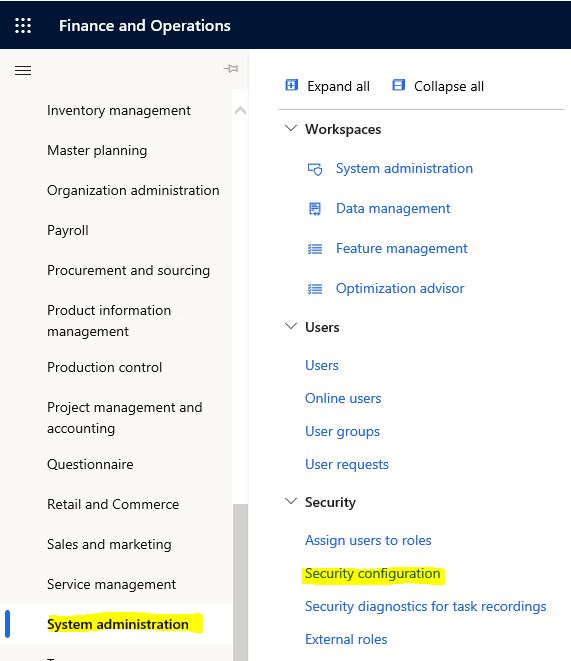
How to Define Privileges from Dynamics 365 Finance and Operations Interface?

In this article, I will explain how to create privilege objects from Dynamics 365 Finance and Operations interface. In my previous article, I explained how fatih.test user was created. I will show an example based on this user. I deleted all roles of the user except system user. I will define a new role and grant privilege a certain object.

Image-1

You can see the menus in Image-2 only when you enter the application with the System user role.

Image-2

In this example, I will define a role that is authorized only for the All Customers form.

Image-3

First, find the name All Cutomers MenuItem. I looked it up from the development environment. You can also see it on the form. CustTableListPage

Image-4

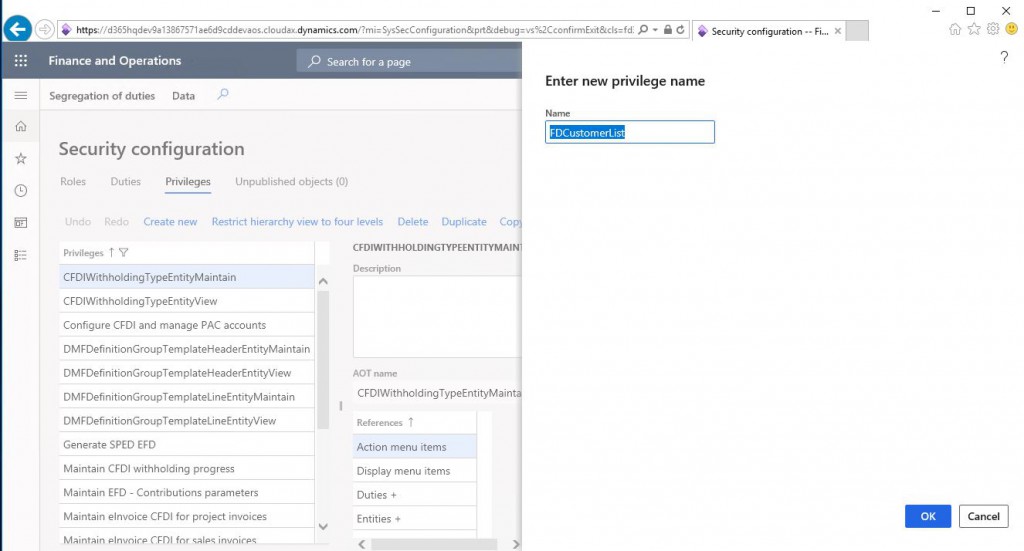
Open your application with a user that has admin privilege and open the System Administration -> Security Configuration form. Got to the Privileges tab and click Create new. Enter the name from the window that opens and click OK.

Image-5

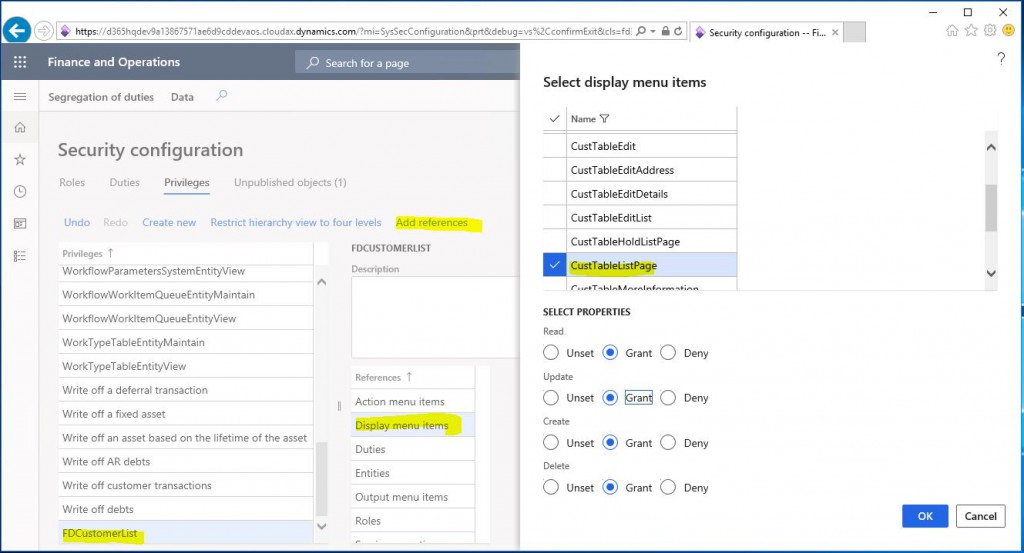
You must define the privilege for the privilege created. We want to authorize a Display menu Item. While on the Display menu Item record, click Add references. Filter and select CustTableListpage from the window that opens. Select Grant for all of them and click OK. We have defined the authorization.

Image-6

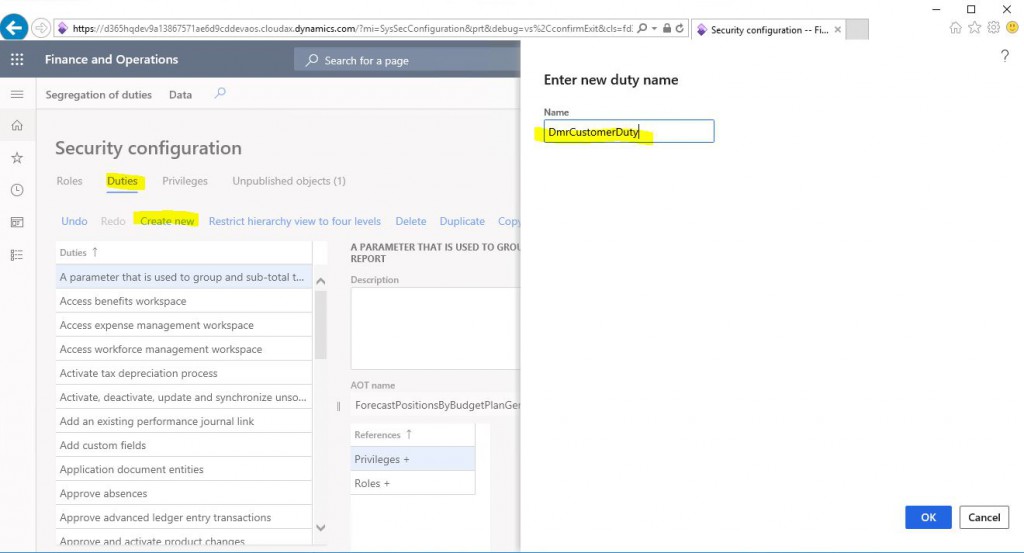
Go to the Duties tab and Click New. Enter a name and create.

Image-7

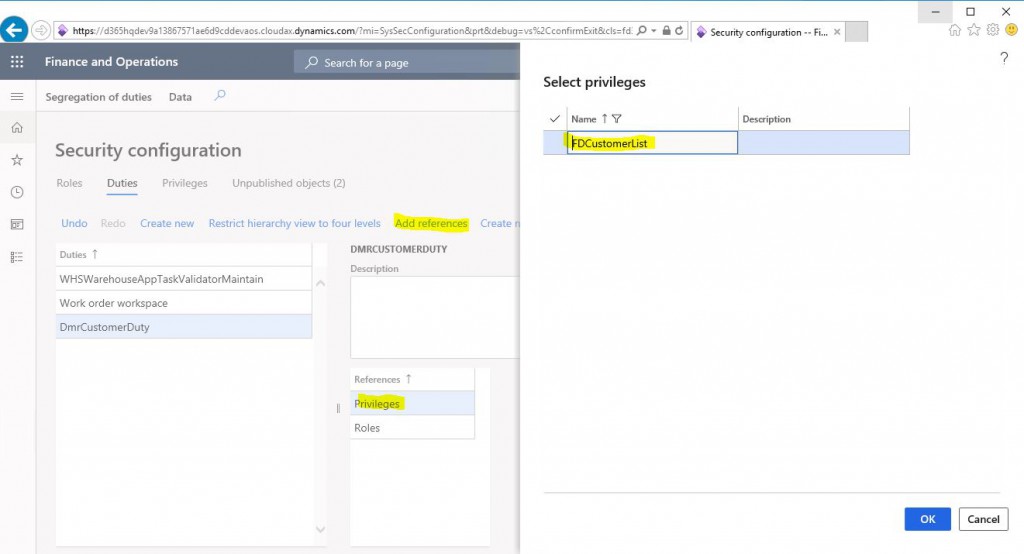
In order to add Privilege over the resulting Duty, we select the Privilege we created by clicking Add Reference.

Image-8

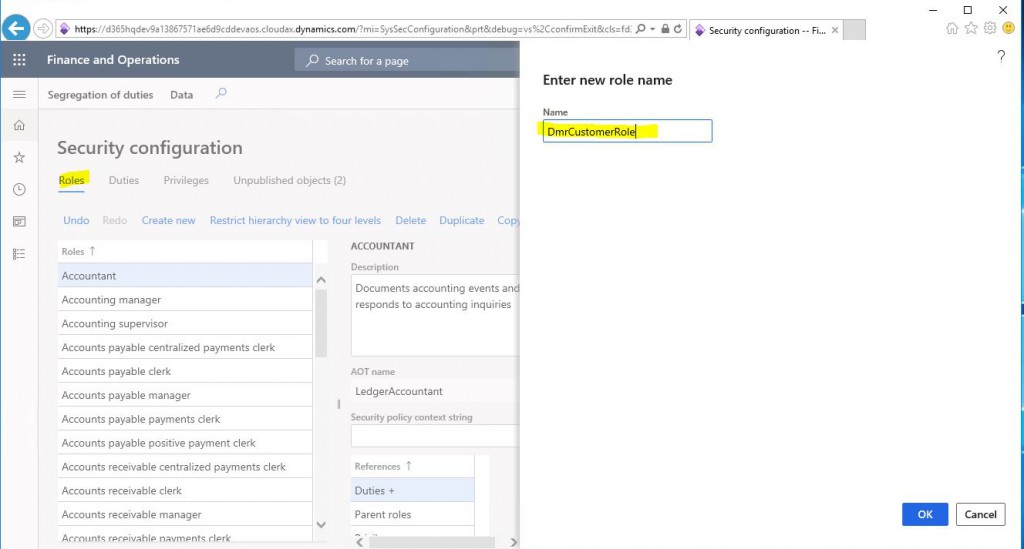
Go to the role tab and create a new role.

Image-9

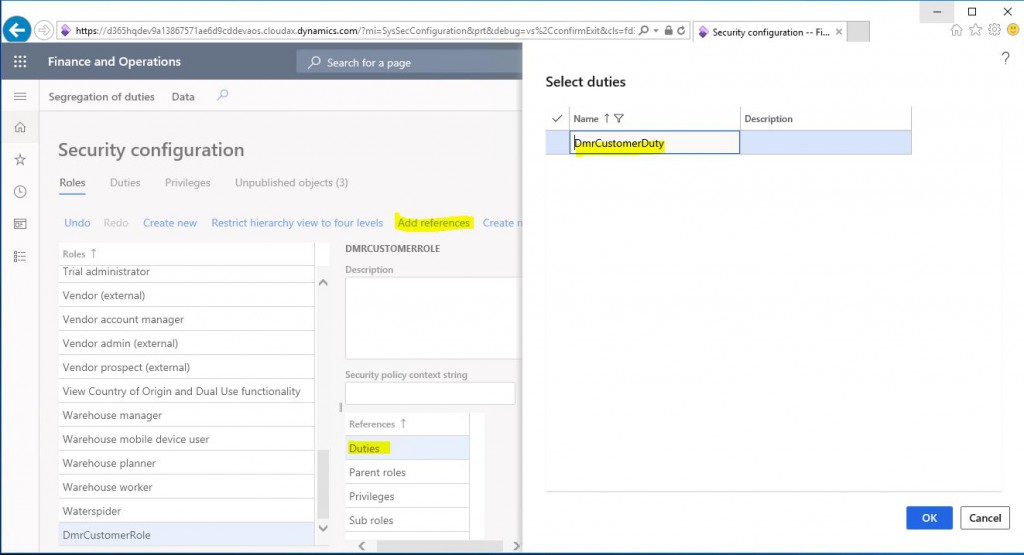
Similarly, add the Duty you created previously as a reference.

Image-10

After these processes, the role privilege definition is finished. But first we need to Publish these objects.

Image-11

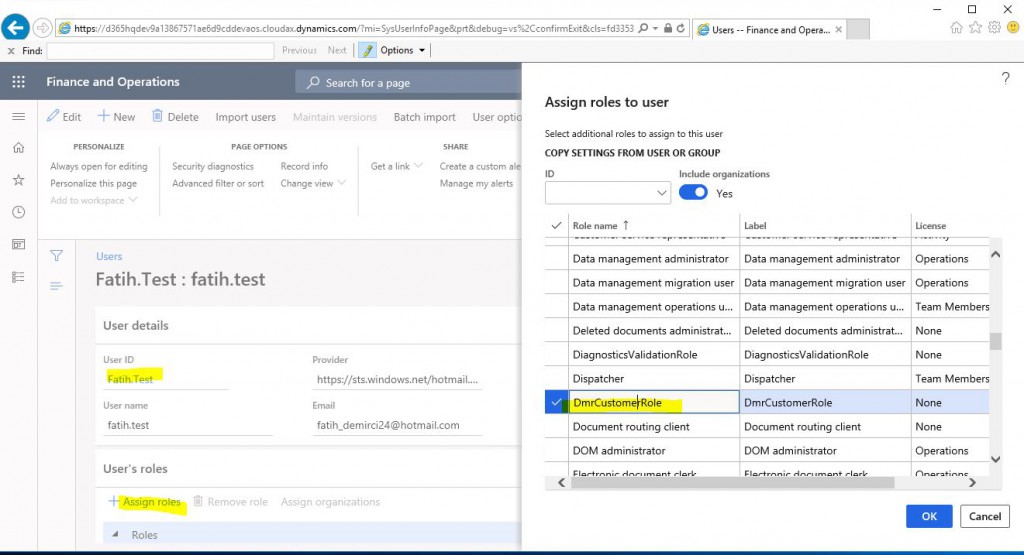
After publishing the privilge objects, go to your user, click Assign Roles and select the role you created from the screen that opens.

Image-12

When you log back into the system with your test user, you will see the menu you have authorized.

Image-13

In this article, I tried to explain how to create privilege objects in the simplest form through the application. Creating from the screen like this something I am not used to. I prefer to create it from the development environment. Also, objects are not created when you create them from the screen. Therefore you need to use Export-Import to move them to other environments. I will also talk about this feature. In addition, I will explain how to make privilege definitions through the development environment in my next article. Privilege is an extensive topic. I will try to talk about all the details.

Regards.

www.fatihdemirci.net

TAGs: Microsoft Life Cycle Services, LCS, Azure, Azure DevOps, Security, Microsoft Dynamics 365, MsDyn365FO, MsDyn365CE, MsDyn365, Dynamics 365 Insights Power BI, Power Automate, Power Apss, Power Virtual Agents, what is Dynamics 365, Dynamics 365 ERP, Dynamics 365 CRM

How to Authorize Dynamics 365 Finance and Operations Lower Level Form Objects?

In this article, I will try to explain how to define an authorization for any object in Dynamics 365 Finance and Operation application. I do not recommend using this. The more details you go into, the more difficult it will be to manage security. However, in some cases, this will be needed. One mistake I see in these cases is to solve this with code, not with the security infrastructure. Never write code for security related work. It seems like a quick solution at first, but there will be a lot of trouble in the future. The support and subsequent requests become very difficult to meet. In this article, I will continue with the project I used in my previous articles. We had authorized a test user for the Customers form. Now they can open the form and see its data. Assume that the Customer group field was asked to appear on this user. Let’s see how we can do this.

Image-1

I add a new Privilege.

Image-2

Under Privilege, right click the Form Control Permissions section and click New Form.

Image-3

In the Name field, select CustTable form.

Image-4

Right click on CustTable to create a new object and type the name of the object you want to authorize. Grant is the key part. With No Access, we ensure that those who own this Privilege do not see this object. It may not appear in the lookup here. It doesn’t matter, you can directly write the name. These definitions will not be sufficient. We need to change a property of the object for which we will define the authorization.

Image-5

In order to make this change, we need to create an extension for our form at this stage.

Image-6

Open the Extension you created. Find the object you want to authorize and from its properties, change NeedPermission to Manual. It means that you will manage the authorization of this object. It’s better to use the Extension as the first step.

Image-7

Then add the Privilege to Duty we used in our previous articles.

Image-8

Save and compile our project and run DB synchronization for our project only. After that, when you log in with the test user and open the Customers form, you will see that the Customer Group field does not appear.

Image-9

In this article, I tried to explain how a low-level object is authorized. It can be done very simply, but if you define too many low-level authorizations, it is very difficult to work it out. Try to authorize from the entry point as much as possible.

Regards.

www.fatihdemirci.net

TAGs: Microsoft Life Cycle Services, LCS, Azure, Azure DevOps, Security, Microsoft Dynamics 365, MsDyn365FO, MsDyn365CE, MsDyn365, Dynamics 365 Insights Power BI, Power Automate, Power Apss, Power Virtual Agents, what is Dynamics 365, Dynamics 365 ERP, Dynamics 365 CRM

Dynamics 365 Finance and Operations Alt Seviye Form Nesnelerine Yetki Nasıl Verilir?

Bu yazıda Dynamics 365 Finance and Operation uygulamasında herhangi bir nesneye nasıl yetki tanımı yapılır anlatmaya çalışacağım. Bunu çok kullanmanızı tavsiye etmiyorum. Ne kadar çok ayrıntıya girerseniz güvenliği yönetmek o kadar zor olacaktır. Ancak tabi bazı durumlarda bu ihtiyaç olacaktır. Bu durumlarda gördüğüm bir yanlışta bunu güvenlik altyapısıyla değil de kodla çözmek oluyor. Kesinlikle güvenlikle ilgili işler için kod yazmayın ilk etapta hızlı çözümmüş gibi görünür ama ilerde çok baş ağrısı olur. Desteği ve sonra gelen taleplerin karşılanması çok zorlaşır. Bu yazıda önceki yazılarımda kullandığım proje ile devam edeceğim. Bir test kullanıcısına Müşteriler formu yetkisi vermiştik. Artık formu açıp verilerini görebiliyor. Varsayalım Customer group alanı bu kullanıcıda görünmesin istendi. Bunu nasıl yapabiliriz görelim.

Resim-1

Read more