Posts Tagged ‘ Microsoft Dynamics 365

How to Move Developments to Dynamics 365 Finance and Operations Test and Live Environments? 4- Installing Deployable Package to Asset Library

In this article, I will explain how to install the Deployable Package created with Build, which is the last step of moving the developments we made from Visual Studio for Dynamics 365 Finance and Operations to Test and Live environments, to Asset Library and then how to carry this package to test and live systems. I talk about performing a simple development movement with this article. Of course, there are too many details here. There are many steps that need to be examined, especially when problems arise.

This process may be more troublesome compared to the old version, but it is definitely a better method. It will be difficult for customers who still develop live and move codes to live every day, but they should definitely switch to moving at least once a week. Even for the old version, we recommend moving to live once a week (twice at most). In this version, moving to live more frequently causes a great loss of time. The problem I usually see in projects that require intervention to live too much is that your test and design stages are insufficient. Developments that are not well designed and tested, constantly create a need to intervene to live environment. With this work logic, you cannot create projects in the new version.

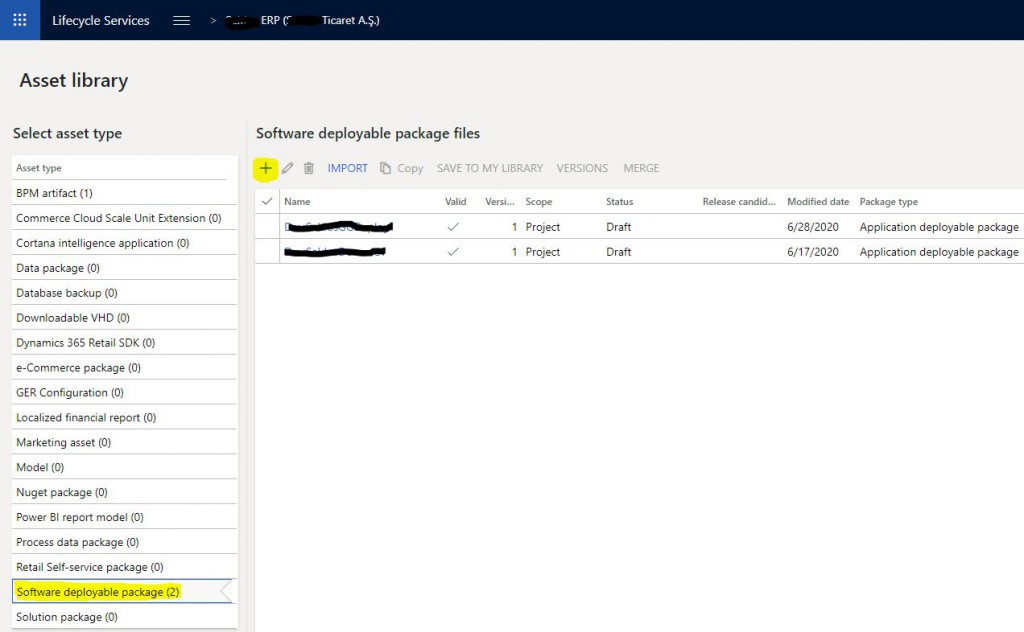
In the third article of this series, we downloaded the Deployable Package, which was the result of Build. We can now upload this package to Lifecycle Services. Log in to the LCS and select our project. Open Asset Library from the menu.

Image-1

Open the Software Deploable Package tab. Open the new package download page by clicking +.

Image-2

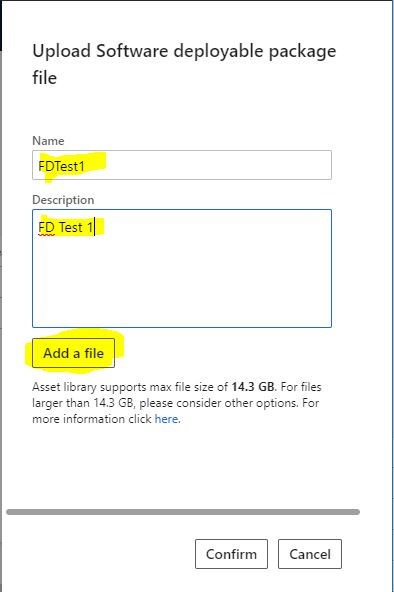
On the page that opens, enter a name and description. It is useful to set a standard here.  Click Add a file.

Image-3

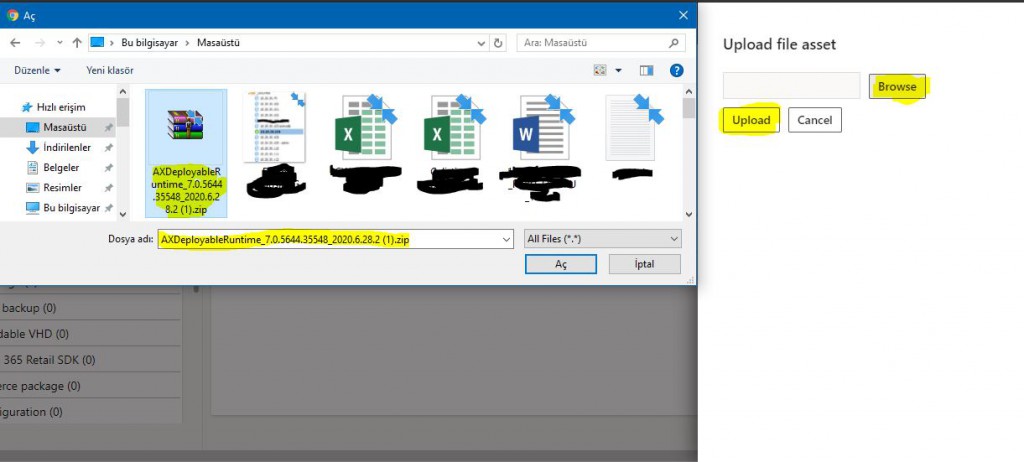
Select the package you downloaded.

Image-4

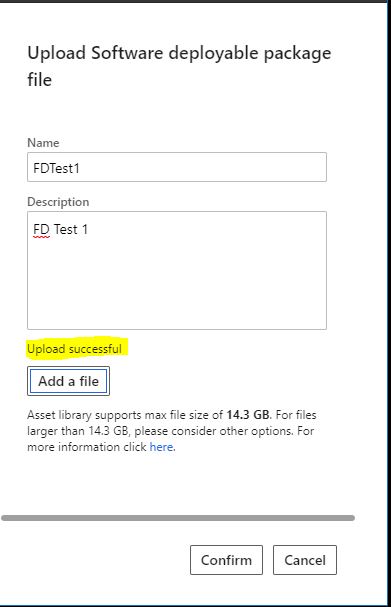
After the installation is complete, click Confirm.

Image-5

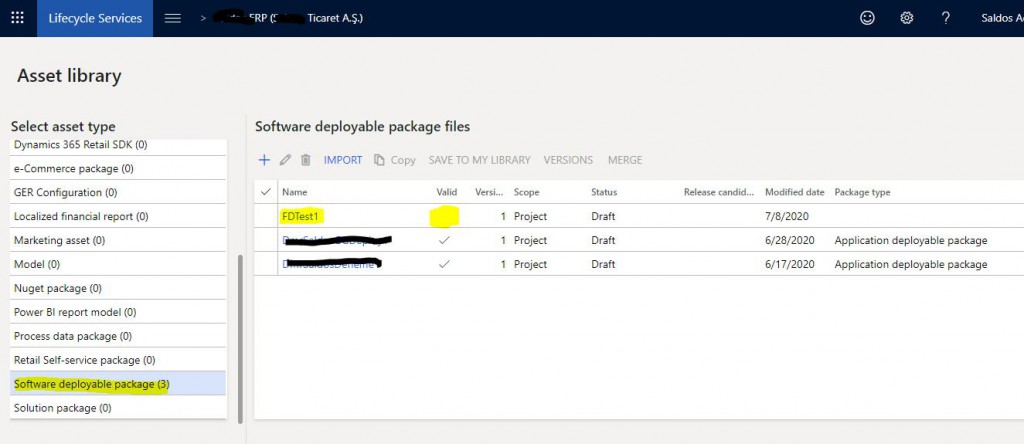
Our package appears in the list. It is not yet confirmed. After a few minutes the Valid part will also be checked. Now we can install this package in our test and live environments.

Image-6

Since it is not live in this environment, I will first show it from the test. The same steps are required for live as well.  Open your SANDBOX Test environment by clicking Full details.

Image-7

Click Maintain-> Apply updates.

Image-8

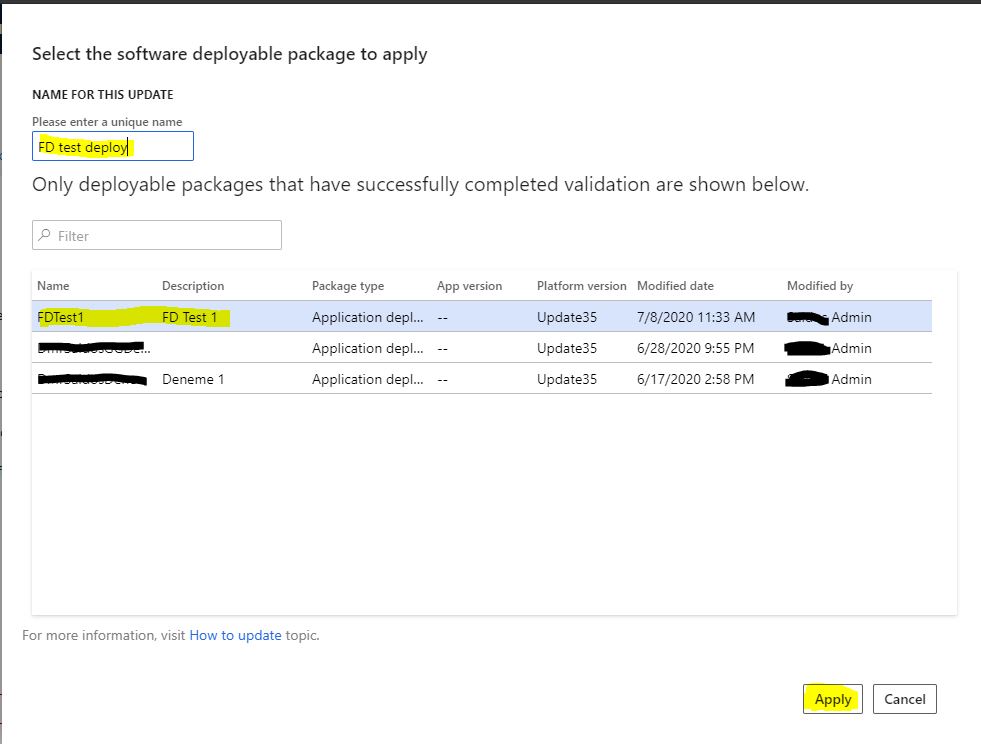
Select the package you installed from the window that opens. Apply is not active without naming it. You need to specify a suitable name format. In the new version, one of the most difficult things seems to be naming. You have to give names so many times that it is difficult to set and apply rules everywhere. After you click Apply, the test environment will automatically start to install the package and you will not be able to access the environment for at least 1 hour. You should be aware of that. You can follow the status of the installation process on the detail page of your environment.

Image-9

The process of making the package live is the same, except there are two differences. Firstly, you need to mark the Package as Release Candidate. Second, you need to set the date you want the package to go live. This is done by using the Schedule button. I could not provide an image of it because it was not live in this environment yet.

Image-10

In this article, we completed the process of moving a development environment to test and live. Of course, I explained it through a very simple and problem-free scenario. In real life, things are not that simple, but not so difficult as well. There are many tools to solve problems. Being organized is very important. You should pay attention to naming and standards. I will continue to explain the details and solution methods of this whole process. I hope it is useful for you.

Regards.

www.fatihdemirci.net

TAGs: Microsoft Life Cycle Services, LCS, Azure, Azure DevOps , Release Candidate, Deployable Package, Microsoft Dynamics 365, MsDyn365FO, MsDyn365CE, MsDyn365, Dynamics 365 Insights Power BI, Power Automate, Power Apss, Power Virtual Agents, what is Dynamics 365, Dynamics 365 ERP, Dynamics 365 CRM

How to Move Developments to Dynamics 365 Finance and Operations Test and Live Environments? 1- Developing and Sending to Azure DevOps.

In this article, I will try to explain how to move the developments we made from Visual Studio for Dynamics 365 Finance and Operations to Test and Live environments. I thought of wrapping it up in a single article, but I realized it would be too long so I divided it into sections. In this first article, we will make a new development and compile it, then we will do the first tests in our development environment, and finally, we will send our development to Azure DevOps. In the other articles of this series, I will explain how to Build in Azure DevOps and how to move the package to test and live environments.

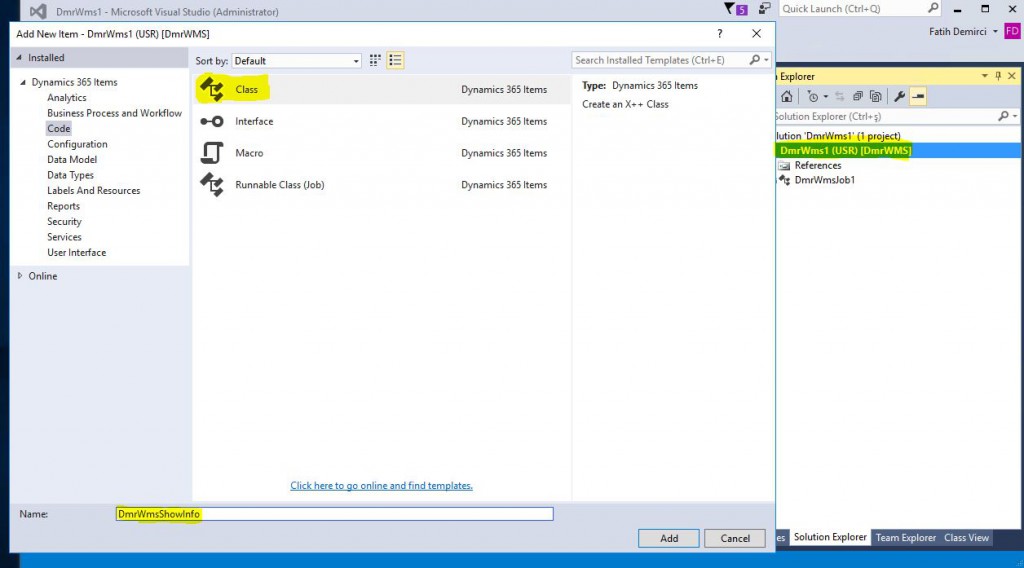
Let’s have a look at our example. I will write a simple class and make an information screen appear when it is run. Then I’ll create a MenuItem and connect it to the Menu. In my previous articles, we created the DmrWMS model and the DMRWms1 project. I will use this project. Right click on the project and click Add New Items. Select Class as its type, name it and click Add.

Image-1

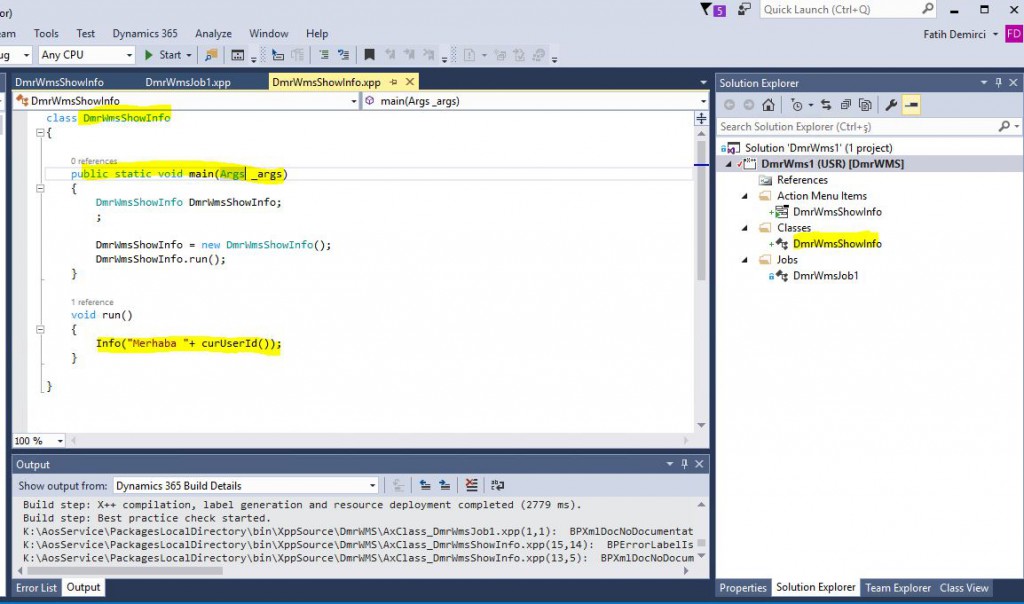
I added the following codes to the class. It has a very simple structure. I made it work on its own with Main. I gave an Info in the Run method.

Image-2

Now let’s create the Menu Item that is necessary to run our class and add it to the menu. Select Action Menu Item from the Add New Items section, name it and click Add.

Image-3

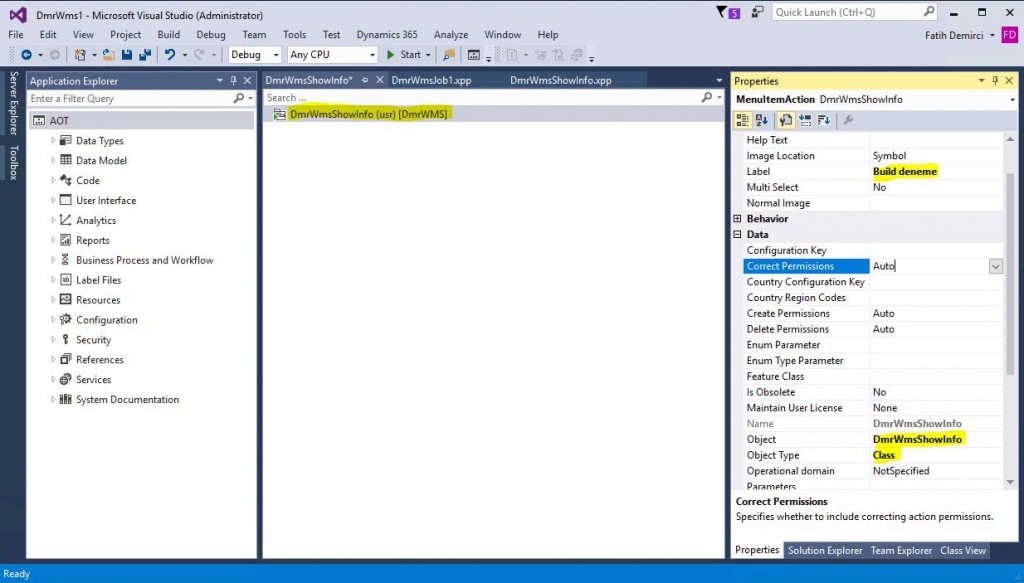
Select the Object Type Class from the resulting Menu Item properties. Select the class you created as Object. Do not forget to set Label as it will appear in the menu.

Image-4

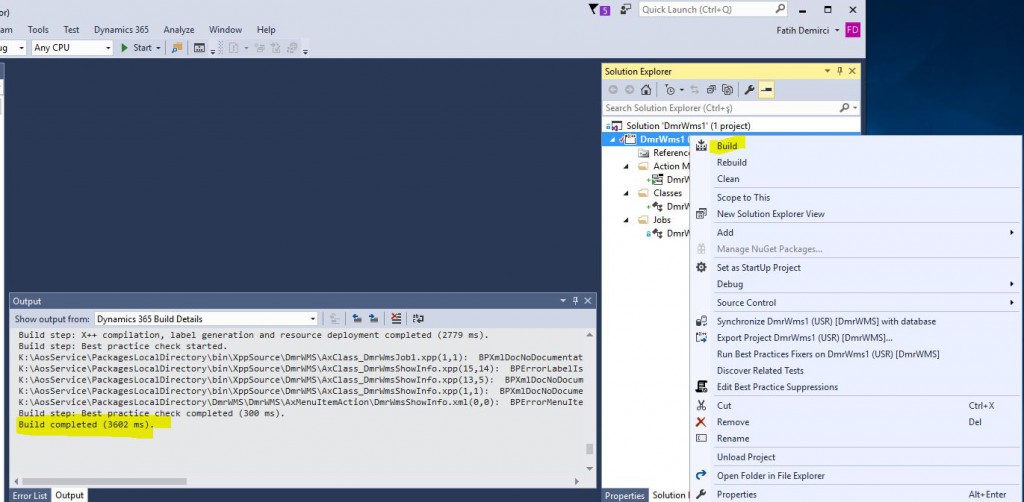
Let’s test the development now. Right click on the project and click Build.

Image-5

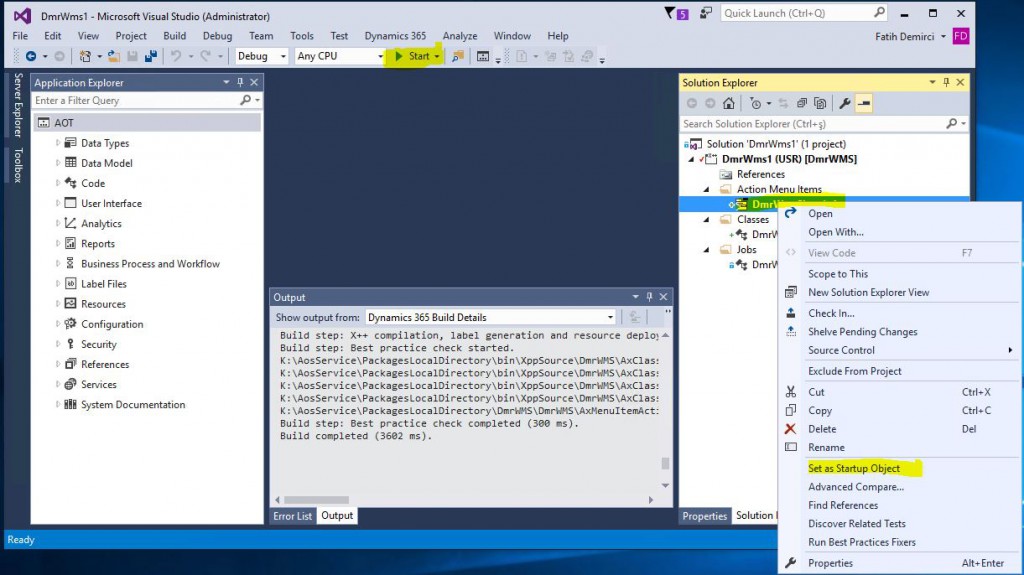
If Build is completed without any errors, mark the Menu Item we created as Set as Startup Object and run it by clicking Start.

Image-6

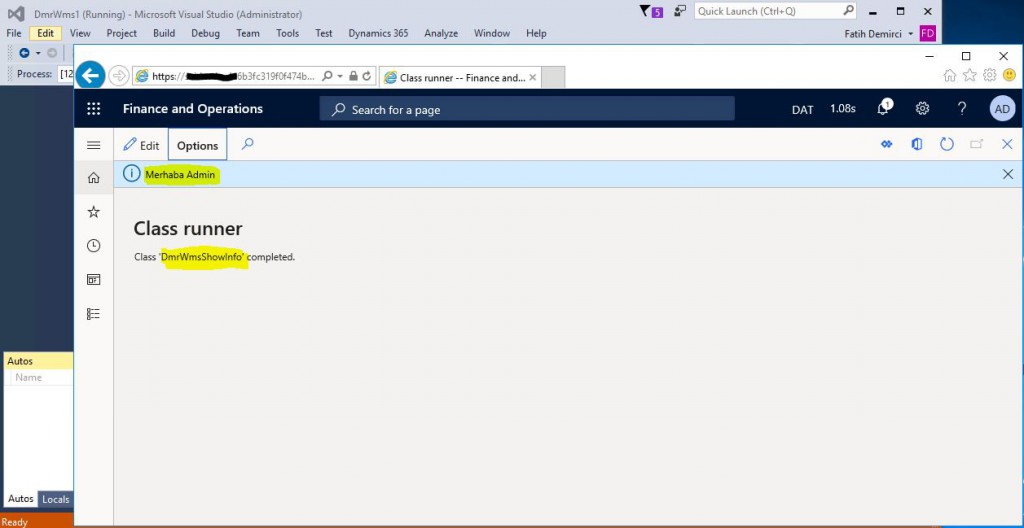
It called the Menu Item class and displayed the notification on the screen. Our code works J

Image-7

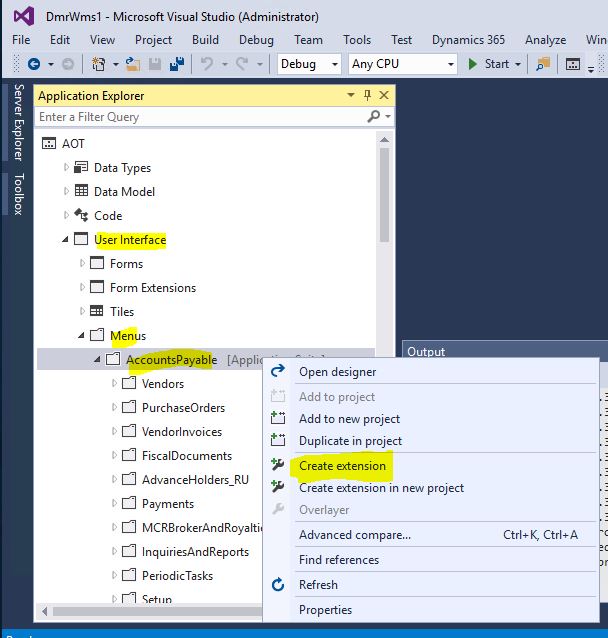
Now we can add it to a menu. Since I want to add it to a standard menu, I must use Extension. I will explain the Extension logic in my next articles, but here you can think of it as an extension of the standard object. You can add new things without breaking the standard. I created an Extension of the AcountsPayable menu with the Create extension option, as shown in the picture.

Image-8

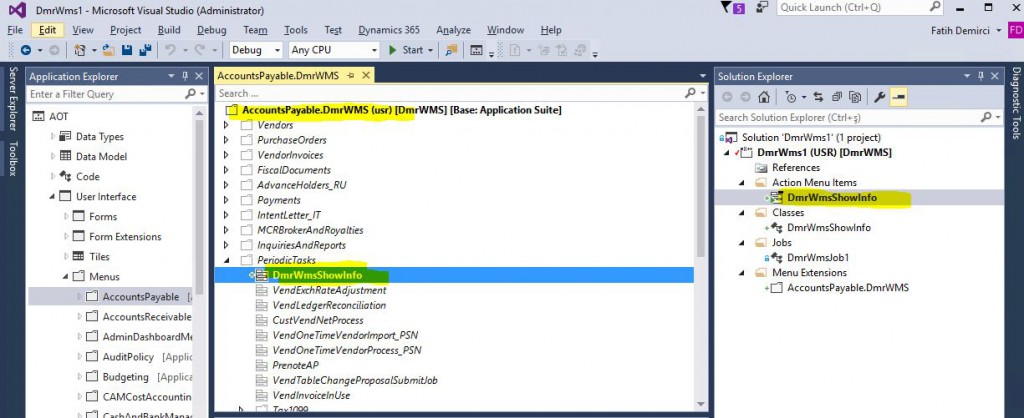
I drag and drop my own Menu Item under PeriodicTask to the resulting menu.

Image-9

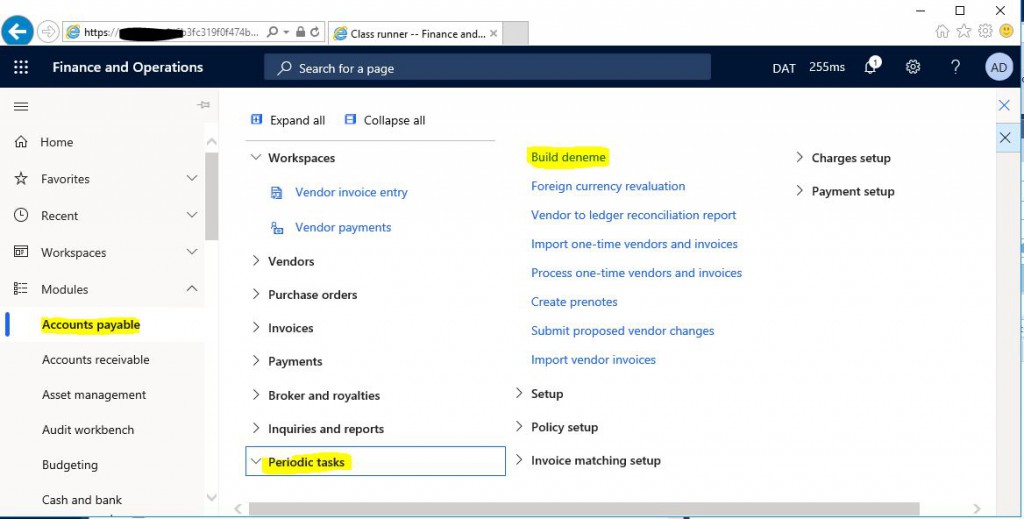
I Build my project again and run it.  Build Test appears in the menu. Our development is almost ready to send to version control. Normally it is necessary to add security related objects here. I’m skipping them for now.

Image-10

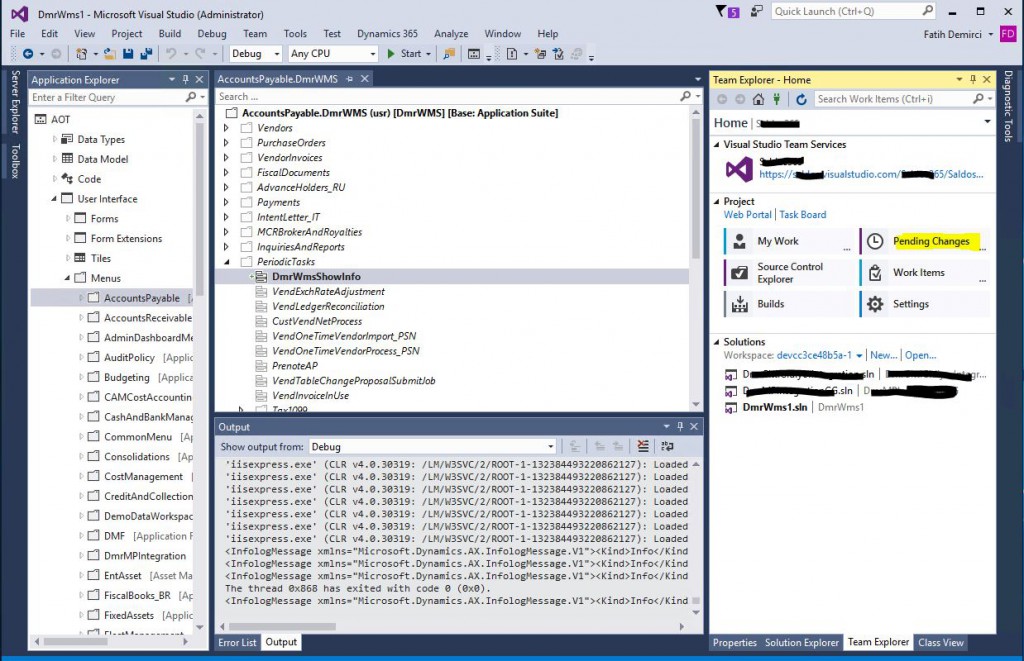
I click Team Explorer-> Panding Changes.

Image-11

I should see all the objects I’ve created. If there is something missing, I need to add it with Add to Source Control. If you have followed me here, it will automatically add when the object is created. I add a comment and click Check In.

Image-12

I click Yes to complete the process.

Image-13

When I check my Azure DevOps project, I can see all my objects. I am now ready to run Build.

Image-14

In this article, we have made the initial preparation to move developments to test and live environments. We created a simple project, performed the first tests and sent it to Azure DevOps. After this stage, if I had a Dev Branch, I had to perform Merge first. But in our example, since we work directly with main, we are ready to start Build. I will talk about how to perform Merge later.

Regards.

www.fatihdemirci.net

TAGs: Microsoft Life Cycle Services, LCS, Azure, Azure DevOps,Build, Deploy to Test,  Microsoft Dynamics 365, MsDyn365FO, MsDyn365CE, MsDyn365, Dynamics 365 Insights Power BI, Power Automate, Power Apps, Power Virtual Agents, what is Dynamics 365, Dynamics 365 ERP, Dynamics 365 CRM
X++ :10- Query Nedir?

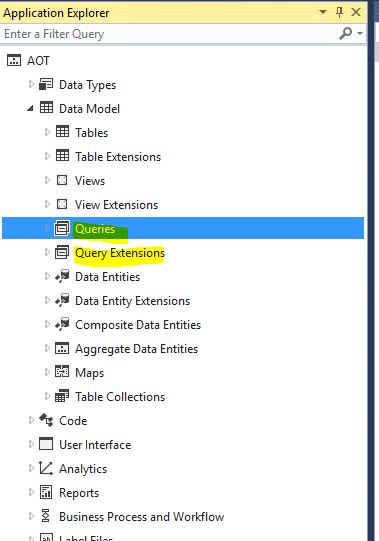
Bu yazıda X++’ın en güçlü özelliklerinden biri olan Query’leri inceleyeceğim. Query nesne tabanlı sorgu olarak özetleyebiliriz. Bu sorgu nesne bazlı olduğu için istenildiği gibi değiştirilebilir ayrıca son kullanıcı ile iletişime sokulabilir. Bu sebeplerden Form ve raporların temel veri kaynağı Query’dir.  Hem kodla hem de ara yüzden oluşturabiliriz. Form ve view gibi yapılarda kullanmak için genelde ara yüzden oluşturulanlar kullanılır.  Bu yazıda ara yüzden örnek bir Query oluşturacağım. İlerleyen yazılarımda kodla nasıl oluştururuz ve nasıl kullanabiliriz anlatacağım.

Resim-1

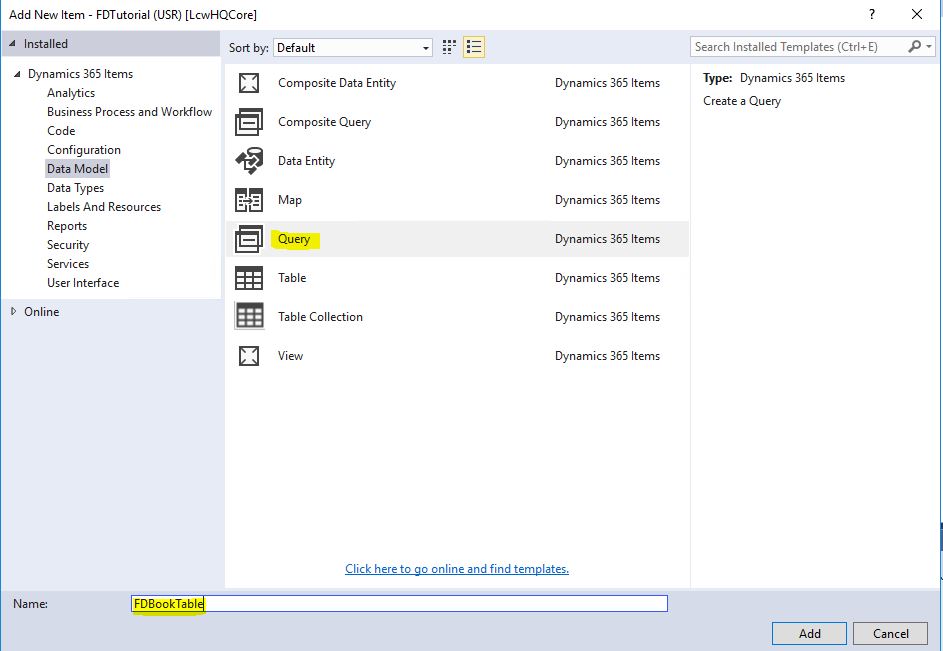
Yeni bir Query oluşturuyorum.

Resim-2

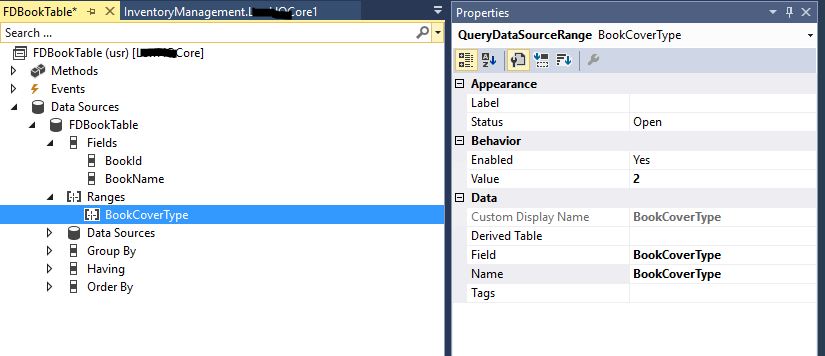
Query’de temel birkaç özellik var tabi öncelikle veri kaynağı belirlemelisiniz. Ben veri kaynağı olarak FDBookTable ekledim ve FieldList ile BookId, BookName oluşturdum. Range olarak ta BookCoverTyoe ekledim. Eğer kabaca sorgu olarak yazsaydım şöyle olurdu. Bu sorguyu artık istediğim yerde kullanabilirim.

Select BookI, BookName From FDBookTable

Where FDBookTable.BookCoverTyoe == FDBookCoverType::paperback;

Resim-3

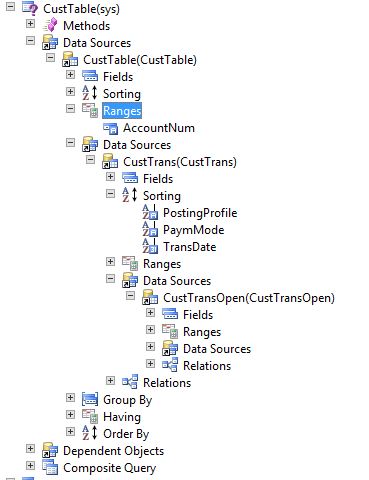
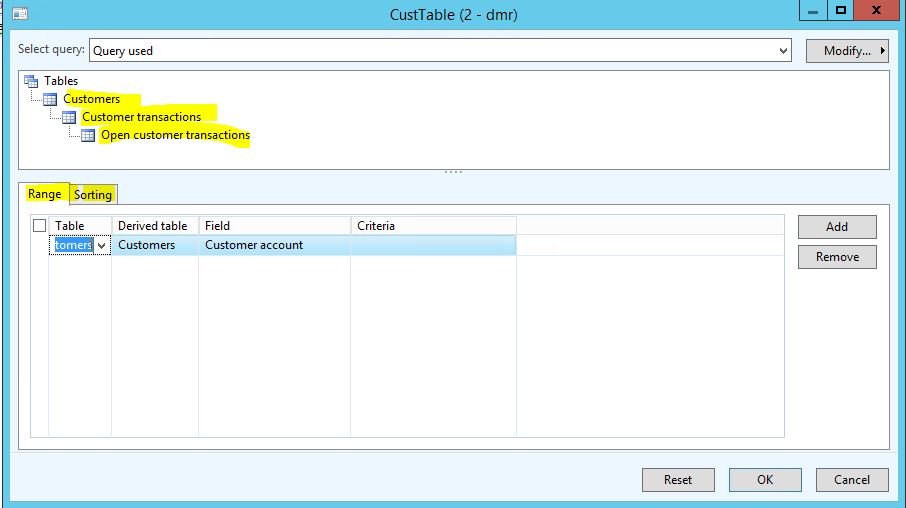
Standartta olan karmaşık bir sorgu örneği. Burada 3 tablo bağlanmış. Filtre ve sıralama verilmiş.

Resim-4

Kullanıcı ile iletişime giren Query ekranı bu şekildedir. Bu resim eski versiyondan ama mantıkta bir fark yoktur. Yukarıdaki sorgunun görsel halini görebildiğimiz gibi buradan kullanıcı istediği işlemleri yapabilir.

Resim-5

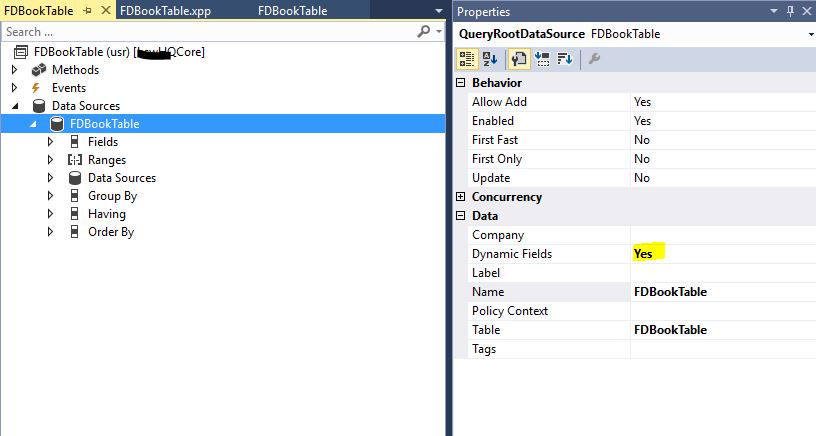
Eklediğimiz veri kaynağı otomatik alanları seçilmeden gelecektir. Eğer tüm alanlar seçilsin isterseniz Dynamics Fields özelliğini Yes yapmak gerekir.

Resim-6

Bu yazıda ara yüzden nasıl Query oluşturulur anlatmaya çalıştım. Query çok geniş ve çok kullanılan bir özelliktir. Ayrıntılarına vakıf olmak için bol bol örnek yapmak lazım. Özellikle form tarafında kullanımı konusunda çok zafiyet görüyorum bu konuda ayrı bir yazı hazırlamayı düşünüyorum.

Selamlar.

www.fatihdemirci.net

TAGs: X++,Query, Azure, Azure DevOps, Microsoft Dynamics 365, MsDyn365FO, MsDyn365CE, MsDyn365

How to Change the Default Model for Dynamics 365 Finance and Operations Developments?

When you install a new DevBox for Dynamics 365 Finance and Operations, the default model is Fleet Management. If you create a new model, you can mark it as the default model while creating it. However, to use an existing model, it is necessary to make changes to the DynamicsDevConfig file.

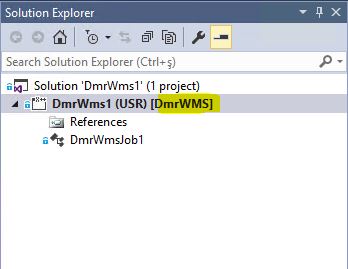
In my previous articles, I created the DmrWMS model and marked it as the default model. Therefore, my every new project opens in the DmrWMS model.

Image-1

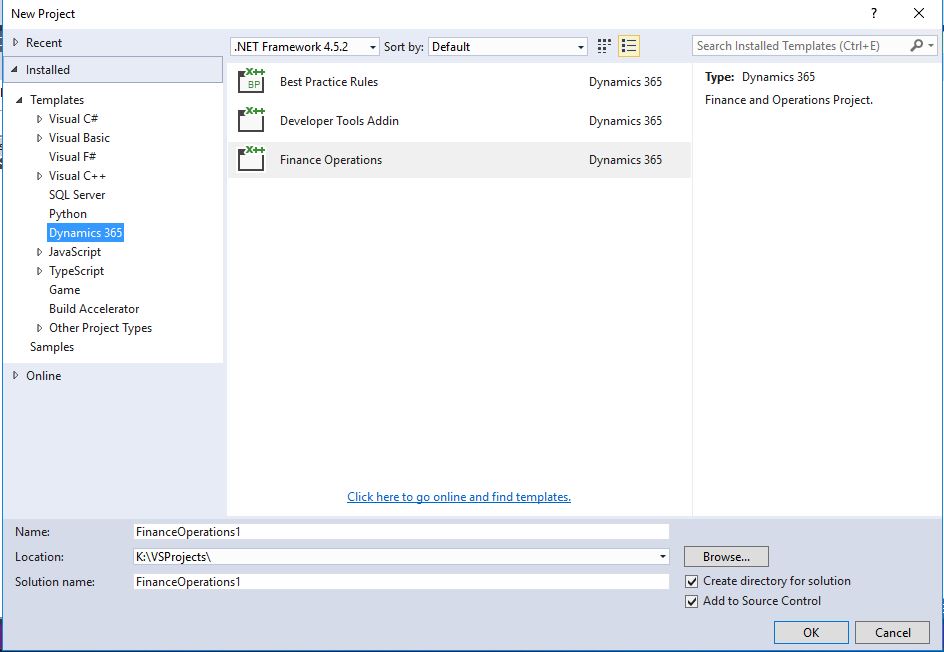
I have two models in this environment. If I want to work on the other model, unfortunately I cannot choose it while creating the project.

Image-2

As you can see, it is not possible to choose a model in the new project creation screen, or I could not find it. Of course I did some research.

Image-3

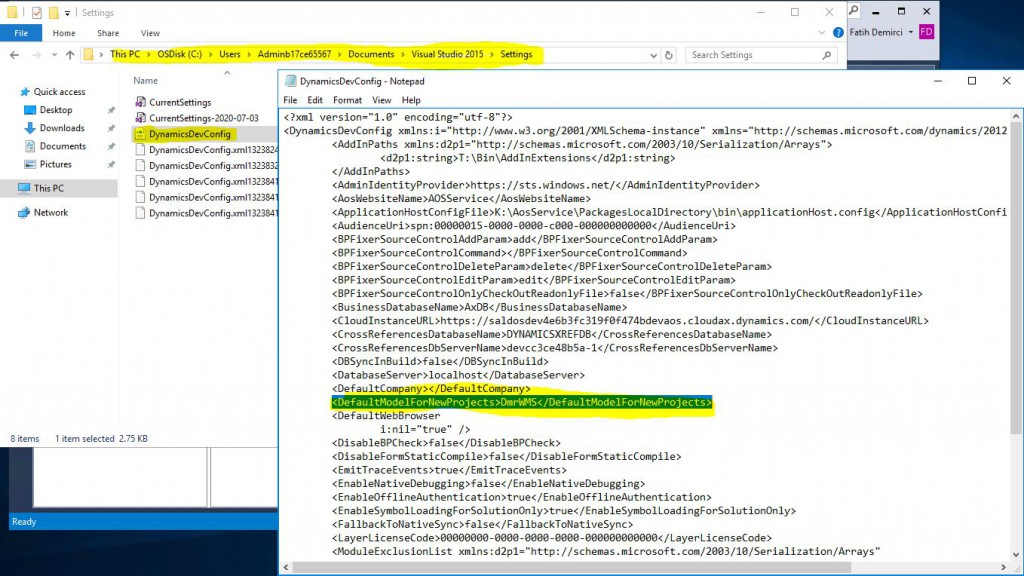
To change this, it is necessary to open the DynamicsDevConfig file in C:\Users\Adminb17ce65567\Documents\Visual Studio 2015\Settings.  You must go to this path with your own user. Adminb17ce65567 is my auto-generated admin user. That is the user I connect with Remote Desktop. You can find very useful information in the DynamicsDevConfig file. Let’s go over these 3 features for now.

<DefaultCompany></DefaultCompany> // You can set the default company here.

<DefaultModelForNewProjects>DmrWMS</DefaultModelForNewProjects> // You can change the default model here. When first opened, you will see Fleet Management here.

<DefaultWebBrowser                   i:nil=”true” /> // You can set the default browser here. Sometimes if you want to use Chrome for tests you can change this.

Image-4

In this article, I tried to explain how you can change the default model with the DynamicsDevConfig file. It is imperative to work with the model and it is necessary to set up the model management correctly and make sure that the software developers develop the right model. It becomes troublesome to fix them later.

Regards.

www.fatihdemirci.net

TAGs: Microsoft Life Cycle Services, LCS, Azure, Azure DevOps, DynamicsDevConfig, Microsoft Dynamics 365, MsDyn365FO, MsDyn365CE, MsDyn365, Dynamics 365 Insights Power BI, Power Automate, Power Apss, Power Virtual Agents, what is Dynamics 365, Dynamics 365 ERP, Dynamics 365 CRM

X++ :9- MenuItems ve Menus Nedir?

Bu yazıda Dynamics 365 Finance and Operations ara yüzlerinin temel nesneleri olan MenuItem ve Menu’lerden bahsedeceğim. MenuItem bir nesnenin giriş noktası olan ve üzerinden yetki tanımı yapılabilen yapılardır. Menu ise adı üzerinde ekrandaki kısa yollardır. Üç tip MenuItem vardır. Display formlar için Output raporlar için Action ise sınıflar için kullanılır.

Resim-1

Önceki yazıda oluşturduğum FDBookTable formu için Display tipinde bir MenuItem oluşturalım.

Resim-2

Mutlaka Label tanımlamalısınız.  ObjectType olarak Form seçiyorum. Object olarak formumu seçiyorum.

Resim-3

Bu MenuItem artık istersek formda buton olarak veya menüye ekleyerek kullanabiliriz. Şimdi biz menüye ekleyelim. Kitap projesini Stok yönetimi altında takip etmek istediğim için Create Extension ile Extension oluşturdum.

Resim-4

Oluşan Extension’a bir alt menü ekliyorum.

Resim-5

Oluşturduğum alt menüye Book Managment etiketini tanımladım. Oluşturduğum menüItem’ı sürükleyip yeni oluşturduğum alt menüye bırakıyorum.

Resim-6

Derleyip projemi çalıştırdığımda uygulamada yeni oluşturduğum menü ve eklediğim MenuItem’ı görebildim.

Resim-7

Bu yazıda ara yüz oluşturmak için kullandığımız Menu ve MenuItem nedir nasıl oluşturulur anlatmaya çalıştım.

Selamlar.

www.fatihdemirci.net

TAGs: X++,Menu,MenuItem, Azure, Azure DevOps, Microsoft Dynamics 365, MsDyn365FO, MsDyn365CE, MsDyn365

Dynamics 365 Finance and Operations Alt Seviye Form Nesnelerine Yetki Nasıl Verilir?

Bu yazıda Dynamics 365 Finance and Operation uygulamasında herhangi bir nesneye nasıl yetki tanımı yapılır anlatmaya çalışacağım. Bunu çok kullanmanızı tavsiye etmiyorum. Ne kadar çok ayrıntıya girerseniz güvenliği yönetmek o kadar zor olacaktır. Ancak tabi bazı durumlarda bu ihtiyaç olacaktır. Bu durumlarda gördüğüm bir yanlışta bunu güvenlik altyapısıyla değil de kodla çözmek oluyor. Kesinlikle güvenlikle ilgili işler için kod yazmayın ilk etapta hızlı çözümmüş gibi görünür ama ilerde çok baş ağrısı olur. Desteği ve sonra gelen taleplerin karşılanması çok zorlaşır. Bu yazıda önceki yazılarımda kullandığım proje ile devam edeceğim. Bir test kullanıcısına Müşteriler formu yetkisi vermiştik. Artık formu açıp verilerini görebiliyor. Varsayalım Customer group alanı bu kullanıcıda görünmesin istendi. Bunu nasıl yapabiliriz görelim.

Resim-1

Read more

X++ :8- Form Nedir?

Bu yazıda Dynamics 365 Finance and Operations formlarının temellerinden ve basit bir formu nasıl oluşturabiliriz anlatacağım. Form uygulamanın kullanıcıya sunduğu ara yüzdür. Çok gelişmiş özellikleri olan bu yapının benim en çok sevdiğim tarafı tasarımla sizi uğraştırmamasıdır. Ağaç yapısında alanları eklediğinizde otomatik tasarım ortaya çıkar ve siz tasarımla uğraşmazsınız.

Bir örnek ile açıklamaya çalışacağım.

Resim-1

Önceki yazılarımda oluşturduğum FDBookTable için bir tane form yapalım.

Resim-2

Formlardaki temel nesneler aslında 3 tanedir. Öncelikle Data Source formun temel veri kaynağını gösterir. Burada Table, View veya Query kullanabiliriz. Methods kod yazabildiğimiz yerler sadece ana alanda değil her bir nesneye de kod yazabiliyoruz. Form metodları ile ilgili ayrı bir yazı düşünüyorum. Gelelim Design kısmına burası bizim tasarımı yaptığımız yer. Burada Pattern uygulayabiliriz.Uyguladığınızda temel nesneleri oluşturmanızı bekliyor bu sayede standartta uygun tasarım yapmış olursunuz.

Resim-3

Ben Apply pattern -> Simple List seçtim. Listede birçok Pattern var.

Resim-4

Simple List için gerekli olan nesneler kırmızı ile gösteriliyor. Her nesneyi eklediğinizde burası düzelecek.

Resim-5

Bazı nesneler kendi tasarımına ihtiyaç duyabilir. Şimdi 3 tane gerekli olan nesneyi ekliyorum.

Resim-6

Action Pane Filter grup ve Grid ekledim. İstenenler bunlardı. Burada veriyi gridde göstereceğiz.

Resim-7

Bir nesnenin doğru veri kaynağından veri gösterebilmesi için Data Source’un seçilmesi gerekiyor.

Resim-8

Veri kaynağından istediğim anaları gride bıraktım ve kaydettim. Artık formum hazır sayılır.

Resim-9

Derleyip formumu başlangıç nesnesi olarak seçip projemi çalıştırdığımda formum açılacak. Veri girişi veya diğer  işlemleri yapabilirim.

Resim-10

Bu yazıda Form nedir nasıl oluşturulur anlatmaya çalıştım. Tabi Form çok geniş bir konu çok farklı tipte formlar yapılabiliyor. En kolay öğrenme yöntemi standartta olan formları incelemek. Ayrıca farklı formlar yapıp kendinizi geliştirebilirsiniz. Formlar için en önemli konu veri kaynağı mantığını anlamak. Formlarda aslında Query kullanılıyor eğer Query mantığında eksikleriniz varsa öncelikle onları halledin.

Selamlar.

www.fatihdemirci.net

TAGs: X++,Form, Azure, Azure DevOps, Microsoft Dynamics 365, MsDyn365FO, MsDyn365CE, MsDyn365

X++ :7- Views Nedir?

Bu yazıda Dynamics 365 Finance and Operations View’lerinden bahsedeceğim. View aslında SQL View’leriyle aynı. Burada oluşturduğunuz View direk SQL de oluşuyor. SQL de birçok özellikle var hepsi X++ ne yazık ki yok. Ama birçoğunu yapabiliyoruz. Bir tane örnek View yapalım.

Resim-1

Yeni bir nesne oluşturma ekranından View seçiyoruz.

Resim-2

Oluşan View’e veri Data Source olarak FDBookTable ekledim. DataSource Fields kısmında tümünü seç demelisiniz. Sonra Fields kısmına View’de olmasını isteyen alanları ekledim. Tabi bu bir sorgu çok karmaşık sorgular yapmak isterseniz Query kullanmalısınız. Derleme ve eşitlemeden sonra hazır olacak.

Resim-3

Açıp alanlara bakabiliriz.

Resim-4

Tablo gibi kullanabilirsiniz. Tabi View sadece veri okumak için kullanılır. Insert Update Delete için kullanamazsınız.  

Resim-5

Bu yazıda View nedir, nasıl oluşturulur ve nerelerde kullanılır anlatmaya çalıştım. View çok önemli ve hayat kurtaran bir özellik temellerini iyi kavrayıp oluşturduğunuz View’leri SQL den kontrol edip kodlarını anlamaya çalışırsanız çok şey öğrenirsiniz.

Selamlar.

www.fatihdemirci.net

TAGs: X++,View, Azure, Azure DevOps, Microsoft Dynamics 365, MsDyn365FO, MsDyn365CE, MsDyn365

X++ :6- Tables Nedir?

Bu yazıda Dynamics 365 Finance and Operations tablolarından bahsedeceğim. Tablo sistemin en önemli nesnesi desek yanlış olmaz. Öncelikle Tablolar gerçek SQL tabloların XRecord sınıfından türeyen sınıf karşılıklarıdır.

Tabloların birçok özelliği var sırayla hepsinden bahsetmeye çalışacağım. Standartta 12000’in üzerinde tablo var.

Resim-1

Yeni bir tablo oluşturalım. FDBookTable bizim temel tablomuz olacak.

Resim-2

Fields alanına önceki yazılarımızda oluşturduğumuz EDT ve Enum’ları kullanarak alanları oluşturdum. Bunu sürükleyip bırakıp yapabilirsiniz.

Fields: Tablonun biz tarafından yönetilen alanlarıdır. SQL’de otomatik alanlar oluşur.

Field groups: SQL de olmayan bir özelliktir. Aynı tipte olan alanları bir araya getirip grup oluşturabilir ve bunları formlarda kullanabilirsiniz. Sonrasında eğer yeni bir alan ekler ve bunu da bir gruba dâhil ederseniz kullanılan tüm formlara otomatik eklenir.

Indexes: Aslında SQL indeksleridir. Burada oluşturulan indeksler otomatik SQL de oluşturulur. Performans için en önemli özelliklerden biri budur. Tabloya göre uygun indeksler belirlenmelidir.

Full Text Indexes: Çok uzun metinlerin içiren kelime aramaları hızlandırmak için oluşturulan indekslerdir. SQL de bire bir oluşur.

Relation: Tabloların birbiriyle olan ilişkilerini tutar. SQL’e yazmaz.

Delete Actions: Bu tablodan kayıt silinmeye çalışıldığında ilişkili tablolarda kayıt varsa nasıl davranması gerektiğine karar verir. X++ ta olan bir özelliktir.

State Machines: İş akışı durumları için kullanılır.

Mappings: Tablolar mapları buradan görüntülenebilir.

Methods: Bir sınıf olduğu için birçok metodu vardır ve bizde ekleyebiliriz.

Events: Tablo üzerinde olan olayları gösterir. Biz X++ yazılımcıları metot kullanmaya daha alışkınız ama yeni versiyonla bunlar biraz değişti.

En temel tablo özelliklerini işaretledim. İleriki yazılarımda tek tek anlatacağım

Resim-3

Modified By ve Modified Date Time özelliklerini açıyorum. Bu sayede otomatik olarak kaydı kim hangi zamanda açmış tutabileceğiz.

Resim-4

Bir tane index oluşturuyorum. En temel anahtar BookId olduğu için onu ekledim. Bu indexi özelliklerden birincil anahtar olarak seçiyorum.

Resim-5

Alanlarında birçok özelliği mevcut. Yine ne temel özelikleri işaretledim.

Resim-6

Tablomu kaydettikten sonra derleme ve eşitleme yapıyorum artık Table Browser ile kontrol edebiliriz.

Resim-7

Bir tane örnek kayıt girdim. Bizim açmadığımız sistemin otomatik açtığı alanlar var onlardan bahsedeyim.

DataAreaId: Şirket kodu eğer tablonuz şirketler üstü değilse bu alan otomatik hangi şirkette işlem yaparsanız o şirket kodu ile dolar.

RecVersion: Kısaca aynı anda iki kullanıcının aynı kaydı güncellemesini engellemek için tutulan rasgele bir sayıdır. Her güncellemede değişir.

Partition: Şirketler üstü bir gruplamanız varsa örneğin finans şirketleri veya üretim şirketleri gibi bunları ayırmak için kullanılır. Şu anda çok aktif kullanılmıyor.

RecId: Tablo bazında tekil int64 tipinde bir anahtardır.

Resim-8

Bu yazıda tabloları size tanıtmaya çalıştım. Bu yazıda ancak kapıyı araladım diyebilirim. Çok fazla ayrıntı mevcut farklı yazılarla tabloları anlatmaya devam edeceğim.

Selamlar.

www.fatihdemirci.net

TAGs: X++,Tables, Azure, Azure DevOps, Microsoft Dynamics 365, MsDyn365FO, MsDyn365CE, MsDyn365

How to Set Up Azure DevOps Connection via Visual Studio in Dynamics 365 Finance and Operations Development Environment?

In this article, I will talk about what needs to be done after creating a new development environment. The first step is to log into Visual Studio. Then, I will explain how to connect to the Azure DevOps project. I intend to summarize the steps to be taken before starting development in a few articles.

In these installations, I will use the development environment we built on Azure. I explained how to deploy a development environment in my previous articles. Once the machine is deployed, you can download and connect Remote Desktop connection information via LCS. Currently Visual Studio 2015 comes installed, but there will be a migration to new versions of Visual Studio soon. Visual Studio must be opened with Run as administrator. For convenience, right click on Visual Studio and click Pin to taskbar.

Image-1

Right click on the Visual Studio icon in the task bar and click Properties

Image-2

Click Advanced from the screen that opens. Check Run as administrator and click OK. This eliminates the need to do this every time you open it. Also, if you forget this, some functions do not work, and you will waste time.

Image-3

We need to Sign in with an account authorized for Visual Studio.

Image-4

I use an account created for this project.

Image-5

Software developers like to use Dark themes, but I use the classic theme because I have difficulty reading on dark screen.

Image-6

If there is no problem with your user’s authorization, your login will be completed. Dynamics 365 menu is available. I will talk about the menus here in my next articles. Now open the Team Explorer screen.

Image-7

Open the connection page with the Manage Connections link.

Image-8

Nothing appears in the Select a Team Foundation Server section. The reason for this is that the user login I used to connect to Visual Studio is not authorized for the Azure DevOps project that we connect to LCS.

Image-9

Open the Azure DevOps project and invite the user to the project by clicking Invite.  Of course, you must log in with an authorized user in Azure DevOps. Since I have the information of the Admin account, I logged in with it.

Image-10

When I type my username from the search, it automatically appears. I select and add it.

Image-11

Also, since I want to have Admin rights in this project, I add my user to the Administrators section as shown in the picture.

Image-12

When I looked back to Visual Studio, I could see my project. To do this, you need to restart Visual Studio. Refreshing doesn’t work.

Image-13

When you click Connect, you will be connected to your Azure DevOps project. You will see the link under Visual Studio Team Services as shown below.

Image-14

In this article, I talked about the initial settings required for a new Devbox. First of all, it is very important to open Visual Studio with admin rights. It is often forgotten, so I explained how to make a definition to automate it. Then, we established the connection to our Azure DevOps project, which is required for the version control of our application. Now we can move on to the other settings. I will talk about Model, Package and Branch setups in my next articles.

Regards.

www.fatihdemirci.net

TAGs: Microsoft Life Cycle Services, LCS, Azure, Azure DevOps, Microsoft Dynamics 365, MsDyn365FO, MsDyn365CE, MsDyn365, Dynamics 365 Insights Power BI, Power Automate, Power Apps, Power Virtual Agents, what is Dynamics 365, Dynamics 365 ERP, Dynamics 365 CRM
Page 14 of 16« First...101213141516