Introduction to Building and Deploying in UDE
Introduction to Building and Deploying in UDE
In the previous part of the series, we looked at how to place custom metadata in a Git repository, version model and project files, and design an appropriate branch structure for UDE.
Our code is therefore no longer a set of files that exists only on a developer’s computer; it is now a traceable source shared by the team. Committing the code to the repository, however, does not mean that development is complete. The next question is a familiar one: does the code actually build, and how do we run it in the connected online UDE environment?
With the classic development VM approach, both steps usually took place on the same machine, so we did not need to think much about the boundary between them. Visual Studio, metadata, the compiler, AOS, and often SQL Server were all hosted on the same VM. In UDE, the development tier and the execution tier are physically separated.
The code and metadata are on our local machine, while the runtime that executes the X++ code is in the cloud. Build and deployment must therefore be treated as two distinct steps.
In this article, we will focus on the following topics:
- What a local build means in UDE
- The differences between project, model, and package from a build perspective
- Project Build, Rebuild, and Model Build options
- The binary/package output produced by a local build
- Full and incremental deployment options for the connected online UDE environment
- When database synchronization is required
- The difference between a deployable package and a Power Platform unified package
- A practical daily build and deployment workflow
Scope of this article: This part does not build an Azure DevOps YAML pipeline from beginning to end. We will first clarify local builds and deployment to an online UDE environment. Automated builds, NuGet packages, XppCreatePackage@3, and pipeline artifacts will be covered in more detail in the next part.
Why Is the Build Model Different in UDE?
The most fundamental change in UDE is the separation of the development tier from the execution tier.
The local development machine contains:
- Visual Studio 2022
- The Finance & Operations Visual Studio extension
- Custom metadata
- Microsoft reference metadata
- The X++ compiler and related development tools
- Visual Studio solution and project files
The unified developer environment in the cloud hosts the application runtime and business data.
| Local Metadata→ | Build / Compile→ | Local Binary→ | Deploy→ | Online UDE Runtime |
In day-to-day development, the separation translates into a straightforward sequence:
1. Write the X++ code in local Visual Studio.
2. Build the code on the local machine.
3. If the build succeeds, deploy the change to the connected online UDE environment.
4. Run database synchronization when required.
5. Test through the browser or attach the debugger, because the code now runs in the cloud runtime.
A successful local build does not automatically update the online environment. Build and deployment are separate operations. Likewise, pushing code to Git does not change the online UDE runtime.
Distinguishing Project, Model, and Package
To understand the build and deployment process, we first need to distinguish three Dynamics 365 F&O concepts: project, model, and package.
These terms are sometimes used interchangeably in everyday conversation. Expressions such as “I built the model,” “I built the project,” and “I deployed the package” may sound as though they describe the same operation, but technically they refer to different levels.
Project
A Visual Studio project is a development organization that groups the objects a developer is working on.
For example, a project for a feature might contain:
- A table extension
- A form extension
- A class
- A menu item
- A security privilege
A project is not itself a deployment unit. It helps us organize development, build a selected group of objects, and manage them through Solution Explorer.
Model
A model is a logical group of metadata and source files. DMRCustomizations and DMRIntegrations are typical examples.
A model can contain classes, tables, forms, data entities, labels, security objects, and other metadata. It also carries information such as publisher, layer, version, and dependencies.
This is why the previous part specifically placed the Descriptor folder under version control. Model definition information is also important during the build process.
Package
A package defines the compilation and deployment boundary in Dynamics 365 F&O. A package can contain one or more models, and every model belongs to a package.
In new development, the model and package often have the same name because we usually select “Create new package” while creating the model. This can make the distinction less visible in daily work.
Consider the following structure:
Package: DMRCustomizations
  Model: DMRCustomizations
  Model: DMRLocalization
Here, two separate models belong to the same compilation and deployment package. A change in one model can therefore affect package dependencies during the build.
| Concept | Primary purpose | Role in build/deployment |
|---|---|---|
| Project | Visual Studio structure used to organize development objects | Builds the selected development objects. |
| Model | Logical group of metadata and source elements | Belongs to a package; dependency and descriptor information matters. |
| Package | Compilation and deployment unit | Defines the boundary for binary generation and deployment. |
What Actually Happens During a Local Build?
Selecting Build in Visual Studio does more than perform an X++ syntax check. The compiler processes the metadata in the selected project or model, resolves references, and produces executable binaries.
At a high level, the flow is:
| X++ / Metadata XML→ | Reference Metadata→ | X++ Compiler→ | Package Binary→ | Deployable Output |
During the build, the compiler must access both our custom metadata and the Microsoft reference metadata. The Configure Metadata settings from the earlier parts of this series are therefore directly involved.
For example, the custom metadata folder might be:
C:\CustomXppMetadata\MetadataReference metadata points to the PackagesLocalDirectory content downloaded for the relevant application version.
The two sides must be compatible in terms of version and dependencies. If our code extends an Application Suite class, the compiler must be able to find that reference in the reference metadata.
Practical rule: When a build fails, do not immediately focus only on the last line you changed. First identify the error category. A missing reference, an incorrect model dependency, a descriptor issue, or a metadata configuration problem can also appear as a compile error.
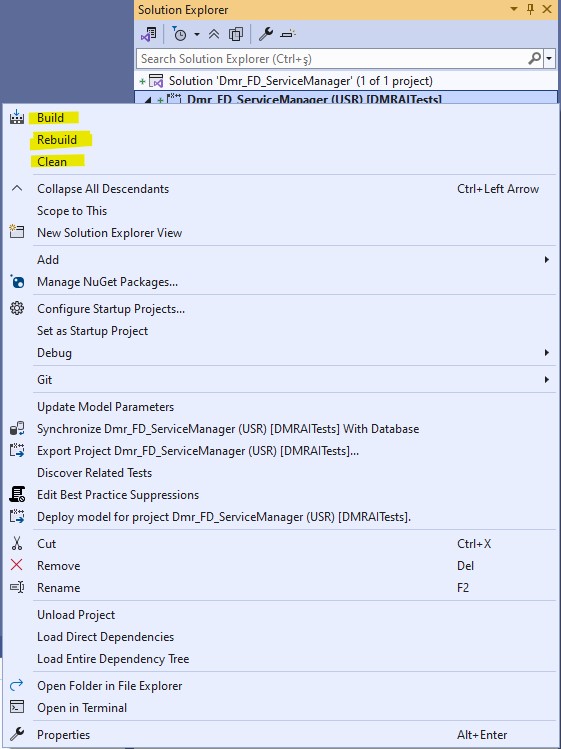
Project Build, Rebuild, and Model Build
Project Build
Project-level Build is the option we will use most often during daily development.
Right-clicking a project in Solution Explorer and selecting Build compiles the developments included in that project. For a small class change or a form extension, this is generally sufficient as the first validation step.
I prefer to start with a project build because it provides fast feedback in the smallest possible scope, making errors quicker to identify and easier to understand.
Rebuild
Rebuild cleans and recompiles the selected scope, so it is more expensive than a normal Build.
Using Rebuild for every small change is usually unnecessary. It can, however, provide a cleaner validation after reference changes, branch switches, or when the build output appears inconsistent.
There is no single recipe, but responding to every build error with a Rebuild can unnecessarily slow development on large models.
Model / Package Build
A project build gives fast feedback for the feature being developed. As we approach a release, or when we need a broader consistency check, a wider build scope is appropriate.
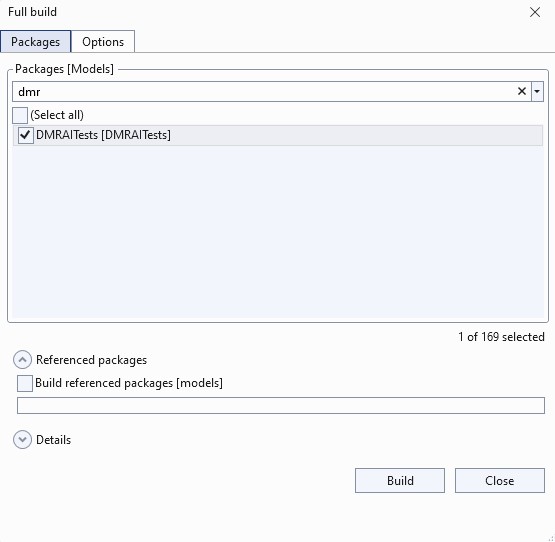
From Dynamics 365 > Build models in Visual Studio, we can select one or more modules/packages and run a full build. The same dialog can also deploy the result to the online environment and control database synchronization.
Where Does the Code Run After a Successful Build?
An important UDE principle appears again here: X++ code does not run on the local machine.
The compiler runs locally, metadata is stored locally, and binaries are produced locally. The actual execution point for business logic, however, is the connected cloud runtime.
These two statements therefore mean different things:
- “The code built successfully.”
- “The code was deployed to the online UDE environment and is running.”
The first confirms that compilation succeeded. The second confirms that the change was transferred to the cloud runtime.
This distinction explains the familiar situation in which the build succeeds but the browser still runs the old code. If deployment did not take place after the build, the online runtime continues to use the previous binary.
For developers coming from classic development VMs, this is one of the most important changes to become comfortable with. Build, deployment, and runtime used to exist on the same machine and could easily blur together. In UDE, the separation between build and runtime is explicit, so a deployment step now stands between “Build succeeded” and “the change is actually running.”
Deployment Options for the Online UDE Environment
Visual Studio provides several ways to send code to the online unified developer environment. The appropriate choice depends on the scope of the change.
For daily use, I group the options into four categories.
1. Deploy Models / Full Model Deploy
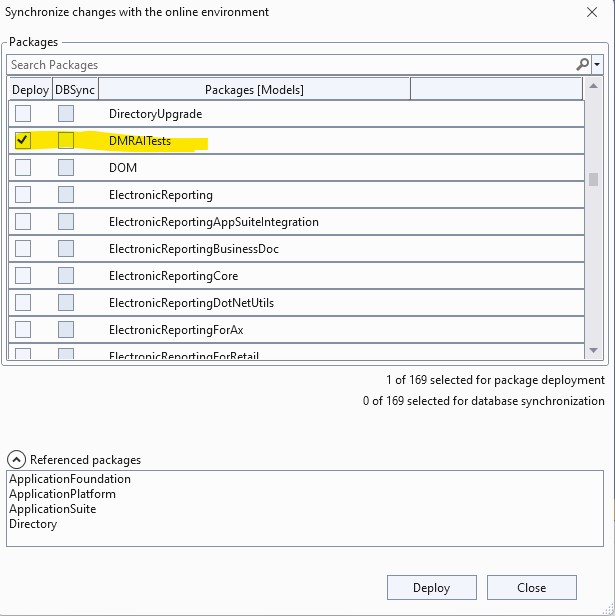
Use Dynamics 365 > Deploy > Deploy models to send one or more previously built modules/packages directly to the online environment.
The dialog lets us select the packages to deploy and, when needed, run database synchronization for the relevant modules.
This option is particularly clear when we want to redeploy an entire model in a controlled manner.
2. Automatic Deployment After a Full Build
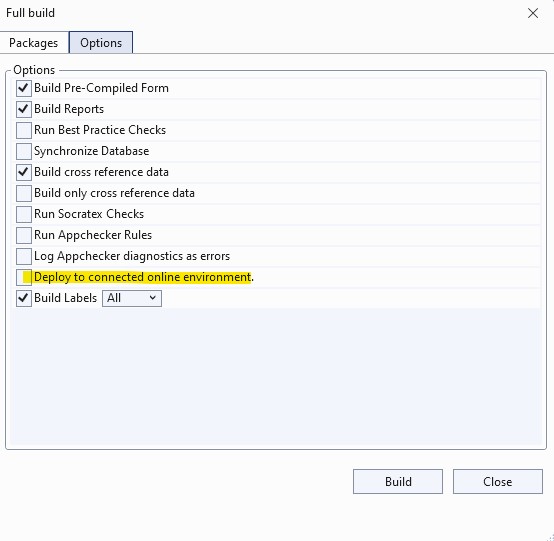
If “Deploy to connected online environment” is enabled in Dynamics 365 > Build models, the selected model/package can be deployed automatically after the full build completes.
The same options also control database synchronization behavior.
This approach is useful when we want a more comprehensive validation at model level.
3. Incremental Deployment with Project Build / Rebuild
Incremental deployment is one of the most practical choices for daily development.
When “Deploy changes to online environment” is enabled in Visual Studio settings, a project Build/Rebuild from Solution Explorer can send the parts changed since the last successful deployment to the online environment.
Sending only changed components instead of deploying a large model each time can save significant time. This is the approach I would normally prefer for classes, form extensions, and small metadata changes in the daily inner loop.
4. Deploy Model for Project
We can also right-click the project in Solution Explorer and select “Deploy model for project.”
This sends changes made to the project’s module since the last successful deployment. An important detail is that this option does not run database synchronization for the module.
It is therefore suitable for a class or business-logic-only change. For a table field or another change that affects the database schema, synchronization must be considered separately.
A potentially confusing distinction
Deploy Models and Deploy Model for Project have similar names, but they serve different purposes.
Deploy Models operates at package/module level and focuses on sending one or more packages to the online environment in a controlled way.
Deploy Model for Project targets changes made since the last deployment for the model associated with the project. It is therefore usually faster and more practical during daily development.
| Scenario | Approach | DB Sync |
|---|---|---|
| One or more previously built modules | Dynamics 365 > Deploy > Deploy models | Optional |
| Deploy together with a full build | Dynamics 365 > Build models + Deploy to connected online environment | Optional |
| Quickly send daily changes | Project Build/Rebuild + Deploy changes to online environment | According to project settings |
| Deploy the project’s module changes | Right-click project > Deploy model for project | Does not run automatically |
| Database synchronization only | Dynamics 365 > Synchronize database | Runs for all models |
When Is Database Synchronization Required?
Deployment and database synchronization are not the same operation.
Changing business logic in a class usually does not change the database schema. Adding a table field, index, relation, or certain entity changes, however, requires the physical database structure to be aligned with metadata.
In such cases, database synchronization is run after deployment or as part of the build/deployment settings.
| Change | Typical DB Sync requirement |
|---|---|
| Add a new method to a class | Usually no |
| Change business logic in an existing method | Usually no |
| Change control behavior through a form extension | Usually no |
| Add a field through a table extension | Yes |
| Change an index, relation, or other schema-affecting metadata | Yes |
| Change the underlying schema of a data entity | Depends on the change; synchronization often needs to be checked |
Running a full DB Sync after every deployment is not automatically safer. Full synchronization can take time and unnecessarily slow the development inner loop.
My approach is to keep deployment as lightweight as possible when there is no schema change, and consciously include synchronization when the schema is affected.
Where Can We Monitor Deployment Logs?
Deployment in UDE should not be thought of as copying files to a local AOS. Visual Studio communicates with a cloud endpoint, and the deployment operation can be monitored in the Output window.
The “FinOps Cloud Runtime” output channel is particularly important.
It shows whether deployment started, whether it completed, and, when an error occurs, links to the relevant logs.
Before moving from “Build succeeded” to browser testing, it is a useful habit to verify that deployment also completed successfully.
Be Careful When Switching Branches
The previous part discussed feature, dev, release, and main branches. In UDE, switching branches also has deployment consequences.
The online UDE environment does not know which local Git branch you are using. It runs whichever binary was deployed most recently.
For example, after deploying changes from feature/A, we may switch the local repository to feature/B. Local metadata changes, but the online runtime is not automatically rolled back.
Projects in which several developers share the same UDE environment therefore need discipline between version control and the deployed state.
Important: A developer-focused UDE environment can be shared by more than one developer. If different branches are deployed without control, the online environment may no longer represent a clean state of any single repository branch. Git and Pull Request discipline is therefore not merely a source-control concern; it is also required to know what code is running in the environment.
A team can adopt one of the following rules:
- Use a separate developer-focused UDE environment for each developer.
- Restrict the branch that may be deployed to a shared UDE environment.
- Validate feature development with local builds and deploy to the shared environment only at dev-branch level.
- After branch switches, make the commit represented by the environment state visible to the team.
The best choice depends on team size and the licensing/environment strategy. What should be avoided is allowing everyone to deploy uncontrolled changes from different feature branches to the same cloud runtime, because the environment quickly becomes difficult to debug.
What Is a Deployable Package?
The deployment methods covered so far are inner-loop deployments from a developer’s Visual Studio instance to the connected online UDE environment.
When a project begins moving controlled releases to UAT, sandbox, or production environments, package generation becomes relevant.
In Dynamics 365 F&O, a deployable package is one or more AOT packages prepared for deployment. It can include model metadata, binaries, reports, and related runtime resources.
The Application/AOT Deployable Package format familiar from the classic LCS era was primarily used with the LCS Asset Library and environment update process.
The key distinction is:
| Local Development→ | Build→ | Direct UDE Deploy |
This is the daily developer inner loop.
| Git→ | Automated Build→ | Deployable / Unified Package→ | Release / Deploy Pipeline |
This is the controlled release flow used across teams and environments.
We do not need to create a deployable package after every class change. Visual Studio incremental deployment is much better suited to daily development. Package generation becomes meaningful at the release and CI/CD boundary.
What Is a Power Platform Unified Package?
One important deployment change introduced with the Unified Experience is the Power Platform unified package format.
Pipeline deployments to Power Platform unified environments use this new package format. In addition to X++ runtime output, it can include Dataverse solutions in the same deployment unit when required.
The XppCreatePackage@3 task in the current Dynamics 365 Finance and Operations Tools for Azure DevOps can generate a Power Platform unified package. The same build can optionally produce a traditional LCS-format deployable package for compatibility.
We will not configure the task in this article, but the conceptual distinction is:
| Output | Where is it used? | Note |
|---|---|---|
| Direct model/incremental deployment | The developer’s connected online UDE | Daily inner loop; no separate release package is required. |
| Traditional deployable package | Classic/LCS-based deployment scenarios and compatibility needs | Packages AOT packages for deployment. |
| Power Platform unified package | Unified environment CI/CD deployment | Can carry X++ output and Dataverse solutions in one package. |
Why Does Version Information Matter in a Unified Package?
When an automated build creates a package, platform and application version information is written into it. The compiler/reference packages used during the build must therefore be compatible with the target environment version.
This will become clearer in the next part when we discuss NuGet packages. The X++ build reference packages in packages.config determine the platform and application references used by the pipeline for compilation.
For now, the rule is simple: do not mix the build reference set and the target environment version arbitrarily. Align the build configuration with the target version in a controlled manner.
My Recommended Daily Development Workflow
Once these options are reduced to a daily workflow, the process is not particularly complicated.
Assume that we are developing a sales order control and using this feature branch:
feature/1450-sales-order-control1. Bring the branch up to date.
git checkout feature/1450-sales-order-control
git fetch origin
git merge origin/dev
2. Check the Visual Studio metadata configuration and the connected environment.
If several UDE environments are in use, make sure the active metadata configuration and the environment selected through Tools > Connect to Dataverse represent the same target.
3. Implement the change and start with a project build.
Resolving compile errors in a small scope is faster.
4. Determine whether the change affects the schema.
A class change will usually not require DB Sync. If a field was added through a table extension, include synchronization in the plan.
5. Send the change to the online UDE using incremental deployment.
If Deploy changes to online environment is enabled, project Build/Rebuild can send the changes. Deploy model for project is another option.
6. Check the FinOps Cloud Runtime output.
Do not move to testing until deployment has actually completed.
7. Test the scenario in the browser.
Run the class, form, or relevant business process in the online UDE runtime.
8. Attach the debugger when necessary.
If build and deployment succeed but behavior is not as expected, use Dynamics 365 > Launch debugger to attach to the cloud runtime.
9. Commit and push the change, then continue with the Pull Request flow.
git status
git add .
git commit -m "AB#1450 Add sales order control"
git push| Code→ | Project Build→ | Incremental Deploy→ | DB Sync if required→ | Test / Debug→ | Commit / PR |
When Does a Full Build / Full Deployment Make Sense?
A common question is: if incremental deployment is so fast, why do we occasionally run a full build or full deployment?
Incremental deployment is ideal for the daily development loop, but dependency changes, major branch switches, or uncertainty about the environment state may require broader validation. In those cases, a full build and full deployment can provide more reliable results.
A broader build/deployment can be safer when:
- Model or package dependencies have changed.
- We switched branches after working on another branch for a long time.
- Several metadata objects changed as part of the same feature.
- An ISV/reference module was updated.
- We are unsure about the environment state after incremental deployment.
- We need a model/package-level validation before a release.
The goal is not to respond to every problem with “clean everything, run a full rebuild, and perform a full DB Sync.” It is more efficient to understand the scope of the change first and then choose the appropriately weighted build and deployment option.
Common Problems After a Build
1. The build succeeded, but the browser runs the old code
First check whether deployment actually occurred. The local build can succeed even though the change was never sent to the online runtime.
2. The code does not build and a reference cannot be found
Check model dependencies, reference metadata configuration, and the Microsoft metadata version being used.
3. A table change was deployed, but the field is missing or a SQL error occurs
The schema change may require database synchronization.
4. I switched branches, but the environment still shows the previous behavior
Changing the Git branch does not automatically roll back the deployment in the cloud runtime. Build and deploy the correct model/package output for the new branch.
5. Incremental deployment did not produce the expected result
When dependency changes are broad or the environment state is uncertain, consider a more comprehensive model/package build and full deployment.
6. Every build takes too long
Check whether a full model rebuild, full deployment, and full database synchronization are being run for every change. Project build plus incremental deployment is much lighter for the daily inner loop.
Do Not Confuse Developer Deployment with Release Deployment
In my view, this is the most important point in this part of the series.
Deploying from Visual Studio to an online UDE is a developer inner-loop operation. We should not manage a production release from a developer’s computer in the same way.
The source for production code should be a controlled commit in the Git repository, not a developer’s local folder. The build should run reproducibly in an Azure DevOps pipeline.
The ideal flow is approximately:
| Feature / Dev Branch→ | Pull Request→ | Build Pipeline→ | Unified Package→ | Deploy Pipeline→ | Target Environment |
Instead of relying on a statement such as “it built successfully on Fatih’s computer,” we can then trace which pipeline built a particular commit and which artifact was deployed to each environment.
This is where the real value of considering UDE together with Git and pipelines becomes apparent.
What Must Be Ready in the Repository for Package Generation?
The importance of the repository structure from the previous part is now much clearer.
At minimum, automated builds require the following items in the repository:
- Custom X++ metadata
- Model descriptor files
- Visual Studio .rnrproj / solution files for the packages to be built
- The build pipeline YAML file
- packages.config
- nuget.config
- Any required build scripts and controlled third-party references
This is why the previous article recommended versioning these files together. The pipeline must take not only X++ XML files from source control, but also the files that define how the build is performed.
Preparing for the Next Part: Azure DevOps Build Pipeline
At this point, we have completed the inner loop between local development and the cloud runtime.
We can build code locally, deploy it to an online UDE in full or incrementally, and manage database synchronization according to the type of change.
The next step is to move this process away from the developer’s computer.
A clean Azure DevOps agent must be able to retrieve the repository, build the same code, and generate a reusable package for release.
The following components will be involved:
- Dynamics 365 Finance and Operations Tools Azure DevOps extension
- Power Platform Build Tools
- X++ Compiler and Build Reference NuGet packages
- Azure Artifacts feed
- packages.config and nuget.config
- VSBuild / MSBuild step
- XppCreatePackage@3
- Power Platform Unified Package
- Pipeline artifact and release/deployment approach
In UDE, it is particularly important to understand not only the traditional deployable package, but also the Power Platform unified package.
In the next part, we will create an Azure DevOps X++ build pipeline from scratch, compile the X++ code from the repository on a Microsoft-hosted agent, and generate a unified package.
Conclusion
Build and deployment in UDE can initially appear more complex than on a classic development VM because the development and execution layers are now separated.
Once the model is understood, the process becomes clearer:
1. Code and metadata reside on the developer’s local machine.
2. The local compiler performs the build.
3. The change is deployed to the cloud runtime so that the X++ code can execute.
4. Database synchronization is managed separately when the schema changes.
5. Incremental deployment provides a fast inner loop for daily development.
6. For releases, Git becomes the source of truth, and build/deployment is managed through pipelines.
It is also worth restating the distinction between model and package: a model is the logical design-time grouping of development elements, while a package defines the compilation and deployment boundary.
Daily development does not require a deployable package for every change. A local build plus incremental UDE deployment may be sufficient. Automated builds and unified packages become relevant for controlled releases to UAT and production.
My simplest summary of a healthy UDE development workflow is:
| Traceable Code in Git→ | Fast Local Build→ | Controlled UDE Deployment→ | Repeatable Pipeline Release |
In the next part of the series, we will build an X++ Azure DevOps pipeline from scratch and use a real example to cover the NuGet feed, packages.config/nuget.config, YAML build steps, XppCreatePackage@3, and Power Platform unified package generation.
Regards.
Fatih Demirci
www.fatihdemirci.net




No comments yet.