What makes a good Dynamics AX Project Manager?
Source : http://www.cognitive-group.com
Archive for the ‘ Dynamics AX ’ Category
Merhaba
Vergi kimlik numarasının bir algoritması var. Bu algoritma sayesinde girilen numaranın geçerli olup olmadığını tespit edebilirsiniz. Bu kontrolü yapacak bir fonksiyona ihtiyacım vardı. İnternette farklı dillerde yazılmış bir çok örnek buldum ancak X++ ile yazılmış bulamadım. Global sınıfına vergiKimlikNoValidation_FD adında bir metot yazdım.
// FD : Vergi kimlik no doğrulama private boolean vergiKimlikNoValidation_FD(int64 kno) { int lastDigit; int total = 0; int i ; int j = 1000000000; int dig; int v1 , v11; ; if (strLen(int2str(kno)) != 10) return false; lastDigit = kno mod 10; for (i = 9; i >= 1; i--) { dig = (kno div j) mod 10 ; j = j / 10 ; if (dig < 0) return false; v1 = ((dig + i) mod 10); v11 = (v1 * power(2, i)) mod 9; if (v1 != 0 && v11 == 0) v11 = 9; total += v11; } if (total mod 10 == 0) total = 0; else total = (10 - (total mod 10)); if (total == lastDigit) return true; else return false; }
Selamlar.
Hi,
As you know with Dynamics AX 2012, you have to create a product first and then release to the product to companies. You can release which company do you want. In my company there is a request to release product all companies automaticly. I have some research and found good post and methods about it. I wrote a class named SECReleaseProductForAllCompanies and make it MenuItemButton as you can see below.
Let see methods of class now.
Class decleration;
// FD Relaese products for all companies class SECReleaseProductForAllCompanies { EcoResProductDisplayProductNumber productNumber; EcoResProduct ecoResProduct; }
Main method; Gets all the selected records and calls run.
public static void main(Args args) { SECReleaseProductForAllCompanies releaseProductForAllCompanies; ecoResProduct EcoResProduct; FormDataSource fdsEcoResProduct; ; fdsEcoResProduct = args.record().dataSource(); for (EcoResProduct = fdsEcoResProduct.getFirst(true) ? fdsEcoResProduct.getFirst(true) : fdsEcoResProduct.cursor(); EcoResProduct; EcoResProduct = fdsEcoResProduct.getnext()) { releaseProductForAllCompanies = new SECReleaseProductForAllCompanies(); releaseProductForAllCompanies.parmProductNumber(ecoResProduct.DisplayProductNumber); releaseProductForAllCompanies.run(); info(strfmt("%1 %2 product successfully released to all companies. ", EcoResProduct.productNumber() , EcoResProduct.productName() )); } }
Parm method;
public EcoResProductDisplayProductNumber parmProductNumber( EcoResProductDisplayProductNumber _productNumber = productNumber) { productNumber = _productNumber; return productNumber; }
Run method;
private void run() { ; this.releaseProduct(); }
Release method; You can use EcoResProductReleaseManagerBase::releaseProduct() static method instead of this.
private void releaseProduct() { InventTable inventTable; InventTableModule inventTableModule; NumberSequenceTable numberSequenceTable; ItemId itemId; InventItemSetupSupplyType inventItemSetupSupplyType; CompanyInfo companyInfo; EcoResStorageDimensionGroupProduct ecoResStorageDimensionGroupProduct; EcoResTrackingDimensionGroupProduct ecoResTrackingDimensionGroupProduct; EcoResStorageDimensionGroupItem ecoResStorageDimensionGroupItem; EcoResTrackingDimensionGroupItem ecoResTrackingDimensionGroupItem; ; select firstOnly ecoResProduct where EcoResProduct.DisplayProductNumber == productNumber; while select companyInfo where companyInfo.DataArea != "DAT" { changecompany (companyInfo.DataArea) { ttsBegin; inventTable = null; inventTableModule = null; inventItemSetupSupplyType = null; ecoResStorageDimensionGroupProduct = null; ecoResTrackingDimensionGroupProduct = null; ecoResStorageDimensionGroupItem = null; ecoResTrackingDimensionGroupItem = null; numberSequenceTable = InventParameters::numRefItemId().numberSequenceTable(); if (!numberSequenceTable.RecId || numberSequenceTable.Manual) { itemId = ecoResProduct.productNumber(); } else { itemId = NumberSeq::newGetNumFromId(numberSequenceTable.RecId).num(); } inventTable.initValue(); inventTable.initFromEcoResProduct(ecoResProduct); inventTable.ItemId = ItemId; inventTable.NameAlias = ecoResProduct.SearchName; inventTable.insert(true); inventTableModule.initValue(); inventTableModule.ItemId = inventTable.ItemId; inventTableModule.ModuleType = ModuleInventPurchSales::Invent; inventTableModule.insert(); inventTableModule.initValue(); inventTableModule.ItemId = inventTable.ItemId; inventTableModule.ModuleType = ModuleInventPurchSales::Purch; inventTableModule.insert(); inventTableModule.initValue(); inventTableModule.ItemId = inventTable.ItemId; inventTableModule.ModuleType = ModuleInventPurchSales::Sales; inventTableModule.insert(); InventItemLocation::createDefault(inventTable.ItemId); inventItemSetupSupplyType.initValue(); inventItemSetupSupplyType.ItemId = inventTable.ItemId; inventItemSetupSupplyType.ItemDataAreaId = inventTable.DataAreaId; inventItemSetupSupplyType.insert(); ecoResStorageDimensionGroupProduct = EcoResStorageDimensionGroupProduct::findByProduct(ecoResProduct.RecId); ecoResTrackingDimensionGroupProduct = EcoResTrackingDimensionGroupProduct::findByProduct(ecoResProduct.RecId); if (ecoResStorageDimensionGroupProduct.RecId) { ecoResStorageDimensionGroupItem.ItemDataAreaId = inventTable.DataAreaId; ecoResStorageDimensionGroupItem.ItemId = inventTable.ItemId; ecoResStorageDimensionGroupItem.StorageDimensionGroup = ecoResStorageDimensionGroupProduct.StorageDimensionGroup; ecoResStorageDimensionGroupItem.insert(); } if (ecoResTrackingDimensionGroupProduct.RecId) { ecoResTrackingDimensionGroupItem.ItemDataAreaId = inventTable.DataAreaId; ecoResTrackingDimensionGroupItem.ItemId = inventTable.ItemId; ecoResTrackingDimensionGroupItem.TrackingDimensionGroup = ecoResTrackingDimensionGroupProduct.TrackingDimensionGroup; ecoResTrackingDimensionGroupItem.insert(); } ttsCommit; } } }
You can download class from here.
Thanks Sreenath Reddy G. for methods.
Until next time.
Merhaba
Ax 2012 ile finansal boyut yapısının tamamen değiştiğini daha önce ifade etmiştim. Bu değişiklik bize bazı durumlarda fazladan yazılım yükü oluşturuyor. Bunlardan biride bir boyuttaki belli bir boyutun değerini kod ile değiştirmek. Şöyle örnekleyeyim.
Bir müşteriniz var ve departman boyutunda 0026 yazıyor. Siz bunu 0030 ile değiştirmek istiyorsunuz.
Ax 2009 ‘da
custTable.Dimension[2] = “0030″; gibi basit bir kod ile bunu yapabilirdiniz.
Ax 2012 ‘de ise şöyle bir metoda ihtiyacınız var;
static void FD_ChangeDimValue(Args _args) { CustTable custTable; DimensionAttributeValueSetStorage dimensionStorage; DimensionAttribute deparmentDimensionAttribute; DimensionAttributeValue newDepartmentValue; ; ttsBegin; // Müşteri seçiliyor custTable = CustTable::findRecId(22565423201,true); // Değiştirelecek boyut seçiliyor deparmentDimensionAttribute = DimensionAttribute::findByName("Department"); // Değiştirilecek boyut için değer seçiliyor. newDepartmentValue = DimensionAttributeValue::findByDimensionAttributeAndValue(deparmentDimensionAttribute, "0030"); dimensionStorage = DimensionAttributeValueSetStorage::find(CustTable.DefaultDimension); dimensionStorage.addItem(newDepartmentValue); CustTable.DefaultDimension = dimensionStorage.save(); CustTable.update(); ttscommit; }
Selamlar.
Merhaba
Yeni projemde yapmakta olduğum bir entegrasyon işi için farklı bir sql server’a bağlanıp veri almam gerekiyordu. Yaptığım çalışmayı sizlerle paylaşıyorum.
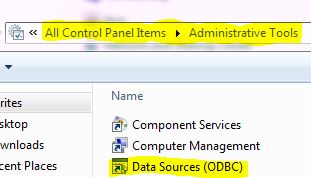
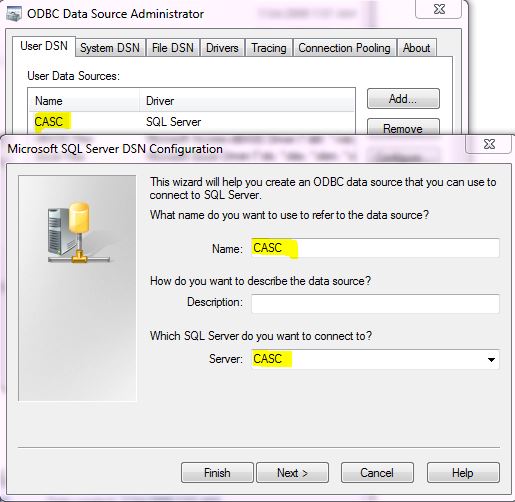
İlk iş bir ODBC bağlantısı kurmak. Bağlantıyı ister AOS’a isterseniz Client makineye kurabilirsiniz. Ancak AOS’ta olması daha mantıklı. Administrative Tools / Data Sources (ODBC) ‘a tıklayarak bağlanmak istediğiniz Sql için Data Source Name (DSN) oluşturmalısınız. Oluşturduğumuz DSN’i kodda kullanacağız.
static public void fd_ConnectSQLthrougODBC(Args _args) { LoginProperty loginProperty; OdbcConnection odbcConnection; Statement statement; ResultSet resultSet; str sql; SqlStatementExecutePermission perm; FDTransferCardTable transferCardTable; ; loginProperty = new LoginProperty(); loginProperty.setDSN("CASC"); //Tanımladığımız DSN loginProperty.setDatabase("SWHSystem"); odbcConnection = new OdbcConnection(loginProperty); if (odbcConnection) { sql = "SELECT * FROM Personnel "; perm = new SqlStatementExecutePermission(sql); perm.assert(); statement = odbcConnection.createStatement(); resultSet = statement.executeQuery(sql); while (resultSet.next()) { transferCardTable.clear(); transferCardTable.ObjectID = resultSet.getString(1); transferCardTable.Name = resultSet.getString(2); transferCardTable.Protected = str2num(resultSet.getString(6)); transferCardTable.PartitionID = resultSet.getString(7); transferCardTable.LastName = resultSet.getString(10); transferCardTable.FirstName = resultSet.getString(11); transferCardTable.MiddleName = resultSet.getString(12); transferCardTable.PersonnelTypeID = resultSet.getString(13); transferCardTable.Template = resultSet.getString(14); transferCardTable.Temporary = str2num(resultSet.getString(15)); transferCardTable.Disabled = str2num(resultSet.getString(22)); transferCardTable.Text1 = resultSet.getString(27); transferCardTable.Text12 = resultSet.getString(38); transferCardTable.insert(); } resultSet.close(); statement.close(); } else { error("ODBC ile veritabanına bağlantı kurulamadı."); } }
Selamlar.
Merhaba
Bu yazımda AIF servis sınıfları kullanarak bir satınalma siparişi oluşturacağım. Örneği inceleyelim.
static void FD_CreatePurchaseOrder(Args _args) { PurchTable purchTable; PurchLine purchLine; AxPurchTable axPurchTable; AxPurchLine axPurchLine; // Kullanacağımız sınıflar InventDim inventDim; ; purchTable.initFromVendTable(VendTable::find("2002")); axPurchTable = AxPurchTable::newPurchTable(purchTable); axPurchTable.parmPurchaseType(PurchaseType::Purch); axPurchTable.parmDocumentStatus(DocumentStatus::PurchaseOrder); axPurchTable.parmPurchName("Deneme siparişi"); axPurchTable.parmAccountingDate(08\06\2013); axPurchTable.parmDeliveryDate(08\06\2013); axPurchTable.parmItemBuyerGroupId("20"); axPurchTable.parmPurchPoolId("02"); axPurchTable.parmInventSiteId("2"); axPurchTable.parmPurchStatus(PurchStatus::Backorder); axPurchTable.doSave(); // İstediğimiz bilgileri doldurup kaydediyoruz. PurchTable'ı kendisi oluşturuyor. purchTable = axPurchTable.purchTable(); purchLine.initFromPurchTable(purchTable); inventDim.clear(); inventDim.InventLocationId = "11"; inventDim.InventSiteId = "1"; inventDim = inventDim::findOrCreate(inventDim); axPurchLine = AxPurchLine::newPurchLine(purchLine); axpurchLine.parmItemId("0004"); axPurchLine.parmPurchQty(2); axPurchLine.parmPurchPrice(10); axPurchLine.parmInventDimId(inventDim.inventDimId); axPurchLine.doSave(); // PurchLine oluşturuluyor. info(strfmt("%1 nolu sipariş oluşturuldu.",purchTable.PurchId )); }
Birden çok PurchLine satırını bu yöntemle oluşturamadım. Nasıl yapıldığını bilen varsa bana da bilgi versin, memnun olurum. Biraz araştırdım, yapılıp yapılamadığına dair bir bilgi bulamadım ama gördüğüm bütün örnekler tek satır üzerine yapılmıştı. Tek satır yapabilmek çok kullanışlı değil mutlaka bir yolu olmalı, eğer bir yolu yoksa bu sınıflar eksik olmuş demektir.
Selamlar.
Merhaba
Ax 2012 ile ilk karşılaştığımda eski versiyonlara göre yavaş olduğunu düşünmüştüm. Gerçekten de öyle, bir çok karşılaştırma örnekleriyle ispatlanmış. Ancak karşılaştırma yapmak çok doğru olmayabilir. Çünkü Ax 2012 tamamen farklı bir yapı. Arka planından tutun form yapısına, veri yapısına kadar bir çok değişiklik var. Bu yüzden karşılaştırma da doğru bir sonuç elde edemeyebiliriz.
İnternette performans ile ilgili bir çok kaynak mevcut. Özellikle Dynamics Ax Performance Team Blog‘u mutlaka takip etmek lazım.
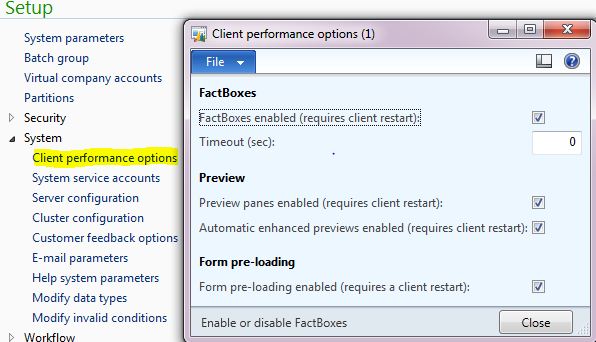
Gelelim yazının konusuna Fact box ve Preview pane‘lerin formlarda bir yavaşlığa sebep olduğu aşikar. Bu yüzden bunları kapatabileceğiniz bir kurulum sayfası yapılmış ancak canlı sistem için kapatmanız tavsiye edilmiyor. Burayı performans sorunlarının tespiti için kullanmalısınız.
System administation / Setup/ Client performance options menüsünden açtığınız formda açma kapatma zaman ayarı yapma gibi işlemleri yapabilirsiniz.
Selamlar.
Merhaba
Bu yazımda tablo kalıtımın da verilerin nasıl oluştuğundan ve Insert() , Delete() ve Update() işlemlerinden bahsedeceğim. Bir metotla türettiğimiz 3 tabloya da kayıt ekleyelim.
static void FD_InsertTableInheritance(Args _args) { FDCarTable carTable; FDTruckTable truckTable; FDMotorcycleTable mtcTable; ; carTable.clear(); carTable.carType = "Taxi"; carTable.numberOfDoors = 2; carTable.Plaque = "34 TK 4422"; carTable.Brand = "Ford"; carTable.Model = "Focus"; carTable.insert(); truckTable.clear(); truckTable.truckType = "Trayler"; truckTable.numberOfAxles = 5; truckTable.Plaque = "34 sdr 54"; truckTable.Brand = "Merecedes"; truckTable.Model = "Truckes"; truckTable.insert(); mtcTable.clear(); mtcTable.motorcycleType = "Mobilet"; mtcTable.hasSidecar = false ; mtcTable.Plaque = "34 df 22"; mtcTable.Brand = "Hundai"; mtcTable.Model = "i345"; mtcTable.insert(); }
FD TruckTable
FDMotorcycleTable
FDVehicleTable
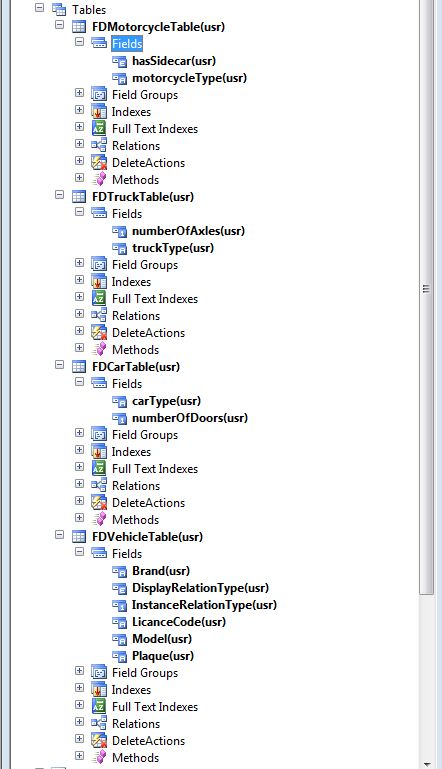
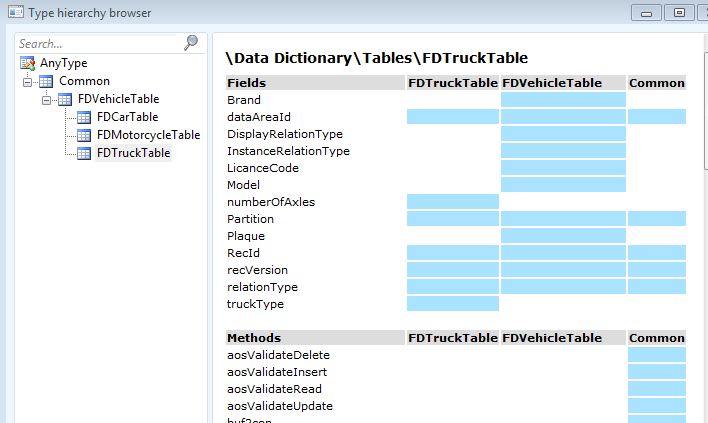
Gördüğünüz gibi biz alt tablolara kayıt ekledik temel tabloda da otomatik veri oluştu. Oluşan verinin hangi tablodan geldiğini InstanceRelationType alanından görebiliyoruz. Ayrıca isteğe göre eklenebilen DisplayRelationType alanından da görebiliyoruz. Türetilmiş tablo ile temel tablonun RecId’leri aynı oluştu. Tablo tarayıcısından türetilmiş tabloyu açtığınızda temel tablodaki alanları da görebiliyorsunuz. Zaten yukarıda yazdığımız metotta da temel tablonun alanlarını kullandık.
Update işleminde de aynı mantık geçerli , istediğiniz tablo değişkeni üzerinden güncelleme yapabilirsiniz. Basit bir örnek yapalım.
static void FD_UpdateTableInheritance(Args _args) { FDCarTable carTable; FDVehicleTable vehicleTable; ; ttsBegin; while select forupdate carTable { carTable.LicanceCode = "LisansFromCar"; carTable.numberOfDoors = 4; carTable.update(); // Hem temel tablo hemde türetilmiş tablo için güncelleme yapılabilir. } while select forUpdate vehicleTable where vehicleTable.InstanceRelationType == tableNum(FDCarTable) { vehicleTable.LicanceCode = "LisansFromVehicle"; vehicleTable.update(); // Sadece temel tablo için güncelleme yapılabilir. } ttsCommit; }
Delete işlemi de update işlemiyle aynı. Dikkat edilmesi gereken nokta temel tablodan bir satır silindiğinde türetilmiş tablodan da o satırın silineceğidir. Tablonun diğer metotlarında da sınıflarda bildiğimiz kalıtım mantığının aynısı çalışıyor.
Selamlar.
Merhaba
Bu yazımda ax 2012 ile hayatımıza giren tablolarda kalıtımdan bahsedeceğim. Bir çok eğitimimde ax tablolarının aslında birer sınıf olduğunu söylemiştim. Tabloların sınıf olması sebebiyle ezilebilen metotları vardı Insert() Update() gibi. Yeni metot yazılabiliyordu vs. Ancak biz tabloları birbirinden türetemiyorduk. Böyle bir desteği yoktu. Ax 2012 ile birlikte tablolar kalıtım özelliği gelmiş oldu böylece tablolar birbirinden türetebiliyoruz ve soyut (abstract) tablolar yapabiliyoruz. Türetilmiş tablolardan bahsederken Base Table ve Driven Table kullanılıyor. Bildiğiniz gibi Parent table ve Child table isimlendirmesi Foreign key ilişkilerinde kullanıyor. Tablolarda kalıtımın sistem tarafından desteklenmesi için bir çok temel yapıya eklemeler yapılmış, yeri geldikçe bahsedeceğim.
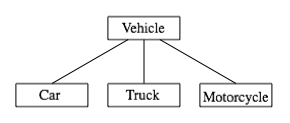
Klasik bir araç örneği ile tablolarda kalıtımı anlatmaya çalışacağım. Örnek yapımız şöyle olsun. Adım adım ilerleyelim.
public void insert() { dictenum enumtype = new dictenum(enumnum(fdvehicletype)); int enumvalue; ; if (this.displayrelationtype != fdvehicletype::unknown) { return; } enumvalue = enumtype.symbol2value(this.getinstancerelationtype()); if (enumvalue == 255) // symbol2value bu fonksiyon eğer çeviremezse 255 döndürür { throw error(strfmt('no %1 enum element found for enumvalue %2', enumstr(fdvehicletype), this.getinstancerelationtype())); } else { this.displayrelationtype = enumvalue; } super(); }
Yapıyı kurmuş olduk. Bir sonraki yazımda veri yönetimi ve tablo metotlarını inceleyeceğim.
Selamlar.
I need to change the grid row’s color in ax 2012 depend on the record status. The usual solution for this is to override the formdatasource method displayoption(). However, the form is listpage type and DataSource method can not be overiden. Customization works only in the interaction class for listpages. I try to do this modification in to the interaction class but i couldn’t . After some search i find a solution. Firts export listpage form to xpo file and change form’s FormTemplate property to the none. Now you can override the displayoption() method with this code.
public void displayOption(Common _record, FormRowDisplayOption _options) { #define.Green(0, 255, 0) #define.Orange(255, 128, 64) #define.LightGreen(64, 128, 128) #define.White(255, 255, 255) FRTImportTable importTable; ; importTable = _record.data(); if (importTable.Status == FRTImportStatus::PreInvoice) { _options.backColor(WinAPI::RGB2int(#Green)); _options.textColor(WinAPI::RGB2int(#White)); } else if (importTable.Status == FRTImportStatus::OpenInvoice) { _options.backColor(WinAPI::RGB2int(#Orange)); } else { _options.backColor(WinAPI::RGB2int(#LightGreen)); } super(_record, _options); }
Export new form to another xpo file. Open each xpo file and find displayoption() method from second xpo file. Copy and paste below code to the first xpo file between METHODS and ENDMETHODS branches.
SOURCE #displayOption #public void displayOption(Common _record, FormRowDisplayOption _options) #{ # #define.DarkGray(80, 80, 80) # #define.LightGray(200, 200, 200) # #define.LightGray2(20, 20, 20) # #define.White(255, 255, 255) # # FRTImportTable importTable; # ; # # importTable = _record.data(); # # if (importTable.Status == FRTImportStatus::PreInvoice) # { # _options.backColor(WinAPI::RGB2int(#DarkGray)); # _options.textColor(WinAPI::RGB2int(#White)); # } # else if (importTable.Status == FRTImportStatus::OpenInvoice) # { # _options.backColor(WinAPI::RGB2int(#LightGray)); # } # else # { # _options.backColor(WinAPI::RGB2int(#LightGray2)); # } # # # super(_record, _options); #} ENDSOURCE
Save the first xpo and import to the ax.
Open your listpage form now you see the colors.
This is not a proper solution but i couldn’t find any other if you do let me know.
Until next time.
Pts | Sal | Çar | Per | Cum | Cts | Paz |
---|---|---|---|---|---|---|
« Eki | ||||||
1 | 2 | 3 | ||||
4 | 5 | 6 | 7 | 8 | 9 | 10 |
11 | 12 | 13 | 14 | 15 | 16 | 17 |
18 | 19 | 20 | 21 | 22 | 23 | 24 |
25 | 26 | 27 | 28 | 29 | 30 | 31 |