Archive for Şubat 25th, 2020

X++ :11- Security Privileges ve Duties Nedir?

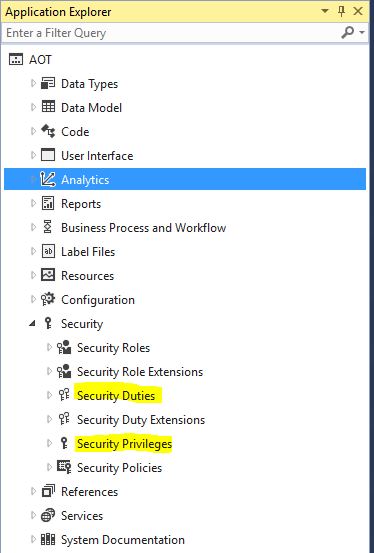
Bu yazıda Dynamics 365 Finance and Operations güvenlik için temel yapılar olan Privilage ve Duty den bahsedeceğim. Güvenlik çok geniş bir konu ama bu yazdı bir yazılımcının proje yaparken oluşturması gereken temel güvenlik nesnelerini anlatacağım. Bu seride kullandığımız MenuItem için güvenlik nesneleri oluşturalım.

Resim-1

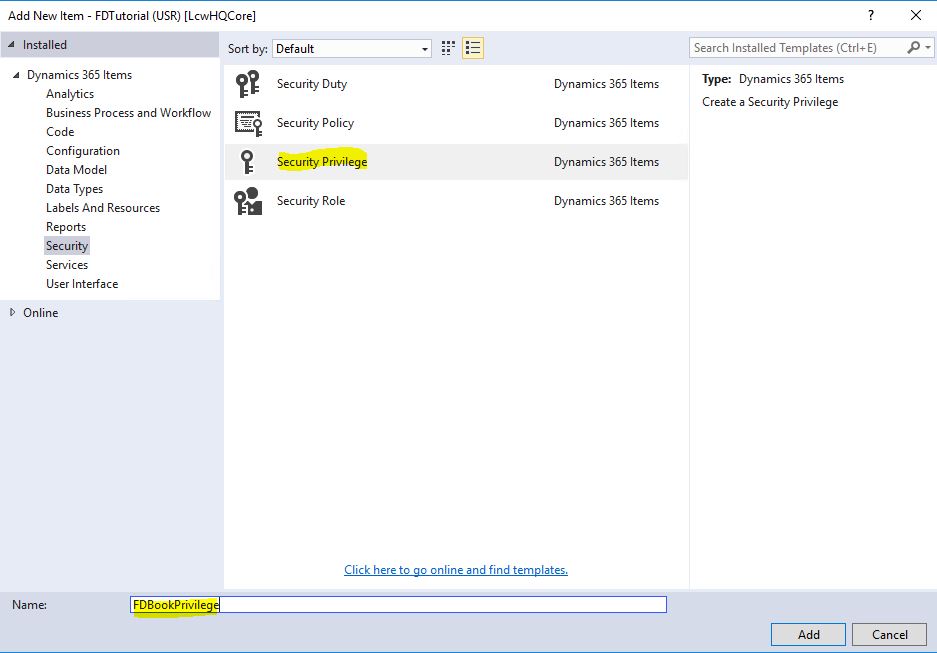
Öncelikle ayrıcalık (Privilage) oluşturalım.

Resim-2

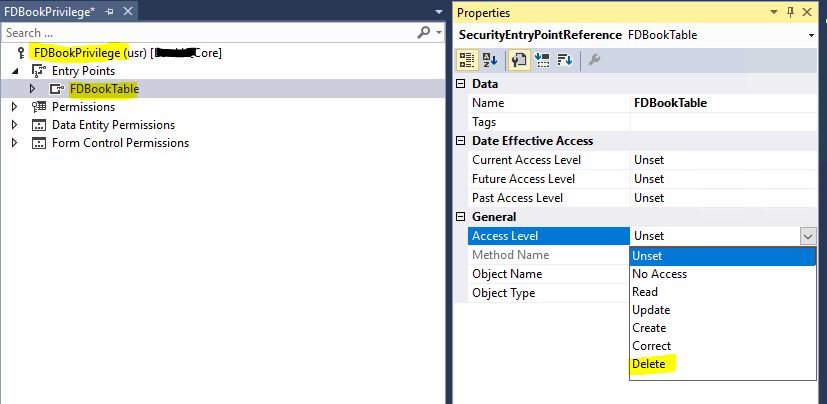
Güvenlik Entry Point üzerinden verilir. FDBookTable MenuItem’mini sürükleyip bir giriş noktası oluşturalım. Access Level kısmında tam yetki vermek için Delete seçebilirsiniz. Yukarı çıktıkça yetki seviyesi azalır.

Resim-3

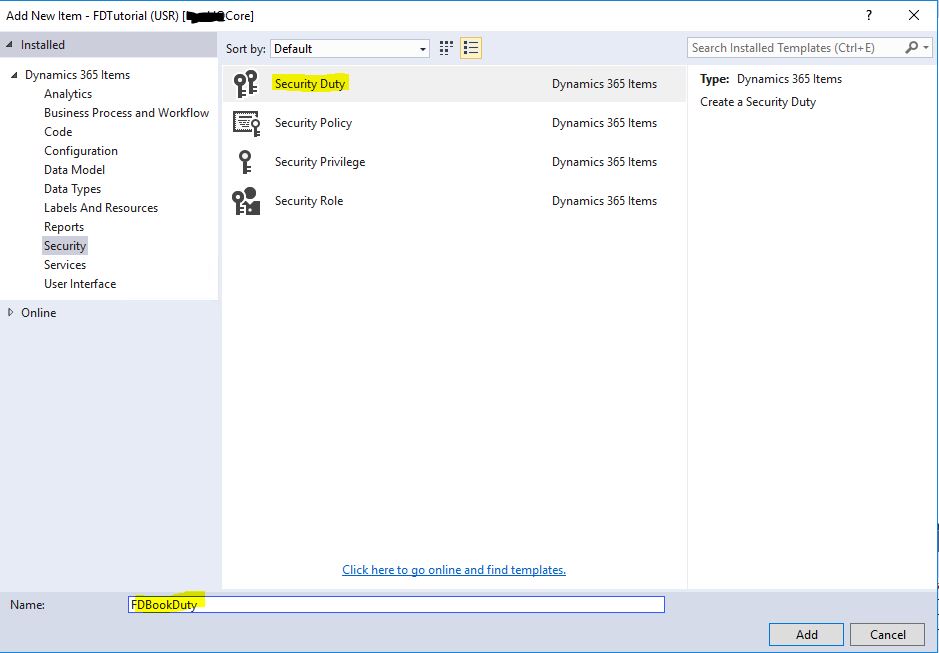
Şimdi görev Duty oluşturalım.

Resim-4

Oluşturduğum göreve ayrıcalığı ekleyelim. Artık BookManagment projemiz için oluşturduğumuz tüm ayrıcalıkları bu göreve ekleyebiliriz. Bu aşamadan sonra istenilen role yetki vermek için bu görevi kullanabiliriz. Yetkileri ara yüzden veren arkadaşlara kolaylık olması için etiketlerin doğru ve yeterli ayrıntıda olması faydalı olur.

Resim-5

Bu yazıda geliştirme yaparken gerekli olan temel güvenlik nesnelerini anlatmaya çalıştım. Güvenlik genelde en sona bırakılan bir konu oluyor ama mutlaka testlerin Admin yetkisiyle değil gerekli güvenlik rolleriyle test edilmesi gerekiyor. Canlı geçişlerde bu konuyla ilgili çok sorunla karşılaştım.

Selamlar.

www.fatihdemirci.net

TAGs: X++,Privilage,Duty, Azure, Azure DevOps, Microsoft Dynamics 365, MsDyn365FO, MsDyn365CE, MsDyn365

How to Move Developments to Dynamics 365 Finance and Operations Test and Live Environments? 4- Installing Deployable Package to Asset Library

In this article, I will explain how to install the Deployable Package created with Build, which is the last step of moving the developments we made from Visual Studio for Dynamics 365 Finance and Operations to Test and Live environments, to Asset Library and then how to carry this package to test and live systems. I talk about performing a simple development movement with this article. Of course, there are too many details here. There are many steps that need to be examined, especially when problems arise.

This process may be more troublesome compared to the old version, but it is definitely a better method. It will be difficult for customers who still develop live and move codes to live every day, but they should definitely switch to moving at least once a week. Even for the old version, we recommend moving to live once a week (twice at most). In this version, moving to live more frequently causes a great loss of time. The problem I usually see in projects that require intervention to live too much is that your test and design stages are insufficient. Developments that are not well designed and tested, constantly create a need to intervene to live environment. With this work logic, you cannot create projects in the new version.

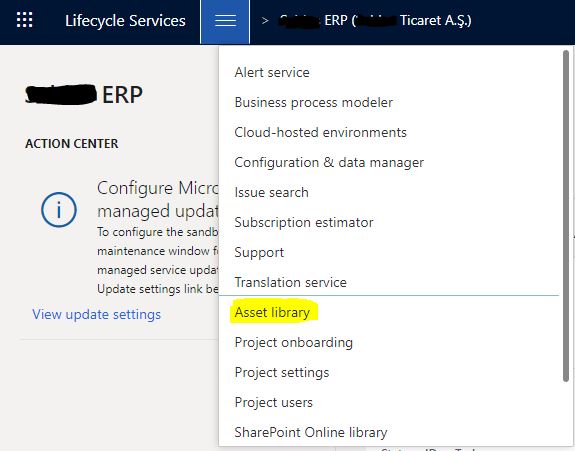
In the third article of this series, we downloaded the Deployable Package, which was the result of Build. We can now upload this package to Lifecycle Services. Log in to the LCS and select our project. Open Asset Library from the menu.

Image-1

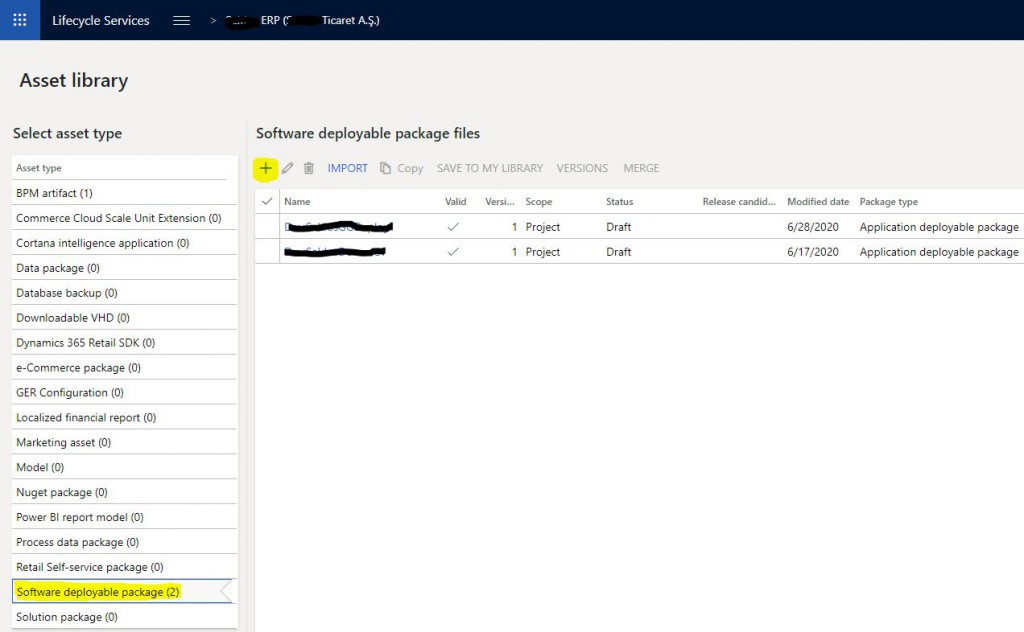
Open the Software Deploable Package tab. Open the new package download page by clicking +.

Image-2

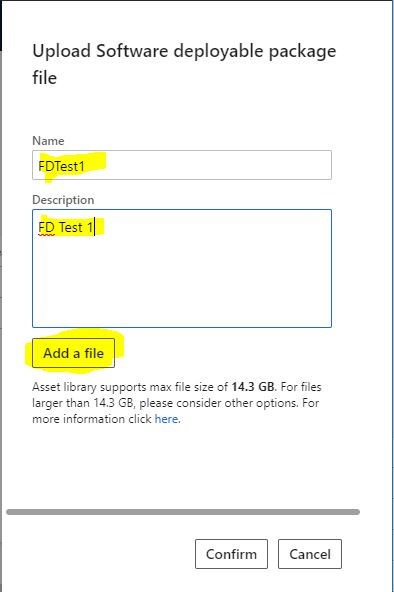
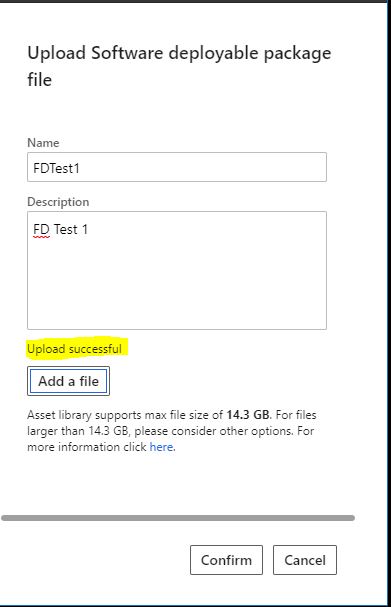
On the page that opens, enter a name and description. It is useful to set a standard here.  Click Add a file.

Image-3

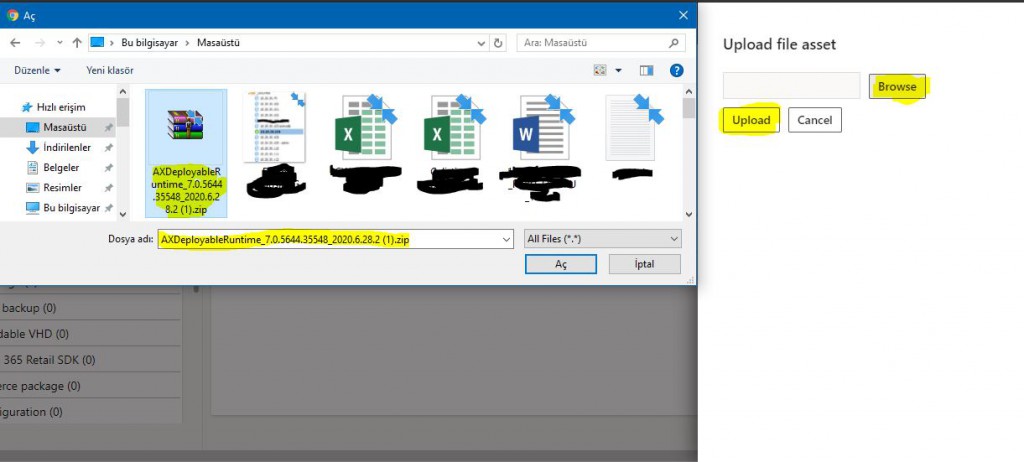
Select the package you downloaded.

Image-4

After the installation is complete, click Confirm.

Image-5

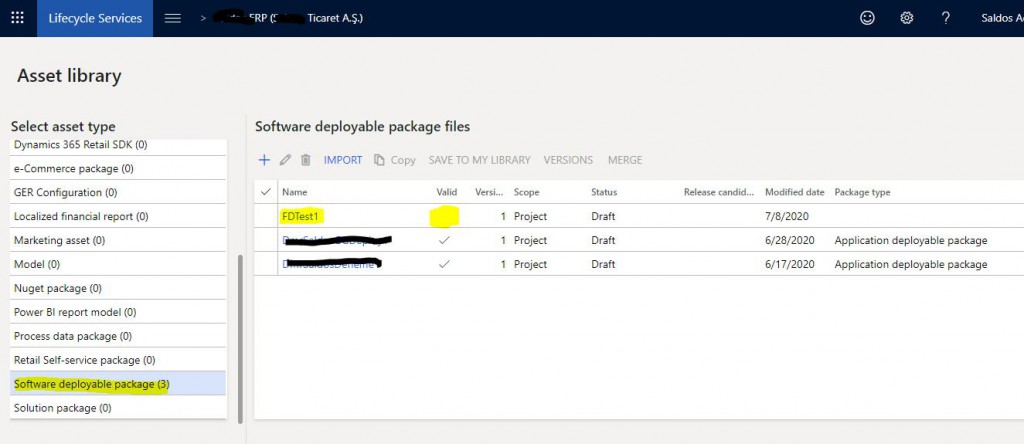
Our package appears in the list. It is not yet confirmed. After a few minutes the Valid part will also be checked. Now we can install this package in our test and live environments.

Image-6

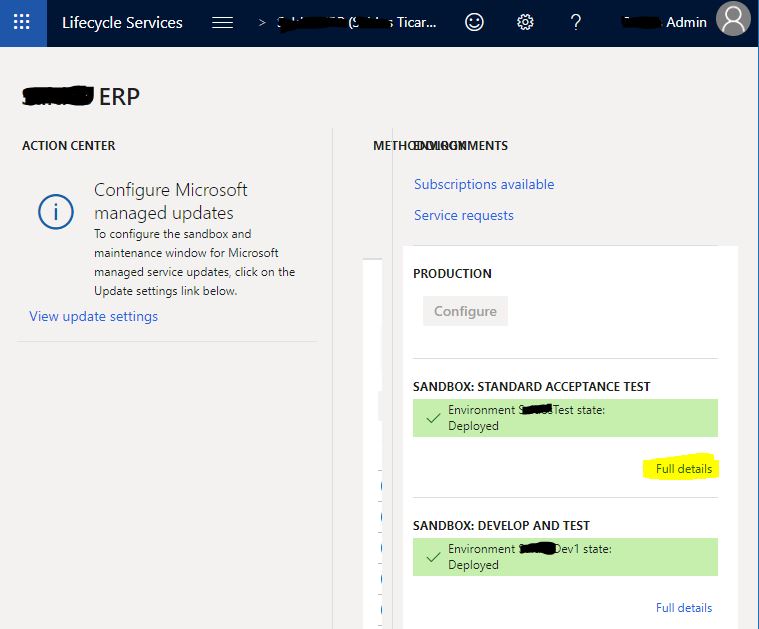
Since it is not live in this environment, I will first show it from the test. The same steps are required for live as well.  Open your SANDBOX Test environment by clicking Full details.

Image-7

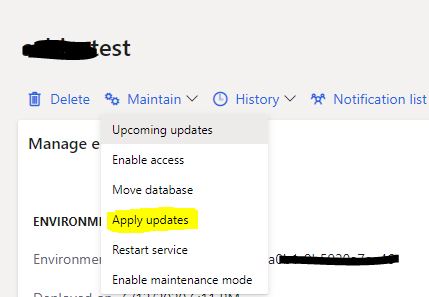
Click Maintain-> Apply updates.

Image-8

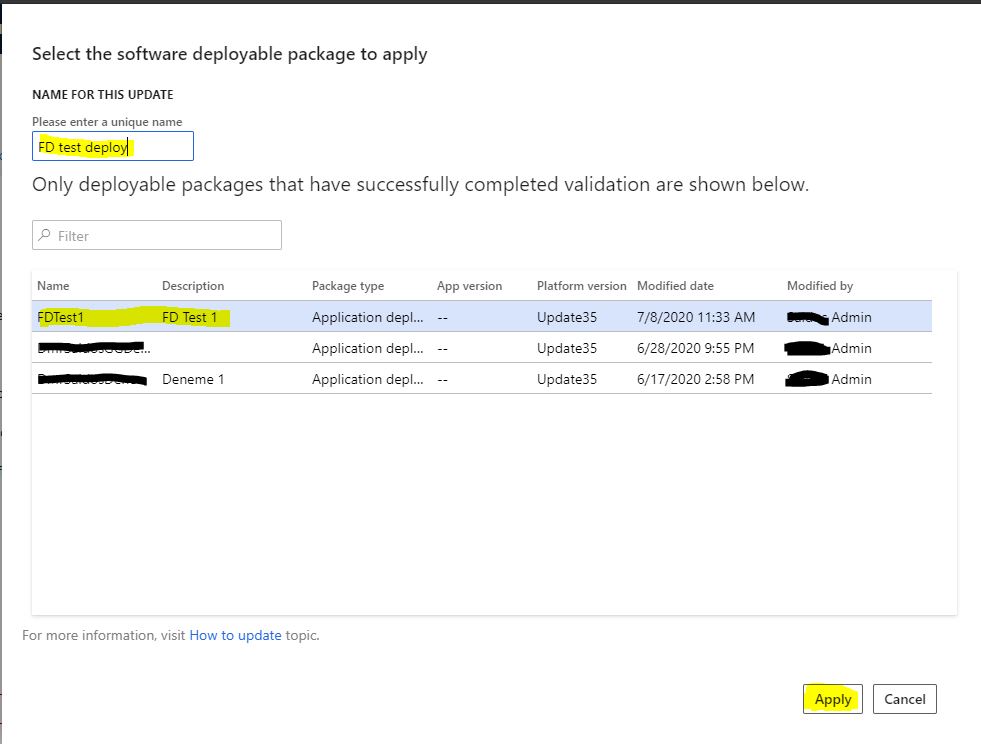
Select the package you installed from the window that opens. Apply is not active without naming it. You need to specify a suitable name format. In the new version, one of the most difficult things seems to be naming. You have to give names so many times that it is difficult to set and apply rules everywhere. After you click Apply, the test environment will automatically start to install the package and you will not be able to access the environment for at least 1 hour. You should be aware of that. You can follow the status of the installation process on the detail page of your environment.

Image-9

The process of making the package live is the same, except there are two differences. Firstly, you need to mark the Package as Release Candidate. Second, you need to set the date you want the package to go live. This is done by using the Schedule button. I could not provide an image of it because it was not live in this environment yet.

Image-10

In this article, we completed the process of moving a development environment to test and live. Of course, I explained it through a very simple and problem-free scenario. In real life, things are not that simple, but not so difficult as well. There are many tools to solve problems. Being organized is very important. You should pay attention to naming and standards. I will continue to explain the details and solution methods of this whole process. I hope it is useful for you.

Regards.

www.fatihdemirci.net

TAGs: Microsoft Life Cycle Services, LCS, Azure, Azure DevOps , Release Candidate, Deployable Package, Microsoft Dynamics 365, MsDyn365FO, MsDyn365CE, MsDyn365, Dynamics 365 Insights Power BI, Power Automate, Power Apss, Power Virtual Agents, what is Dynamics 365, Dynamics 365 ERP, Dynamics 365 CRM

How to Move Developments to Dynamics 365 Finance and Operations Test and Live Environments? 1- Developing and Sending to Azure DevOps.

In this article, I will try to explain how to move the developments we made from Visual Studio for Dynamics 365 Finance and Operations to Test and Live environments. I thought of wrapping it up in a single article, but I realized it would be too long so I divided it into sections. In this first article, we will make a new development and compile it, then we will do the first tests in our development environment, and finally, we will send our development to Azure DevOps. In the other articles of this series, I will explain how to Build in Azure DevOps and how to move the package to test and live environments.

Let’s have a look at our example. I will write a simple class and make an information screen appear when it is run. Then I’ll create a MenuItem and connect it to the Menu. In my previous articles, we created the DmrWMS model and the DMRWms1 project. I will use this project. Right click on the project and click Add New Items. Select Class as its type, name it and click Add.
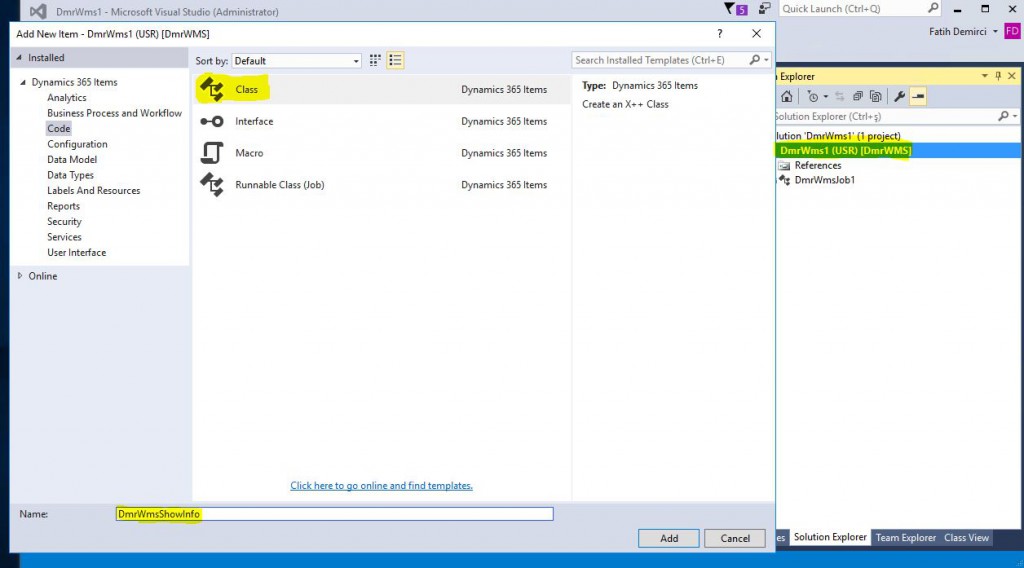
Image-1

I added the following codes to the class. It has a very simple structure. I made it work on its own with Main. I gave an Info in the Run method.
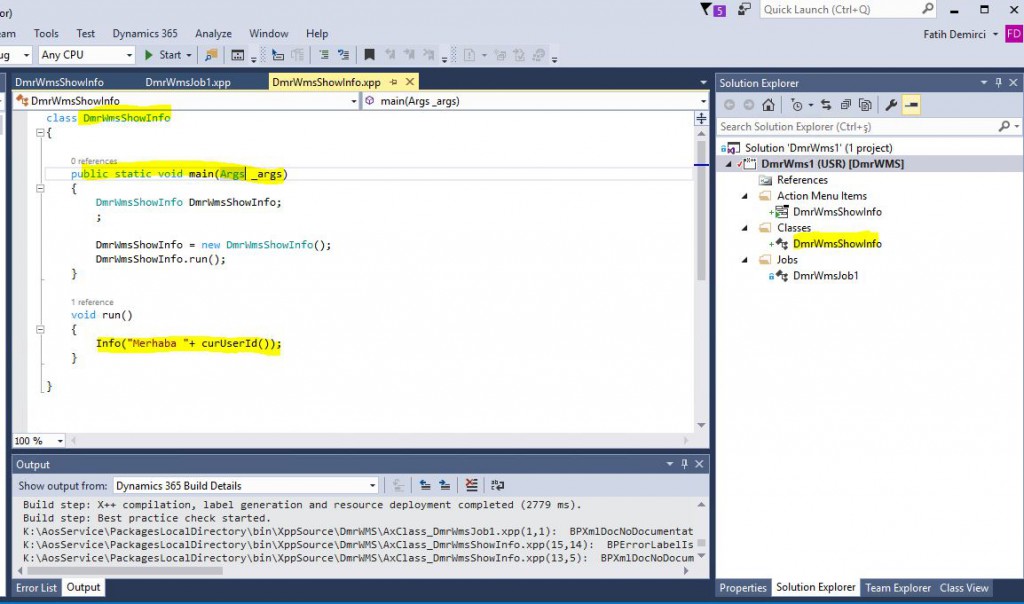
Image-2

Now let’s create the Menu Item that is necessary to run our class and add it to the menu. Select Action Menu Item from the Add New Items section, name it and click Add.

Image-3

Select the Object Type Class from the resulting Menu Item properties. Select the class you created as Object. Do not forget to set Label as it will appear in the menu.
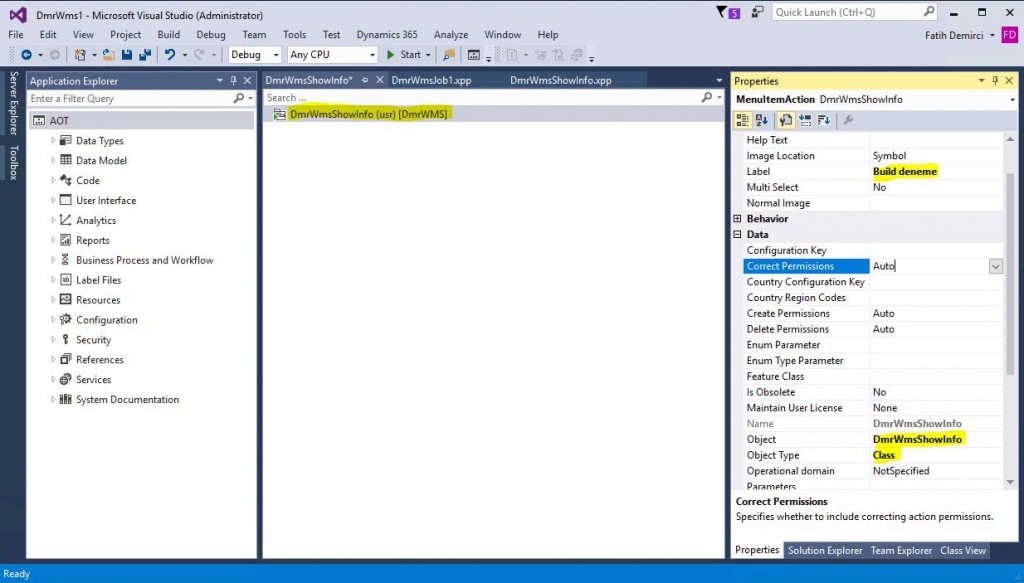
Image-4

Let’s test the development now. Right click on the project and click Build.
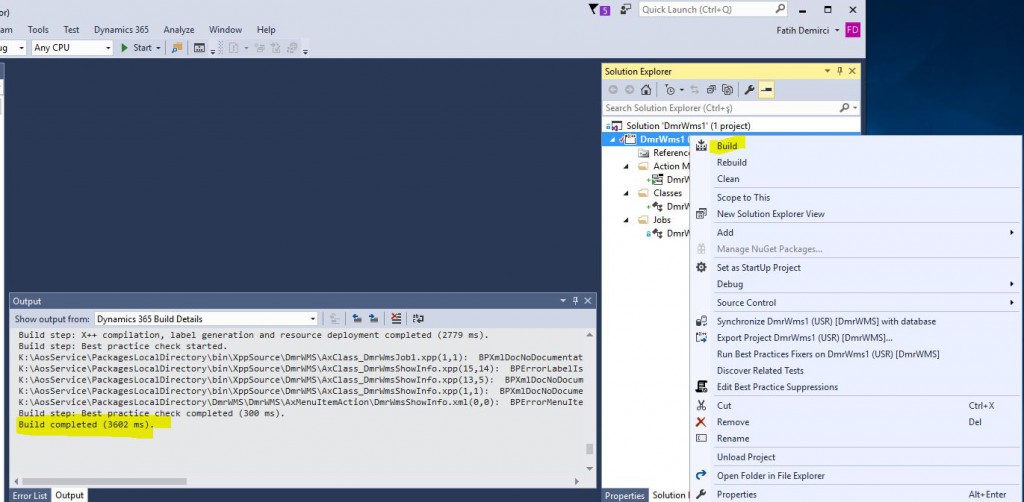
Image-5

If Build is completed without any errors, mark the Menu Item we created as Set as Startup Object and run it by clicking Start.
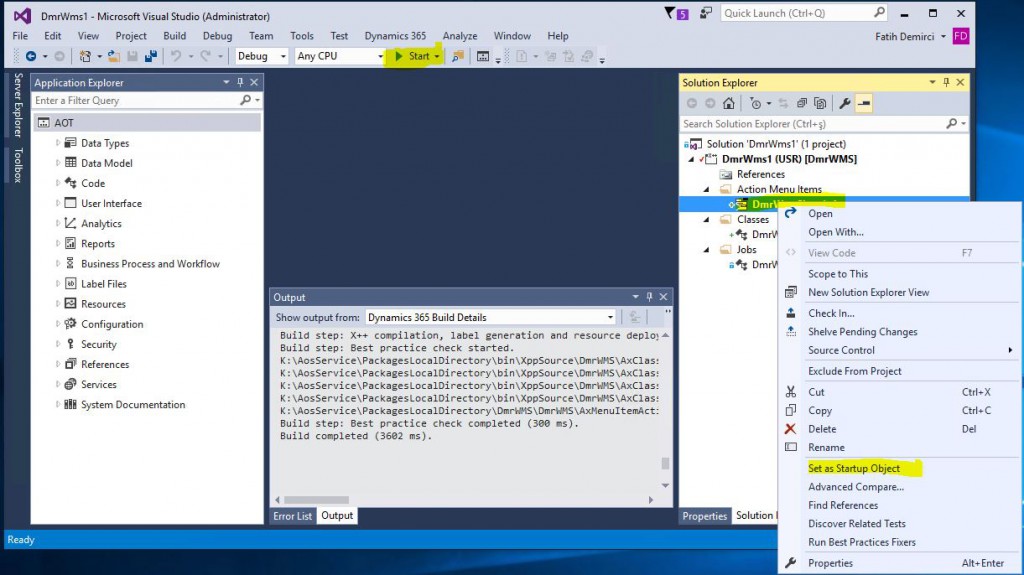
Image-6

It called the Menu Item class and displayed the notification on the screen. Our code works J
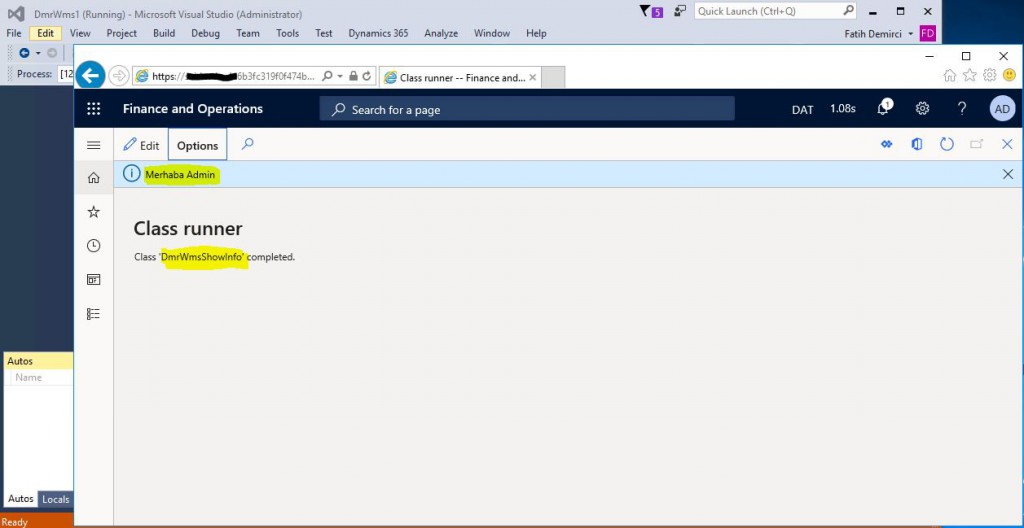
Image-7

Now we can add it to a menu. Since I want to add it to a standard menu, I must use Extension. I will explain the Extension logic in my next articles, but here you can think of it as an extension of the standard object. You can add new things without breaking the standard. I created an Extension of the AcountsPayable menu with the Create extension option, as shown in the picture.
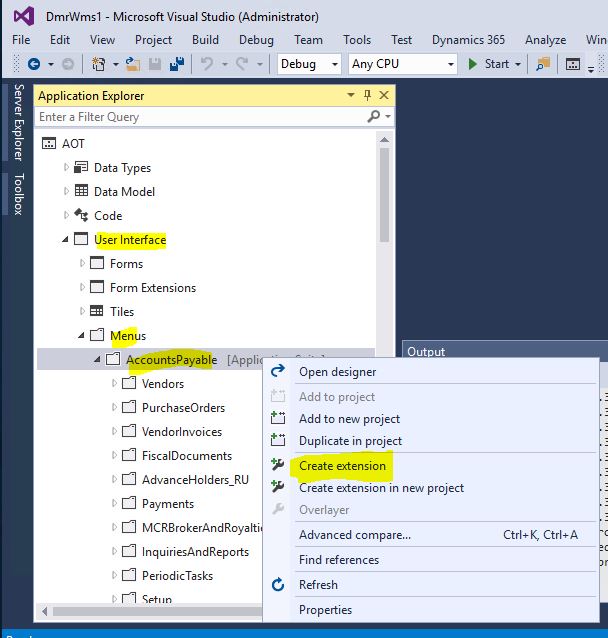
Image-8

I drag and drop my own Menu Item under PeriodicTask to the resulting menu.
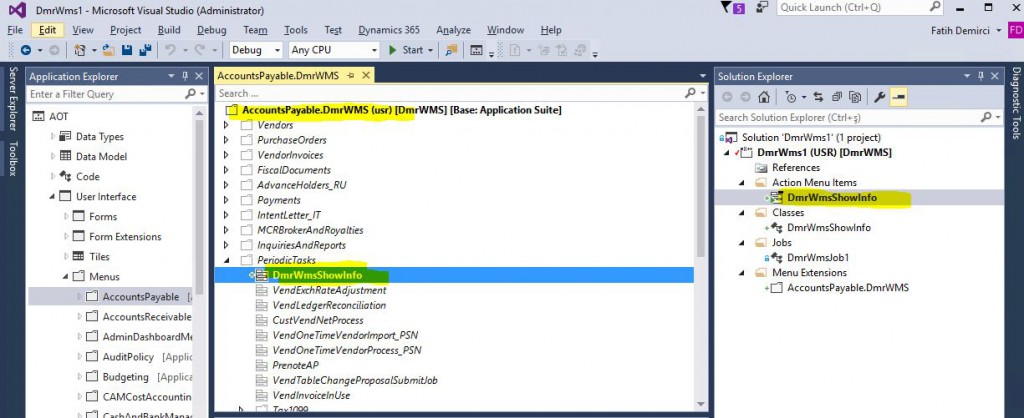
Image-9

I Build my project again and run it.  Build Test appears in the menu. Our development is almost ready to send to version control. Normally it is necessary to add security related objects here. I’m skipping them for now.
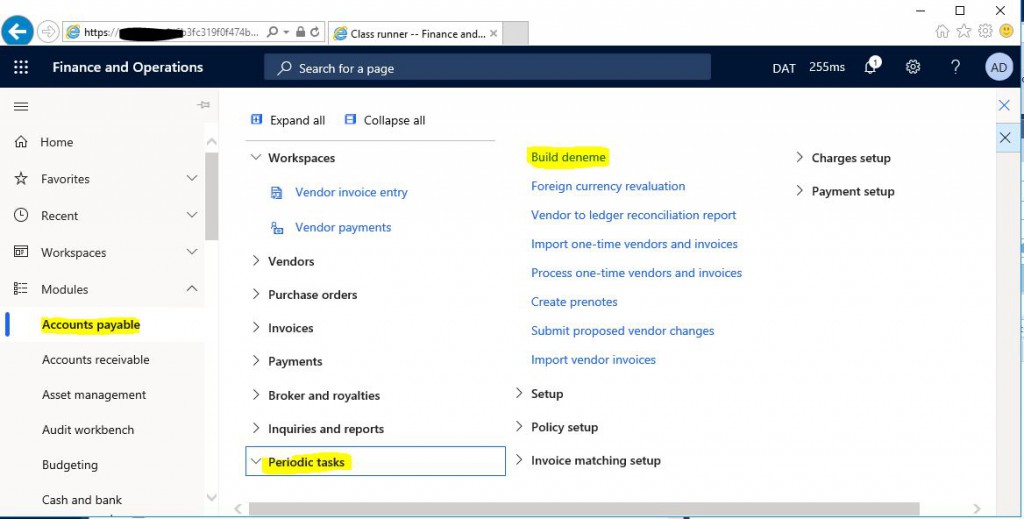
Image-10

I click Team Explorer-> Panding Changes.
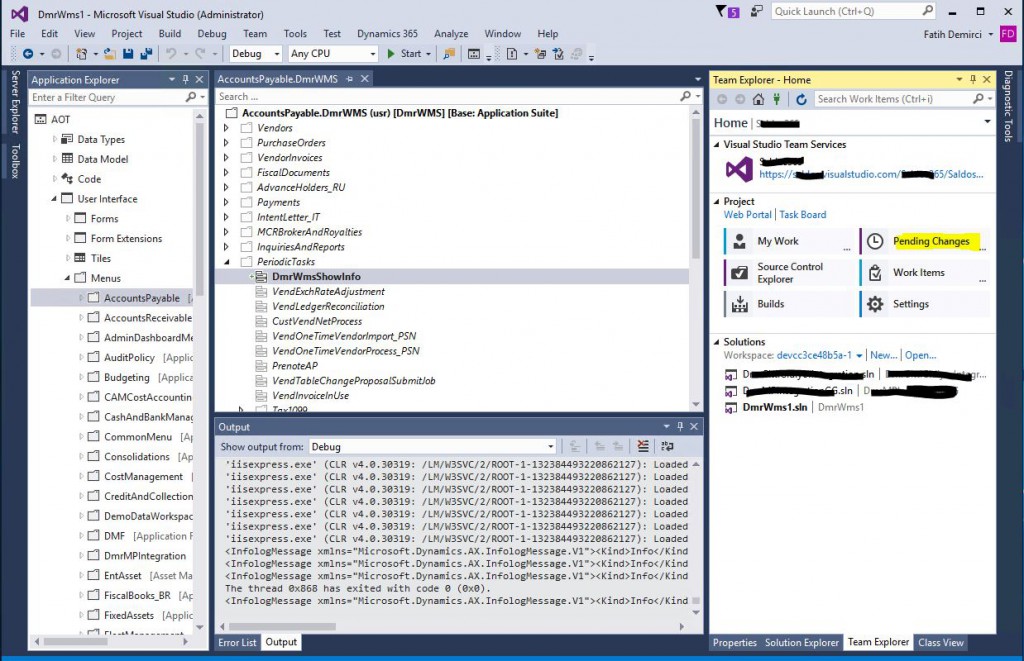
Image-11

I should see all the objects I’ve created. If there is something missing, I need to add it with Add to Source Control. If you have followed me here, it will automatically add when the object is created. I add a comment and click Check In.

Image-12

I click Yes to complete the process.

Image-13

When I check my Azure DevOps project, I can see all my objects. I am now ready to run Build.

Image-14

In this article, we have made the initial preparation to move developments to test and live environments. We created a simple project, performed the first tests and sent it to Azure DevOps. After this stage, if I had a Dev Branch, I had to perform Merge first. But in our example, since we work directly with main, we are ready to start Build. I will talk about how to perform Merge later.

Regards.

www.fatihdemirci.net

TAGs: Microsoft Life Cycle Services, LCS, Azure, Azure DevOps,Build, Deploy to Test,  Microsoft Dynamics 365, MsDyn365FO, MsDyn365CE, MsDyn365, Dynamics 365 Insights Power BI, Power Automate, Power Apps, Power Virtual Agents, what is Dynamics 365, Dynamics 365 ERP, Dynamics 365 CRM