Git Repository Structure and Metadata Management with UDE
Git Repository Structure and Metadata Management with UDE
Introduction
In the previous parts of the series, we created our UDE environment, installed the required tools, configured Visual Studio, and completed our first X++ development.
Up to this point, we have focused mostly on getting the development environment up and running. In a real project, however, writing the code is only one part of the job. How the code will be shared within the team, which change was made by whom, how to return to an older version when necessary, and which source the build process will use are at least as important as development itself.
This is exactly where Git and the Azure DevOps Repository structure come into play.
Using Git is also particularly important on the UDE side. This is because custom metadata now resides on our local machine, and multiple developers can connect to the same UDE environment. Therefore, the source code needs to be kept in a single, traceable reference.
In this article, we will mainly look at the following topics:
- Where custom metadata should be stored within the repository
- How the repository folder structure can be designed
- The approach to metadata, Visual Studio projects, build files, and .gitignore
- Branch structure options based on the size of the project
- The Pull Request, branch policy, and hotfix approach
- A developer’s daily Git workflow and metadata conflicts
The Metadata Approach That Changes with UDE
In classic Dynamics 365 Finance & Operations development VMs, Microsoft standard metadata and the custom metadata we developed were stored under the same PackagesLocalDirectory structure.
For example, the folder we had been accustomed to seeing for years was:
Inside this folder, Microsoft packages, ISV solutions, and our custom models could exist side by side.
With UDE, this distinction becomes much clearer.
In the metadata configuration in Visual Studio, we define two separate locations:
- Folder for your own custom metadata
- Folders for reference metadata
The first field points to the folder containing the X++ models we develop ourselves, while the second field points to Microsoft standard metadata and, if applicable, other reference models.
In my opinion, this separation is one of the most useful aspects of UDE.
In practice, it provides us with the following advantages:
- Microsoft standard metadata does not become part of the repository.
- We can limit the repository to only our custom code and project files.
- Switching branches and synchronizing code becomes cleaner.
- Microsoft updates and custom code are separated from each other more clearly.
- Which files the build pipeline will use becomes more controlled.
The basic rule I use here is:
Recommended Local Folder Structure
In the previous parts, we used the following folder for custom metadata:
If we want, we can also use this folder directly as the repository root. I prefer to separate the repository root from the actual metadata folder to keep the structure a little more organized.
For example, a structure like this can be used:
C:\CustomXppMetadata
│
├── Metadata
├── Projects
├── Build
├── Scripts
├── Documentation
├── .gitignore
└── README.md
We can also point the Folder for your own custom metadata field in Visual Studio to the following folder:
This separates the repository root from the custom metadata folder that Visual Studio works with.
What Are the Folders Used For?
Metadata
This folder contains the Dynamics 365 F&O packages and models that we develop.
For example:
Metadata
│
└── DMRCustomizations
    │
    ├── Descriptor
    │   └── DMRCustomizations.xml
    │
    └── DMRCustomizations
        ├── AxClass
        ├── AxTable
        ├── AxForm
        ├── AxMenuItemDisplay
        ├── AxSecurityPrivilege
        └── AxLabelFile
Here, the first DMRCustomizations folder represents the package structure, while the inner DMRCustomizations folder represents the model metadata.
It is especially important not to forget the Descriptor folder. Definitions such as the model name, publisher information, layer, and dependencies are stored here, and this information is also required on the build side.
For this reason, it is important to put the model metadata and the descriptor file under source control together.
Projects
We can keep the Visual Studio solution and X++ project files in this folder.
For example:
Projects
│
└── DMR_FD_AITest1
    ├── DMR_FD_AITest1.sln
    └── DMR_FD_AITest1.rnrproj
The actual representation of the X++ source code is the XML files under Metadata. Even so, keeping the solution and .rnrproj files in the repository significantly simplifies teamwork and build pipeline setup.
When a new developer gets the repository, they can start working directly with the same solution structure.
In addition, on the automated build side, the relevant .rnrproj files for the packages to be built need to be present in the repository.
Build
We can keep Azure DevOps pipeline and build configuration files in this folder.
For example:
Build
├── azure-pipelines.yml
├── packages.config
└── nuget.config
In the next part, we will already use this folder in more detail when setting up the build pipeline.
Scripts
We can keep the PowerShell scripts we use for repository setup, auxiliary development tasks, or build steps here.
Scripts
├── Initialize-DeveloperEnvironment.ps1
├── Update-Metadata.ps1
└── Build-Model.ps1
Documentation
A separate Documentation folder is very useful for technical notes, development standards, and architectural decisions related to the project.
Documentation
├── DevelopmentStandards.md
├── BranchStrategy.md
└── DeploymentProcess.md
README.md
For me, README.md is like the entry page of the repository.
At a minimum, I find it useful to have the following information here:
- A short description of the project
- The Dynamics 365 version being used
- Custom metadata folder
- Required model dependencies
- Visual Studio solution information
- Branch structure
- Initial setup steps
- Build pipeline information
- Link to the development standards
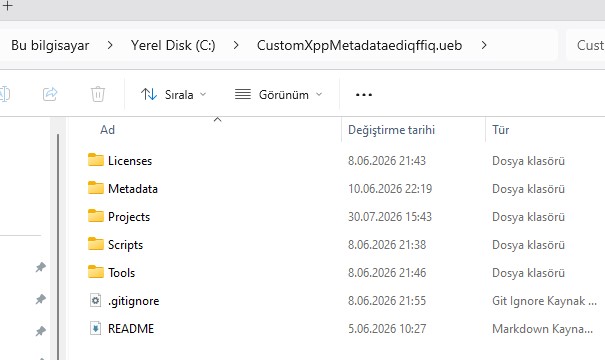
Having README.md as the first place a new developer looks when starting on the project makes things significantly easier. The screenshot below is from my own machine. It is not exactly the same as the structure I described here; the goal is not to impose a single folder standard anyway. Depending on the project, there may also be additional folders such as Tools or Licenses.
Recommended Overall Structure for the Repository
If we consider the entire repository as a whole, an example structure can look like this:
D365FO-UDE
│
├── Metadata
│   │
│   ├── DMRCustomizations
│   │   ├── Descriptor
│   │   │   └── DMRCustomizations.xml
│   │   │
│   │   └── DMRCustomizations
│   │       ├── AxClass
│   │       ├── AxTable
│   │       ├── AxForm
│   │       ├── AxMenuItemDisplay
│   │       ├── AxSecurityPrivilege
│   │       └── AxLabelFile
│   │
│   └── DMRIntegrations
│       ├── Descriptor
│       │   └── DMRIntegrations.xml
│       │
│       └── DMRIntegrations
│           ├── AxClass
│           ├── AxDataEntityView
│           └── AxService
│
├── Projects
│   ├── DMRCustomizations
│   │   ├── DMRCustomizations.sln
│   │   └── DMRCustomizations.rnrproj
│   │
│   └── DMRIntegrations
│       ├── DMRIntegrations.sln
│       └── DMRIntegrations.rnrproj
│
├── Build
│   ├── azure-pipelines.yml
│   ├── packages.config
│   └── nuget.config
│
├── Scripts
│   └── Initialize-DeveloperEnvironment.ps1
│
├── Documentation
│   ├── DevelopmentStandards.md
│   └── BranchStrategy.md
│
├── .gitignore
└── README.md
Multiple models and packages can exist within the same repository.
My general approach is to keep custom models that belong to the same Dynamics 365 project and the same release cycle in a single repository.
A separate repository for each model may look more organized at first. However, if the models depend on each other, are released together in the same version, and are developed by the same team, this separation often makes things more difficult rather than easier.
Which Files Should Be Added to Git?
I roughly think of the files that should go into the repository in three groups: custom metadata, development/build definitions, and genuinely required reference files.
Custom model metadata files
For example:
AxClass
AxTable
AxForm
AxView
AxQuery
AxDataEntityView
AxMenuItemDisplay
AxMenuItemAction
AxSecurityRole
AxSecurityDuty
AxSecurityPrivilege
AxLabelFile
These make up the actual X++ source code and metadata definitions of the application.
Model descriptor files
For example:
I often see the descriptor file being forgotten, especially when a model is added for the first time.
Even if the Metadata folder is in the repository, when the descriptor is missing another developer may not be able to see the model correctly, or the build side may not be able to resolve the model information.
Visual Studio solution and project files
*.sln
*.rnrproj
These are important both for enabling new developers to get started quickly and for automated builds.
Pipeline files
azure-pipelines.yml
packages.config
nuget.config
Build definitions should also be versioned together with the code.
packages.config defines which build packages and versions will be used, while nuget.config defines which feed those packages will be obtained from. I prefer to keep both in the repository, in a location that is as easy to find as possible.
The critical point here is this: we should not write information such as a username, password, PAT, or access key into nuget.config. Credentials should be managed through the pipeline/service connection or secure variables.
Development scripts and documents
*.ps1
*.md
*.json
*.yml
*.yaml
It is also useful to version the scripts and documents we use to set up the project, build it, or describe the development standards together with the code.
Required third-party DLL files
In general, I prefer not to put binary files in the repository. However, some ISV solutions or custom integrations may require specific reference DLLs during the build.
For this reason, adding *.dll directly to .gitignore can sometimes cause unexpected build errors.
If these DLLs cannot be managed through NuGet or another package feed, it may be necessary to keep the ones that are genuinely required in the repository in a controlled manner.
Which Files Should Not Be Added to Git?
Files that are not source code, can be regenerated, or are machine-specific should be kept outside the repository.
Microsoft standard metadata
We do not add the following Microsoft metadata content downloaded during the UDE connection process to the repository:
PackagesLocalDirectory
PackagesLocalDirectory.zip
This folder contains Microsoft application and platform metadata. It is large, and its size and content vary depending on the application version we are connected to.
Each developer can download and use the required reference metadata for their own environment.
Visual Studio temporary files
.vs
*.user
*.suo
These are the developer’s own local Visual Studio settings.
Build outputs
bin
obj
output
artifacts
TestResults
Since these folders are regenerated during compilation, there is no need to put them under source control.
Log and temporary files
*.log
*.tmp
*.temp
*.cache
Cross-reference database files
DYNAMICSXREFDB.bak
*.mdf
*.ldf
The cross-reference database is specific to the developer machine and can be recreated when needed.
NuGet packages and downloaded build packages
*.nupkg
packages
.nuget
It is better to manage the NuGet packages themselves through a feed such as Azure Artifacts rather than keeping them in Git.
Deployment outputs
*.zip
*.axdeployablepackage
DeployablePackages
UnifiedPackages
It is also better to store the deployable/unified package files produced by the build as pipeline artifacts instead of committing them to the source repository.
Sample .gitignore File
As a starting point, we can use a .gitignore like the following at the repository root:
# Visual Studio
.vs/
*.user
*.suo
*.userosscache
*.sln.docstates

# Build output
**/bin/
**/obj/
**/output/
**/artifacts/
**/TestResults/

# Logs and temporary files
*.log
*.tmp
*.temp
*.cache
*.bak

# Local databases
*.mdf
*.ldf
DYNAMICSXREFDB.bak

# Microsoft reference metadata
PackagesLocalDirectory/
PackagesLocalDirectory.zip

# Downloaded development assets
Microsoft.Dynamics.FinOps.ToolsVS2022.vsix
TraceParser.msi

# NuGet local content
.nuget/
packages/
*.nupkg

# Deployment outputs
DeployablePackages/
UnifiedPackages/
*.axdeployablepackage

# Operating system files
Thumbs.db
Desktop.ini
.DS_Store

# Secrets / private files
*.pfx
.env
Note in particular that we have not added the following line here:
Because there may be some third-party DLLs that we genuinely need for the build. For this reason, I do not automatically exclude all DLLs.
Another important point is to create the .gitignore file at the very beginning. Adding a file to .gitignore after Git has already started tracking it does not automatically stop Git from tracking that file. If necessary, it must also be removed from the index with git rm –cached.
The ignore actions we perform from the Git Changes screen in Visual Studio also add rules to the .gitignore file at the repository root. In other words, we still manage the common ignore standard for the team in this file.
Creating an Azure DevOps Repository
We create a new Git repository inside our Azure DevOps project.
Example name:
After the repository is created, we can clone it to our local machine.
Example:
cd C:\

git clone https://dev.azure.com/<Organization>/<Project>/_git/D365FO-UDE CustomXppMetadata
In this example, the repository is cloned into the following folder:
Then we can create the basic folders:
cd C:\CustomXppMetadata

New-Item -ItemType Directory -Path Metadata
New-Item -ItemType Directory -Path Projects
New-Item -ItemType Directory -Path Build
New-Item -ItemType Directory -Path Scripts
New-Item -ItemType Directory -Path Documentation
Then, in Visual Studio, we go to the following menu:
Extensions
   > Dynamics 365
      > Configure Metadata
We define the custom metadata folder as follows:
On the reference metadata side, we use the Microsoft metadata folder downloaded from UDE.
For example:
With this structure, we also physically separate our custom code from the Microsoft standard.
Creating the First Commit
Once the folder structure, .gitignore, and README.md are ready, we can create the first commit.
git status
git add .
git commit -m "Initialize D365 F&O UDE repository structure"
git push origin main
After the first commit, it is useful to review the repository contents once in Azure DevOps.
I specifically check the following points:
- Has Microsoft standard metadata been added to the repository?
- Have large ZIP or NuGet files been added?
- Are the descriptor files present?
- Have the Visual Studio solution and project files been added?
- Is there any file containing a password or connection information?
- Have unnecessary build outputs been added to the repository?
If a large or sensitive file has been committed by mistake, deleting it only from the local folder is not always sufficient; the file may remain in Git history. For this reason, checking before the first commit is the cleanest approach.
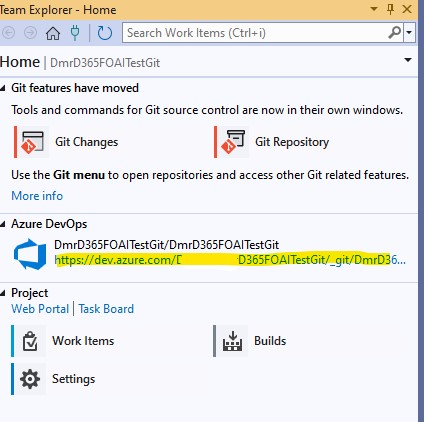
You can also connect to Azure DevOps through Visual Studio. In the screenshot below, you can see the connection structure I use.
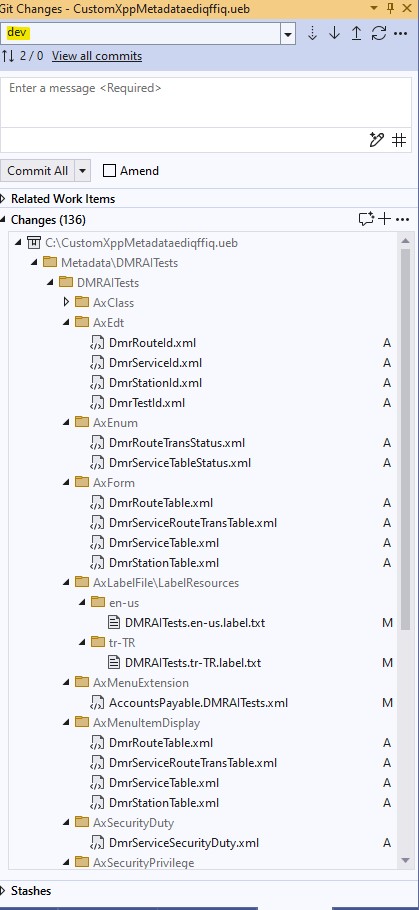
After adding the repository folder to Git, the changes you make start to appear in the Git Changes screen. From here, you can manage commit, push, and branch operations from Visual Studio.
What Should the Branch Structure Be?
There is no single correct template for the branch structure. Team size, the number of developments being worked on at the same time, the UAT duration, and how frequently releases are deployed to production directly affect the structure.
I try to keep the branch strategy as simple as possible. Because having more branches than necessary can create just as much operational overhead as an insufficient branch structure.
Still, in a real F&O project, at a minimum we need to be able to separate the following code states from one another:
- Developments that have not yet been completed
- Code whose development is complete and has been integrated
- The version in the Test/UAT process
- Code running in production
How these are separated may vary depending on the scale of the project. Below, I will show the three-level approach that I use.
Option 1: Simple main + dev Structure
For trial projects with a single developer or for very small teams, starting with two branches may be sufficient:
main
└── dev
main
- Contains stable code that can be deployed to production.
- Represents the version that is already live or ready to go live.
- Daily development is not done directly on it.
- Changes are brought in from the dev branch through a Pull Request.
dev
- It is the daily integration branch.
- Completed developments are merged here.
- Builds and basic checks can be run on this branch.
The flow is as follows:
Development
    ↓
dev
    ↓ Pull Request
main
This structure can work well for small projects with a simple release process.
Option 2: feature + dev + main Structure
If there is more than one developer on the team, this is the starting structure I prefer more often:
main
└── dev
    ├── feature/1234-customer-integration
    ├── feature/1250-sales-order-control
    └── feature/1280-invoice-report
For each task, we create a short-lived feature branch from the dev branch.
For example:
git checkout dev
git pull

git checkout -b feature/1234-customer-integration
When development is complete, we push the branch to the remote repository:
git add .
git commit -m "AB#1234 Add customer integration service"
git push -u origin feature/1234-customer-integration
Then, in Azure DevOps, we open a Pull Request from the feature branch to dev:
feature/1234-customer-integration
                    ↓
                   dev
After code review and the required build checks, the feature branch is merged into dev.
The most important practical benefits of this structure are:
- Each development remains isolated from the others.
- Incomplete code is not moved directly to dev.
- Code review is performed through the Pull Request.
- A link can be established between the Work Item and the commit/PR.
- It becomes easier to isolate and revert a problematic change.
Option 3: feature + dev + release + main Structure
In projects where the UAT period is long, the production environment is active, or development of the next version continues at the same time, a separate release branch is useful. However, it should not be added automatically to every project; as the number of branches increases, the DevOps process also becomes heavier.
Example structure:
main
│
├── hotfix/1.0.1-critical-invoice-error
│
└── release/1.1.0
       ↑
      dev
       ↑
feature/*
The code flow is roughly as follows:
feature/*
    ↓
   dev
    ↓
release/1.1.0
    ↓
   main
feature branches
They are created from dev for each development.
Examples:
feature/1234-customer-integration
feature/1250-credit-limit-control
feature/1280-bank-interface
It is important to keep them as short-lived as possible.
dev
It is the integration branch where completed developments are merged.
For example, the following checks can be run here:
- Developer tests
- Model build
- Best Practice checks
- Automated tests
- General integration checks
Which of these checks are automated depends on the pipeline maturity of the project.
release branch
It represents a specific version that will be taken into functional testing or UAT.
For example:
release/1.1.0
release/2026.09
release/sprint-12
I find it more understandable to use version-based release branches instead of one permanently active release branch.
For example:
This branch is created from dev at a specific point. During UAT, only bug fixes belonging to that version are brought into this branch.
Meanwhile, new development can continue on dev.
Especially if UAT lasts several weeks, this separation provides significant convenience. While the version being tested remains stable, the team does not have to put the next developments on hold.
main
Represents code that is running in production or ready to be deployed to production.
When release testing is complete, a Pull Request is opened from the release branch to main:
release/1.1.0
        ↓
       main
After the merge, it is useful to tag the relevant commit to mark the production version:
For example:
git tag -a v1.1.0 -m "Production release 1.1.0"
git push origin v1.1.0
This makes it much easier to track retrospectively which commit is running in production.
Hotfix Structure
When an urgent issue occurs in production, creating the hotfix branch from main is the cleanest approach.
git checkout main
git pull

git checkout -b hotfix/1.1.1-invoice-posting-error
When the fix is complete, we merge the change into main:
hotfix/1.1.1-invoice-posting-error
                    ↓
                   main
But the process does not end here.
The same fix also needs to be carried over to dev and, if it is open, to the relevant release branch:
hotfix
   ├── main
   ├── dev
   └── release/1.2.0
Otherwise, the issue we fixed in production may return with the next release.
Branch Naming Standard
Defining a common standard for branch names within the team is a small but very useful step.
For example:
feature/<work-item-id>-<short-description>
bugfix/<work-item-id>-<short-description>
hotfix/<version>-<short-description>
release/<version>
Examples:
feature/1234-vendor-integration
feature/1280-sales-report
bugfix/1325-tax-calculation
hotfix/1.0.1-invoice-posting
release/1.2.0
I use the following rules for branch names:
- Do not use Turkish characters
- Do not use spaces
- Use a short and clear description
- Include the Azure DevOps Work Item number
Even a standard this simple makes searching and tracking in Azure DevOps easier.
Branch Policy Settings
I recommend using a minimum set of branch policies, especially on the main, dev, and release branches.
For the main branch
- Direct push should be disabled
- Pull Request should be mandatory
- There should be at least one reviewer
- Self-approval of a Pull Request should be disabled
- Build validation should be mandatory
- Merge should not be allowed until open comments are resolved
- A Work Item link should be mandatory
For the dev branch
- Pull Request should be mandatory
- There should be at least one reviewer
- Build validation should run
- Merge conflicts should be checked
For the release branch
- New features should not be accepted
- Only test bug fixes should be accepted
- Build validation should be mandatory
- It should be verified that fixes are carried back to the dev branch
The main goal here is not to lock down the branch; it is to ensure that a change going to production has passed at least one review and build check.
Using Squash Merge
When developing on a feature branch, many small commits can naturally be created:
Fix compilation
Update label
Correct method
Fix build
Final correction
Carrying all of these commits into the dev history separately makes the repository history unnecessarily noisy after a while.
For this reason, I prefer to use Squash Merge in most projects when merging feature branches into dev.
For example, even if there are ten small commits in the feature branch, a single meaningful commit can remain on the dev side:
For hotfix and release merges, a normal merge may be preferred according to the team standard in order to keep the release history more visible.
There is no single mandatory method here; what matters is that the team applies the same merge standard consistently.
A Developer’s Daily Git Workflow
If we translate this into a daily workflow, a sample developer day can proceed roughly as follows.
1. Update the dev branch
git checkout dev
git pull origin dev
2. Create a feature branch
3. Do the development
We perform our X++ development in Visual Studio.
To review the changes before committing:
git status
git diff
4. Commit the changes
git add .
git commit -m "AB#1450 Add sales order control"
5. Keep the branch up to date
If development takes several days, it is a good idea to bring the latest changes from dev into our own feature branch:
git fetch origin
git merge origin/dev
Depending on the team standard, rebase can also be preferred:
If the team is not very experienced with Git, the merge approach may be easier to understand and less surprising at the beginning.
6. Push to the remote repository
7. Create a Pull Request
In Azure DevOps, we open a Pull Request from the feature branch to dev:
feature/1450-sales-order-control
                    ↓
                   dev
I expect at least the following information to be included in the Pull Request description:
- The development performed
- Related Work Item
- Affected modules and processes
- Test scenario
- Technical risks, if any
- Database synchronization requirement, if any
- New security object information, if any
Pay Attention to Metadata Conflicts
Dynamics 365 Finance & Operations metadata files are stored in XML format.
When two developers work on the same form, table, or class at the same time, we may encounter a classic Git merge conflict.
The risk of conflict is higher especially for the following objects:
- Forms
- Tables
- Data entities
- Security roles and duties
- Label files
- Large classes
A few simple habits are very useful for reducing the risk of conflicts:
- Keep feature branches as short-lived as possible
- Regularly bring changes from dev into the feature branch
- Break large tasks into smaller development pieces
- Have developers who will work on the same object coordinate in advance
- Keep each Pull Request focused on a single business requirement as much as possible
- Avoid unnecessary formatting or ordering changes
When a metadata conflict is resolved, we should not rely only on Git saying that the ‘merge is complete.’ It is also useful to open and check the relevant object in Visual Studio/Application Explorer.
The XML may have been technically merged, but it should also be verified that the resulting metadata builds correctly and produces the behavior we expect.
Common Mistakes We Make
1. Adding Microsoft standard metadata to the repository
This unnecessarily increases the repository size and also makes branch/sync operations heavier.
PackagesLocalDirectory should remain on the local machine as reference metadata.
2. Forgetting the descriptor file
Adding the model metadata but omitting the Descriptor folder can cause problems on other machines and during the build process.
3. Not managing metadata and project files together
Including only the .rnrproj file is not enough; the actual source code is the XML files under Metadata.
The opposite is also problematic. If we include only the metadata and do not add the solution/.rnrproj files, it becomes more difficult for a new developer to open the project and for the pipeline to build it.
4. Automatically ignoring all DLL files
A genuinely required third-party reference DLL may also be left outside the repository by mistake.
5. Everyone working directly on the dev branch
It may work for a while in a small team, but as the number of developments increases, incomplete work and conflicts begin to get mixed together.
6. Leaving the main and hotfix flow uncontrolled
Committing directly to main causes the review trail to be lost. Likewise, leaving a production hotfix only in main can cause the fix to be lost in the next release.
7. Adding passwords, tokens, or connection information to the repository
Information such as connection strings, passwords, PATs, tokens, or private certificates should not be stored in the source code repository.
Conclusion
When we consider UDE and Git together, the main change is not simply that the folder path has changed. Custom metadata now resides more independently on the developer’s local machine, and this makes source code management much more centralized.
In my opinion, the goal of a healthy UDE repository is as simple as possible: keep custom code, Visual Studio projects, and build definitions under the same version control, while keeping Microsoft metadata and temporary files outside of it.
In summary, our repository structure is roughly as follows:
Repository
├── Custom Metadata
├── Visual Studio Projects
├── Build Definitions
├── Scripts
└── Documentation
Microsoft standard metadata, Visual Studio temporary files, build outputs, and local databases should remain outside the repository.
It is best to expand the branch structure according to the actual needs of the project:
Small project:
dev → main
Medium-sized project:
feature → dev → mainProject with a UAT/release process:
feature → dev → release → main
hotfix: main → fix → main + dev (+ open release)I try to preserve the following three principles without making the structure more complicated than necessary:
- Isolate developments in feature branches as much as possible.
- Do not develop directly on the main branch, which represents production code.
- Manage custom metadata, Visual Studio projects, and build definitions within the same version control process.
From this point on, our developments are no longer just files sitting on a local machine; they become traceable by the team, reviewable, and connectable to an automated build process.
In the next part of the series, we will use this repository structure to create an X++ Build Pipeline in Azure DevOps. We will cover NuGet packages, packages.config/nuget.config, the YAML pipeline, and unified package generation step by step.
Regards.
Fatih Demirci





No comments yet.