Posts Tagged ‘ Project onboarding

Dynamics 365 Finance and Operations Branch Mantığı ve Lokal Klasörleri Azure DevOps projesine bağlama.

Bu yazıda Dynamics 365 Finance and Operations için versiyon kontrol kullanmak artık bir zorunluluk. Eski versiyonlarda da kullanma imkanı vardı ama çok iyi çalışmıyordu bu yüzden bu zamana kadar çalıştığım onlarca projenin sadece bir kaçında versiyon kontrol kullanmıştık. Tabi artık geliştirme ortamımızın Visual Studio olması bunu çok kolaylaştırıyor.  Şimdi proje başlangıcında yapılması gereken temel birkaç ayarın nasıl yapılacağına ve Branch mantığına bakalım. Branch dal demektir ve kodunuzu yönetmeyi ve geliştiricilerin bağımsız çalışmasını sağlar. Birçok Branch stratejisi mevcut. Ben bu konuda bir uzman sayılmam bu yüzden mümkün olduğunca basit hallerini kullanmaya çalışıyorum. En çok kullanılan 3 yaklaşım şöyle. Main, Main ve Dev, Main, Dev ve Release. Bu 3 farklı yöntemi kullanabilirsiniz. Daha geniş bilgi için Branching strategies yazısını inceleyebilirsiniz. Ben genelde Dev ve Main yapısıyla ilerliyorum. Eğer proje küçük ve sizden başka geliştirme yapan birileri yoksa sadece Main ile de devam edebilirsiniz. Tek Branch olduğunda birleştirme işlemi gerekmiyor daha hızlı canlıya alım yapabiliyorsunuz ama belli şeyleri almak istemediğinizde tek Branch işinizi çözmediği için en azından Dev ile çalışmak gerekiyor. Şimdi ilk tanımlar nasıl yapılıyor ona bakalım.

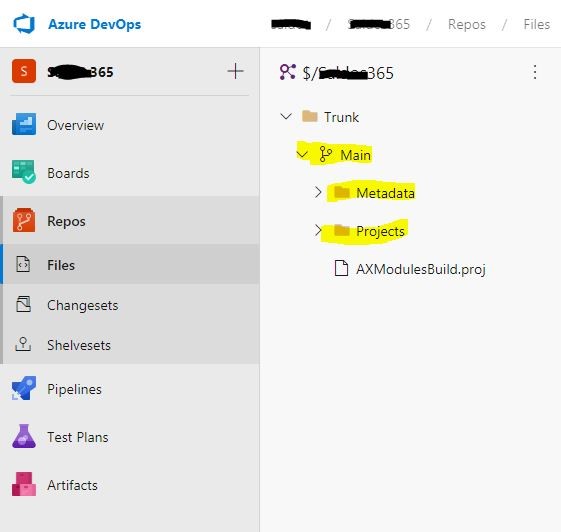
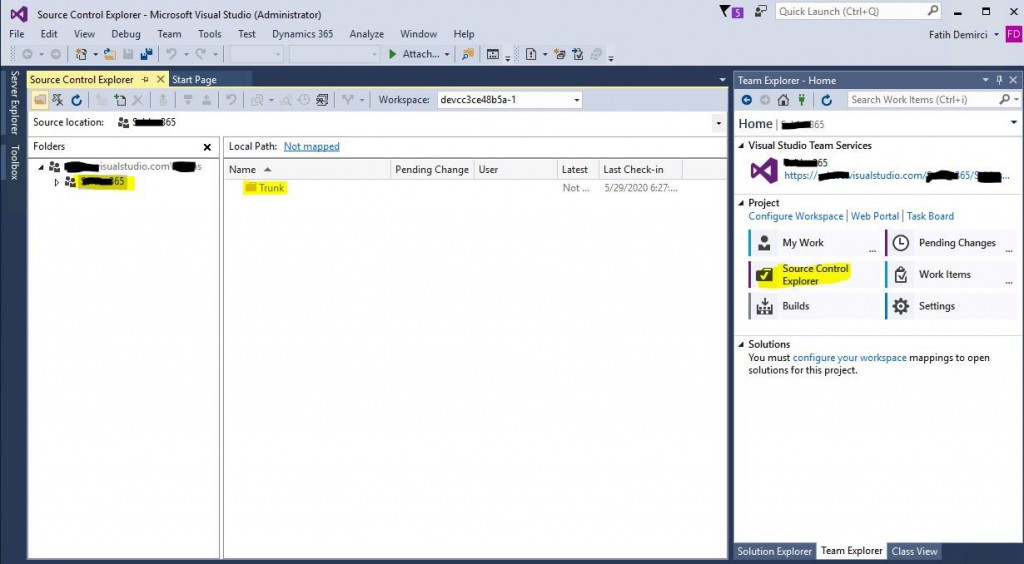
LCS üzerinden Azure DevOps bağlantısının nasıl yapıldığını önceki yazılarımda anlattım. Bu bağlantıyı yaptığınızda Azure DevOps projenizin içinde aşağıdaki Trunk klasörü oluşacak. Bu yapıyı korumalısınız. Sadece ilk oluştuğunda Main de klasör olarak oluşuyor. Bunu Visual Studio içinden Branch’e çevirmelisiniz. Bende sıfır bir ortam olmadığı için resmini alamadım bu yüzden resimde Main Branch olarak var.

Resim-1

Read more

Yeni bir Azure Devops hesabı nasıl oluşturulur ve Lifecycle Services (LCS) Dynamics 365 Finance and Operations projesine nasıl bağlanır.

Bu yazıda yeni bir Azure DevOps hesabı oluşturup yeni bir proje başlatıp bunu Lifecycle Services’e nasıl bağlıyoruz anlatmaya çalışacağım. Bu yazıyı hazırlarken sıfır bir hesabım olmadığı için bazı resimleri eski projelerden aldım. Ancak maksadımı anlatmaya yeteceğini düşünüyorum.

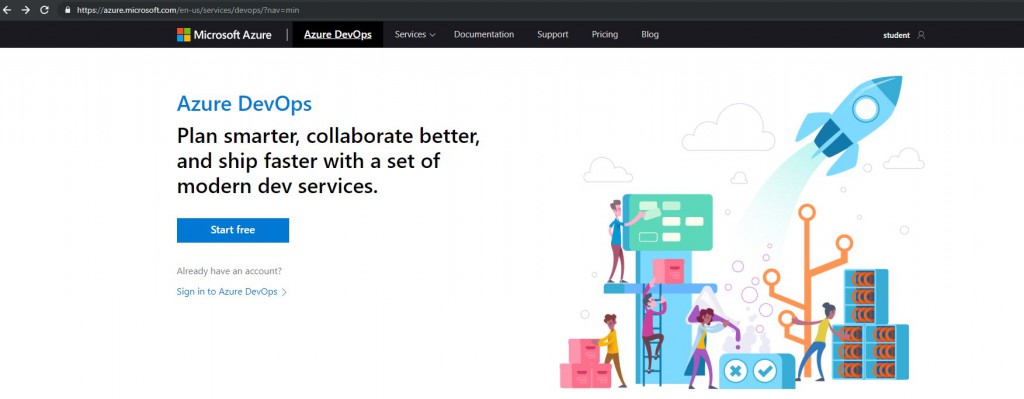
Eğer hali hazırda bir hesabınız varsa onu kullanabilirsiniz. Yoksa yeni bir mail ile aşağıdaki ekrandan Start free butonunu kullanarak yeni Azure DevOps hesabı oluşturmayı başlatabilirsiniz.

Resim-1

Read more

Microsoft Azure Subscription’a Dynamics 365 Finance and Operations deploy edebilmek için Dynamics Deployment Services Account yetkisi nasıl verilir?

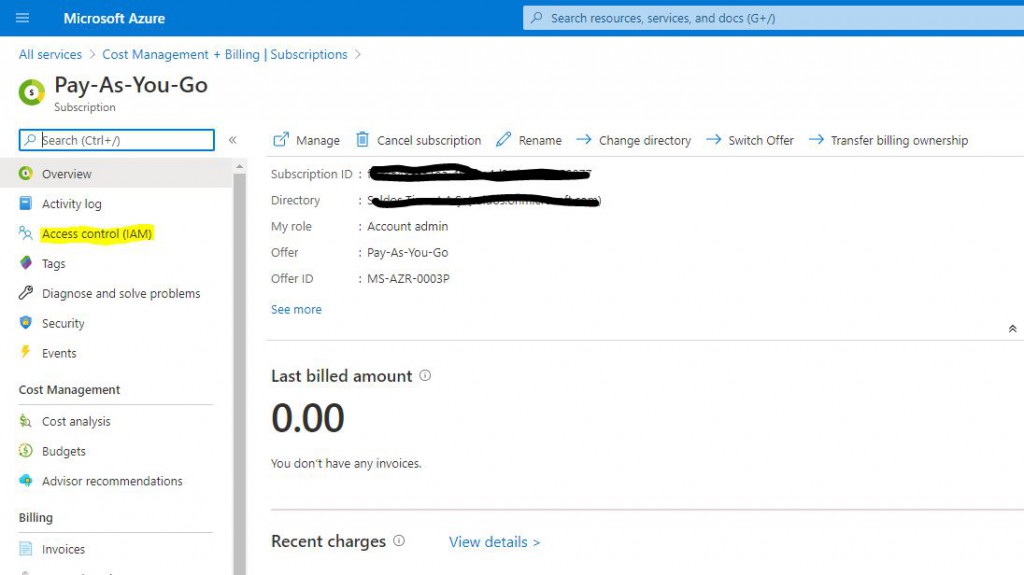
Bu yazıda LCS üzerinden yeni bir ortam ayağa kaldırmak gerekli olan Dynamics Deployment Services Account yetkisi nasıl verilir adım adım tarif edeceğim. Öncelikle Admin hesabıyla Azure Portale giriş yapıyoruz. Cost Management +Billing > Subscriptions kısmını açıyoruz.

Resim-1

Read more

Dynamics 365 Finance and Operations için yeni bir X++ geliştirme sanal makinesi nasıl ayağa kaldırılır?

Bu yazıda yeni bir X++ geliştirmeleri için yeni bir sanal makine nasıl ayağa kaldırılır adım adım anlatmaya çalışacağım. Bu örnekte bir müşteri ortamında bunu asıl yapacağınızı anlatacağım. Partner veya eğitim amaçlı sanal makinelerde benzer bir mantığa sahip.

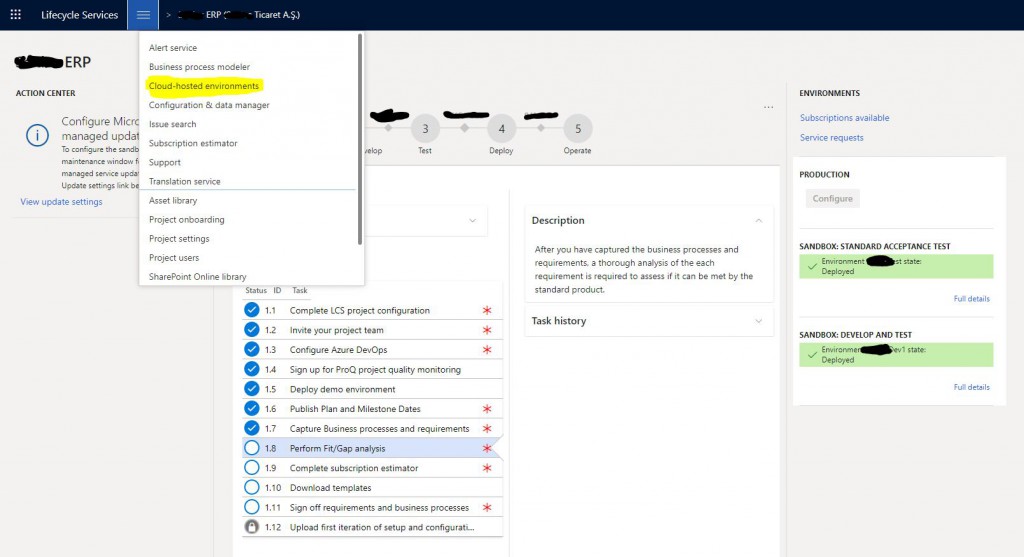
Öncelikle Lifecycle Services’a giriş yapıyoruz. Projemizi seçip hamburger menüden Cloud-hosted environments’ı seçiyoruz.

Resim-1

Read more

Yeni bir Dynamics 365 Finance and Operations uygulama projesini Microsoft Life Cycle Services (LCS) üzerinden nasıl ayarlanır.

Bu yazıda size Dynamics 365 Finance, Dynamics 365 Supply Chain Management veya Dynamics 365 Commerce için yeni bir lisans satışından sonra uyarlama projeyi başlatmak için gerekli olan adımları anlatmaya çalışacağım.

Öncelikle firmanın Tenant Administrator hesabıyla Azure Active Directory (Azure AD) de aşağıdaki adımları takip ederek aktivasyon işlemi yapılmalı:

  1. InPrivate/Incognito olarak yeni bir oturum oluşturun ve Microsoft 365 Admin Center’ı açın.
  2. Tenant Administrator hesabıyla giriş yapın.
  3. Billing > Products & services gidin ve orada aldığınız ürünün olduğundan emin olun. Eğer yoksa iş ortağınızla iletişime geçin.
  4. Eğer ürün aboneliği (Subscription)  aktifse uygulama projesi (Implementation Project) oluşturmayı tetiklemek için LCS ye giriş yapın.
  5. Yeni bir sayfada LCS’e Tenant Administrator hesabıyla giriş yapın.
  6. Ekrana çıkan kutucukları onaylayın böylece proje oluşturulmuş olacak.
  7. Tenant Administrator otomatik olarak Project Owner rolüne atanır. Bundan sonra projeyi LCS de görebilirsiniz.

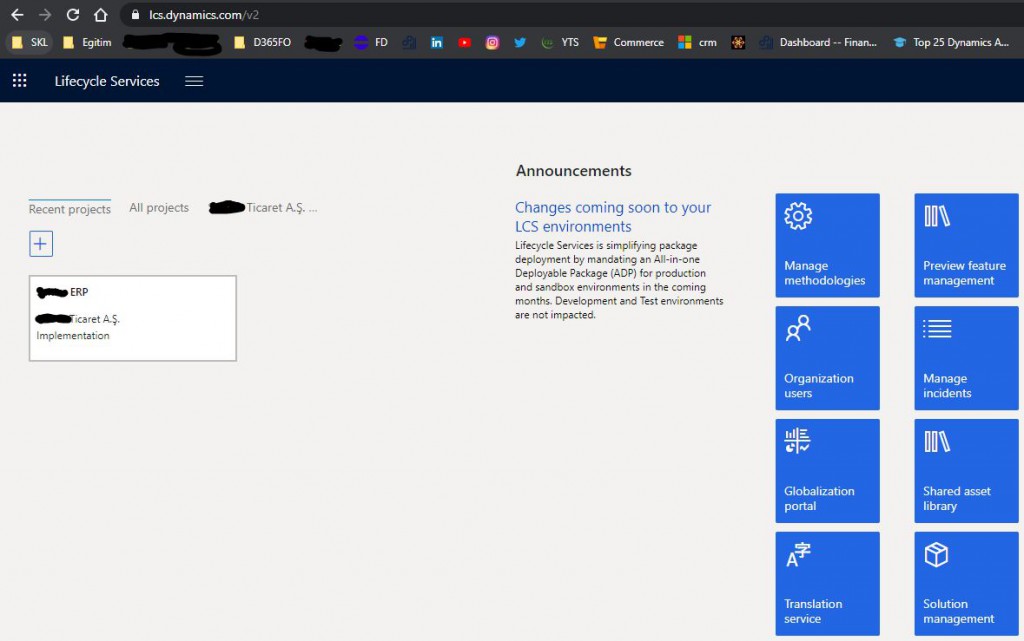
Yukarıdaki adımları tamamladıktan sonra eğer bir sorun yoksa Resim-1 de görünen uyarlama(Implementation) projesi oluşacak.

Resim-1

Read more

How to give Dynamics Deployment Services Account authorization to Microsoft Azure Subscription in order to deploy Dynamics 365 Finance and Operations?

In this article, I will describe step by step how to authorize Dynamics Deployment Services Account, which is necessary to deploy a new environment via LCS. First, log into Azure Portal with the Admin account. Open Cost Management +Billing > Subscriptions.

Image-1

Select the subscription you want to authorize and click on Access control (IAM) from the screen that opens.

Image-2

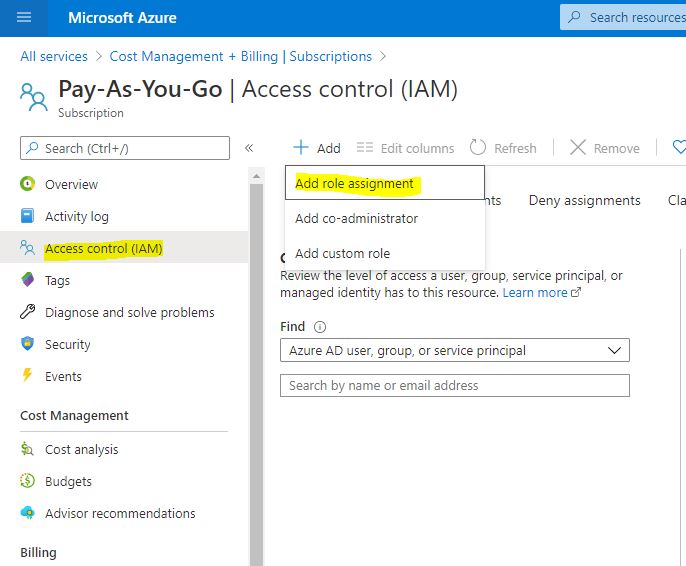
Open the new role definition window by clicking on Add> Add role assignment.

Image-3

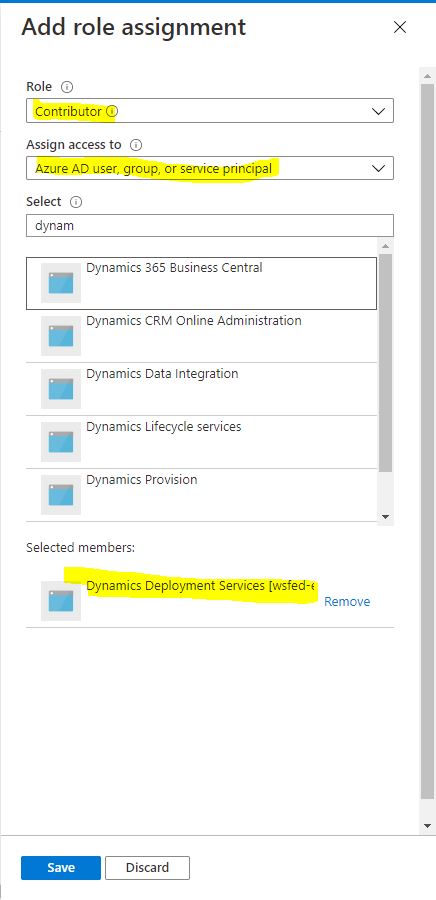
In the window that opens, select Contributor as Role. In the Assign Access to section, select Azure AD user, group, or service principal. When you type Dynamics in the Select section, the options will be automatically available. From there, select Dynamics Deployment Services [wsfed-enabled] and click save.

Image-4

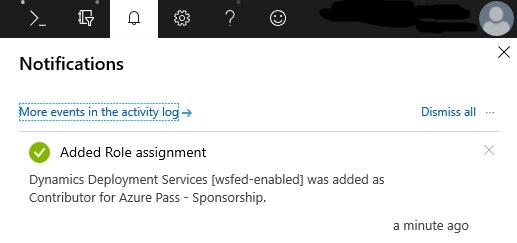
When the process is completed, you will see the information below.

Image-5

In this article, I tried to explain how the Dynamics Deployment Services Account is authorized over Azure, which is one of the necessary steps to deploy a new environment. This step is usually skipped and an error is received in the Deploy operation over LCS. It is useful to give this authorization beforehand.

Regards.

www.fatihdemirci.net

TAGs: Microsoft Life Cycle Services, Dynamics Deployment Services Account, LCS, Azure, Azure DevOps, Project onboarding, Microsoft Dynamics 365, MsDyn365FO, MsDyn365CE, MsDyn365, Dynamics 365 Insights Power BI, Power Automate, Power Apps, Power Virtual Agents, what is Dynamics 365, Dynamics 365 ERP, Dynamics 365 CRM

How to deploy a new X++ development VM for Dynamics 365 Finance and Operations?

In this article, I will try to explain step by step how to deploy a new virtual machine for new X++ developments. In this example, I will explain how to do this in a client environment. It has a similar logic in virtual machines for partner or educational purposes.

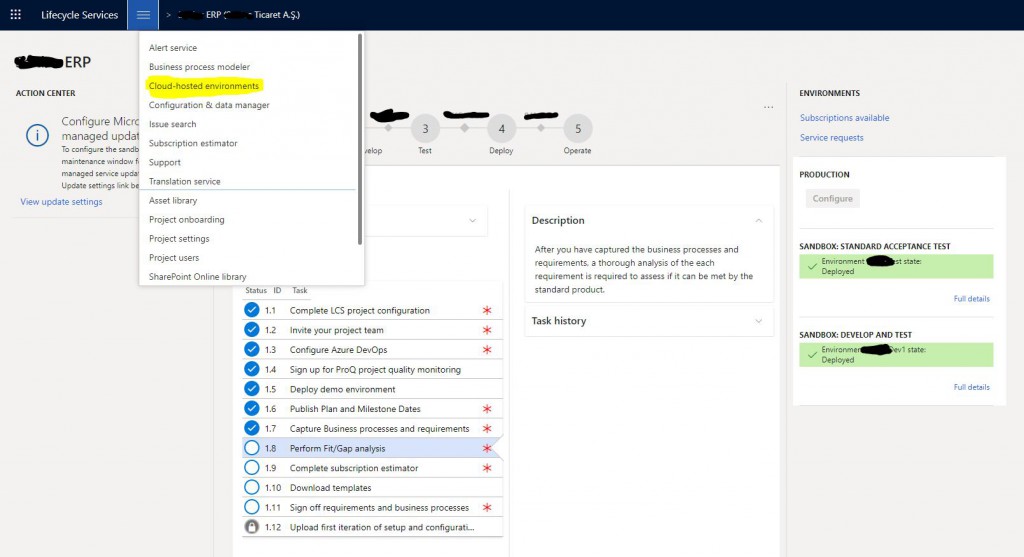
First, we log in to Lifecycle Services. Select your project and select Cloud-hosted environments from the hamburger menu.

Image-1

A page will open and list your environments. Here you can view the details and manage their status. For a new environment, click the + Add button.

Image-2

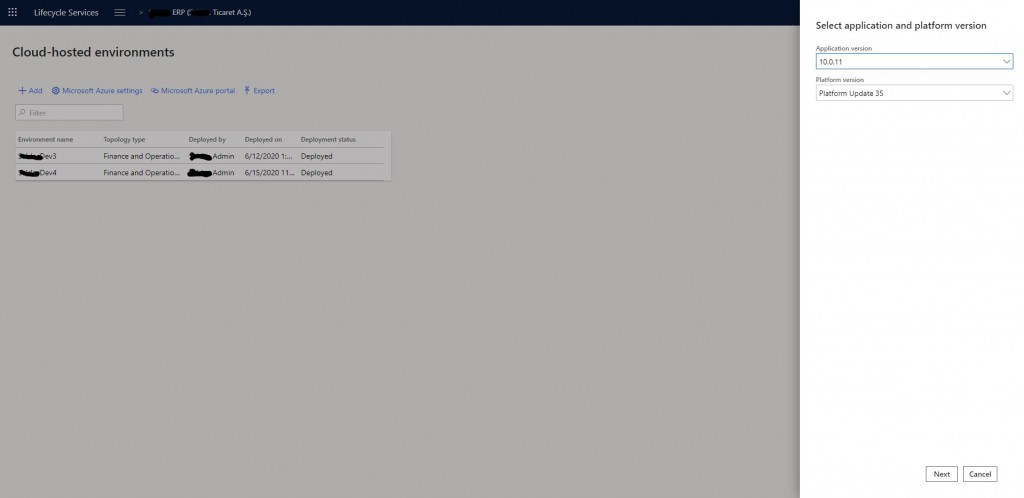
The first screen that opens has Application Version and Platform Version. You usually select the most recent one. Of course, you should select the version of your environment here. Click Next to proceed.

Image-3

Here you select the type of the environment. Available options are Demo and DevTest. For development, you should select DevTest.

Image-4

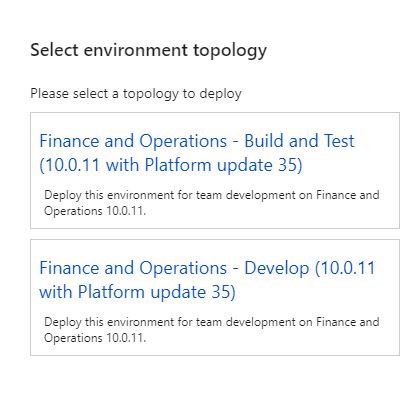
There are two options here. First one is used for Build or Test. For development, you should select Develop. For additional Test or Build environments, you should use the option above.

Image-5

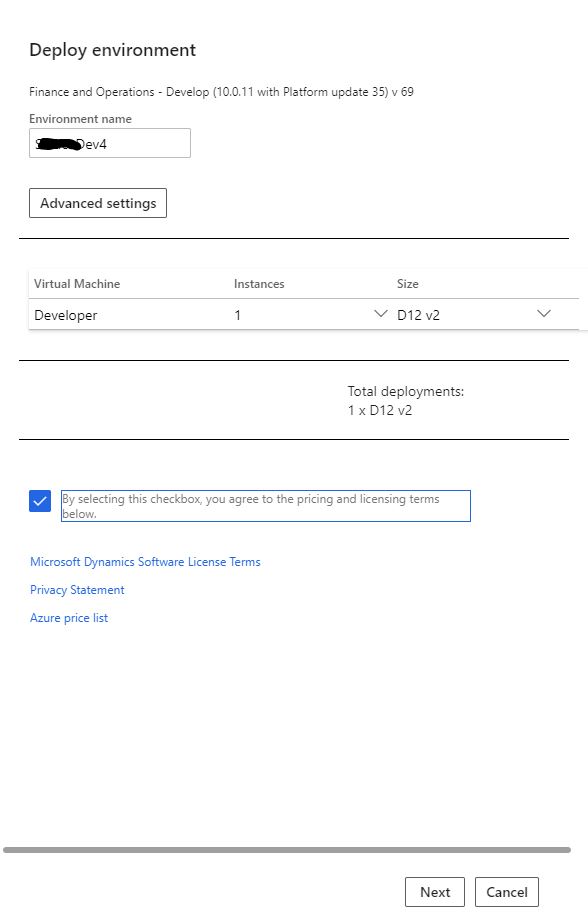
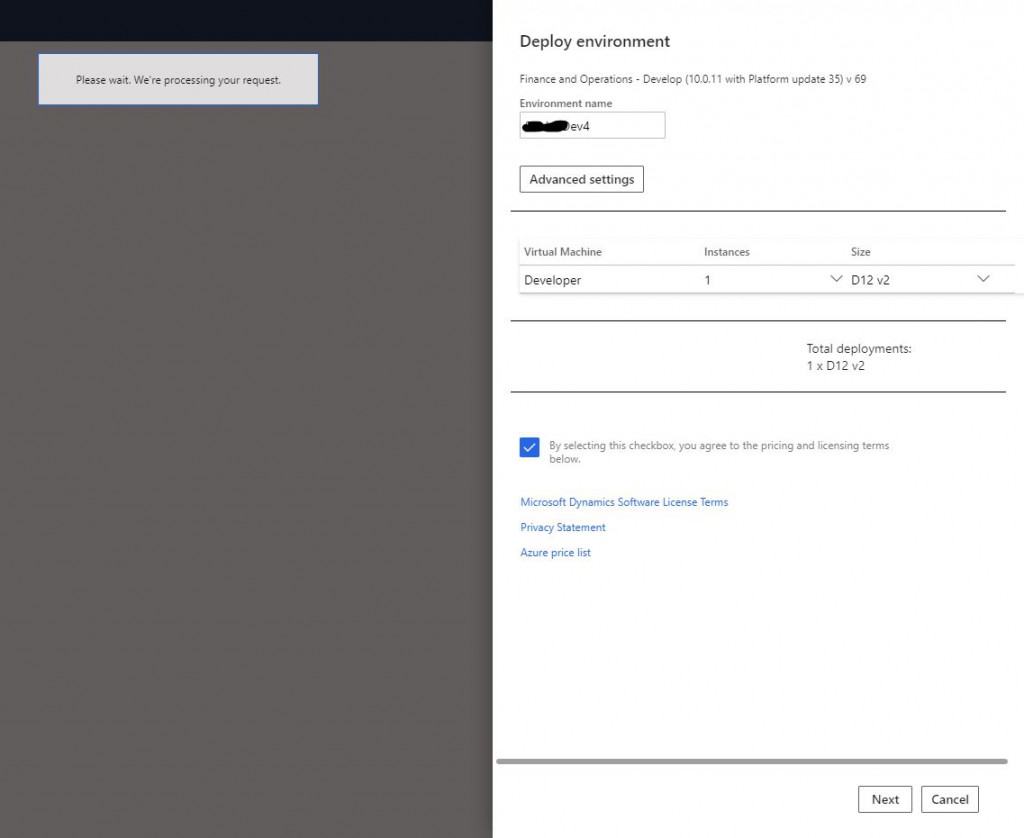
Here you can adjust the environment settings. First give a name. This name is not virtual machine’s name. We will set it from the advanced settings. The most important option is D12 machines that are recommended for you, but if you want it to be a little faster and money is not an issue, definitely choose D13. Think of it like D13 is exactly twice as D12 in terms of money and configuration. You can view the advanced settings by clicking Advanced Settings.

Image-6

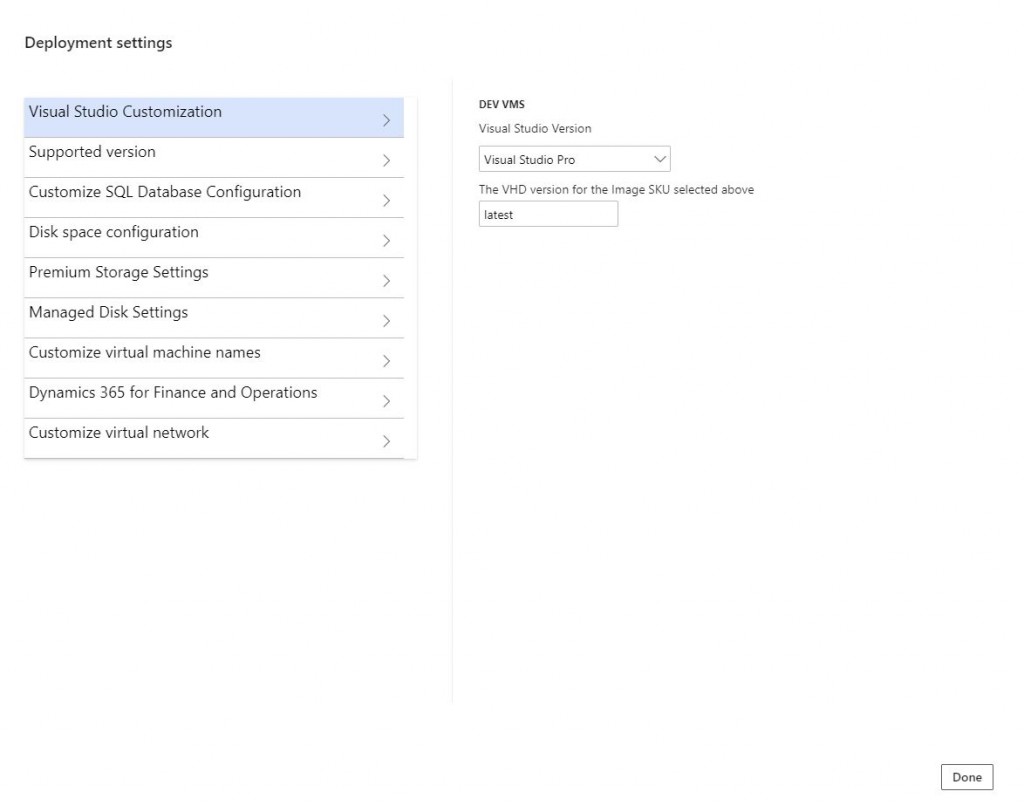
You can make advanced settings from the screen that opens. You don’t need to change many settings.  I will talk about the important ones. Visual Studio Version has two options.  Pro and Enterprise, use whichever suits you best.

Image-7

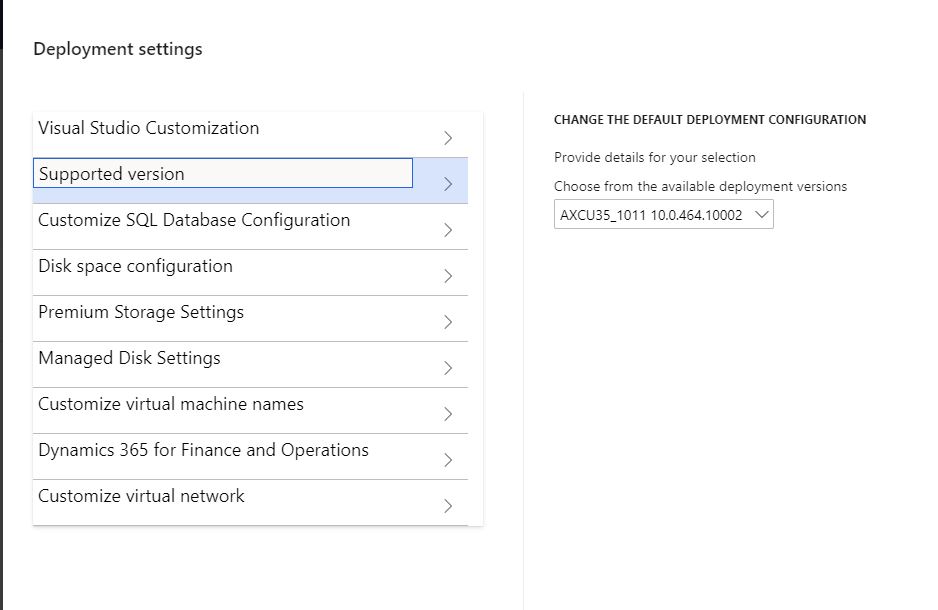
Here you can find the details of the version. Generally, you need to keep all development versions the same.

Image-8

Here you can choose whether you want Demo data in your environment. Generally, this is not necessary for the customer environment. If you are going to use Management Reporter, you can select demo data for it as well.

Image-9

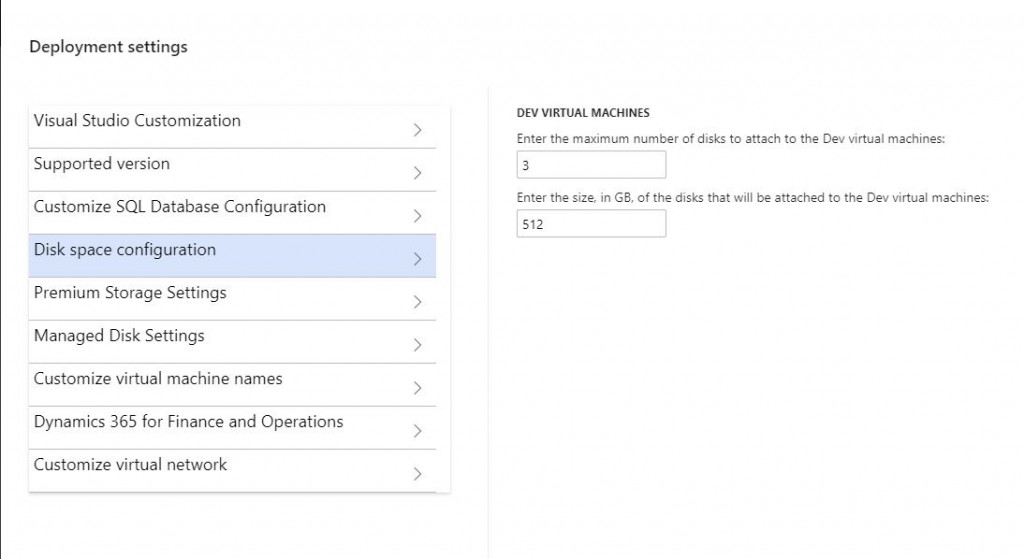
In this section you can adjust the disk sizes. These settings are sufficient for general improvements.

Image-10

You can enter the virtual machine name here. If you leave it blank, it automatically assigns a name, and it’s not a good one.

Image-11

After completing the settings, you can start the deploy process by clicking Next.

Image-12

You will then be able to see your new environment in Deploying status in the list below. It usually takes 3-4 hours to complete. I’ve seen it take less. I did not start Deploy because it was not needed for this environment.  When these steps are done, the virtual machine will be ready. Even if you see the virtual machine when you go to the Azure side, do not try to open it before the process is completed. In order to properly use the environment, this must be Deployed.

Image-13

In this article, I briefly explained how to deploy a new development machine and I will explain the necessary settings to start developing on this machine in my next articles.

Regards.

www.fatihdemirci.net

TAGs: Microsoft Life Cycle Services, LCS, Azure, Azure DevOps,X++, Project onboarding, Microsoft Dynamics 365, MsDyn365FO, MsDyn365CE, MsDyn365, Dynamics 365 Insights Power BI, Power Automate, Power Apss, Power Virtual Agents, what is Dynamics 365, Dynamics 365 ERP, Dynamics 365 CRM

How to create a new Azure Devops account and connect to Lifecycle Services (LCS) Dynamics 365 Finance and Operations project.

In this article, I will try to explain how to create a new Azure DevOps account, start a new project and connect it to Lifecycle Services. Since I did not have a new account while preparing this article, I used some pictures from old projects. However, I think it will be enough to make my point.

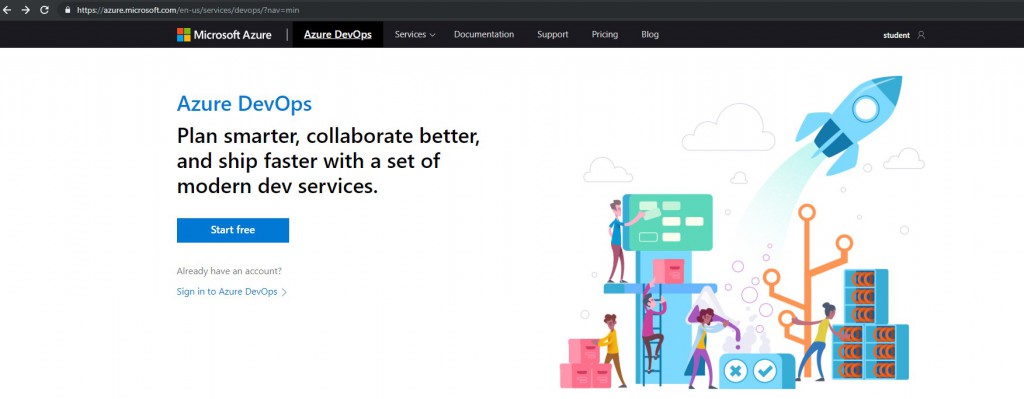
If you already have an account, you can use it. If not, you can start creating a new Azure DevOps account with a new mail using the Start free button on the screen below.

Image-1

First, you will pass certain steps and reach the Organization step. If you are making this installation for a customer or company, it is useful to use an appropriate mail and give the names correctly. You can choose where the project will be hosted. It makes more sense for us to choose Europe.

Image-2

When you continue, the screen below will appear. Click on Organization Settings.

Image-3

Since Lifecycle Services supports the old URL format, here you need to turn off Use the new URL.

Image-4

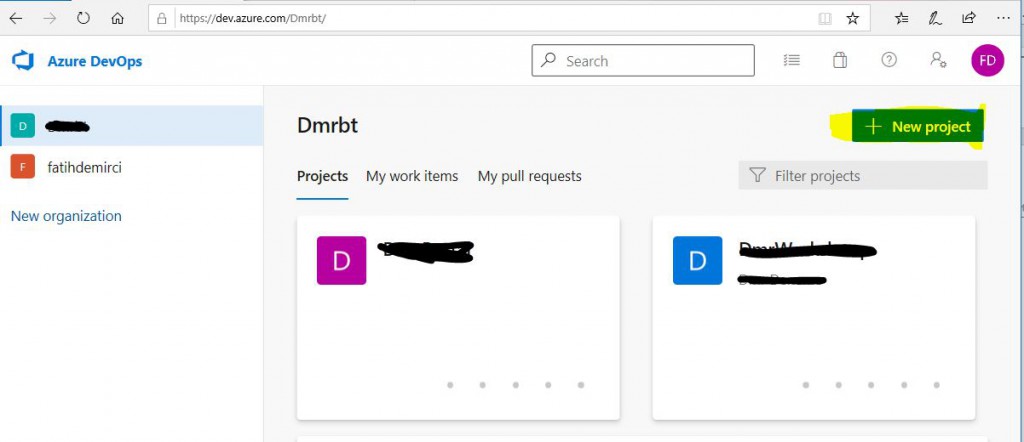
After this step, your account will be ready. If you already have an account like I do, you can log in directly and go to the project page. Start creating a new project with the New Project button.

Image-5

The name and description of the project is very important. We usually choose Private projects. There are two options in Version Control. Git is not officially supported but I’ve seen projects using it. We select TFVC. In the Work Item Process section, you can set up a project and choose the one that suits your methodology.  When you click on the Create button, the project will be created.

Image-6

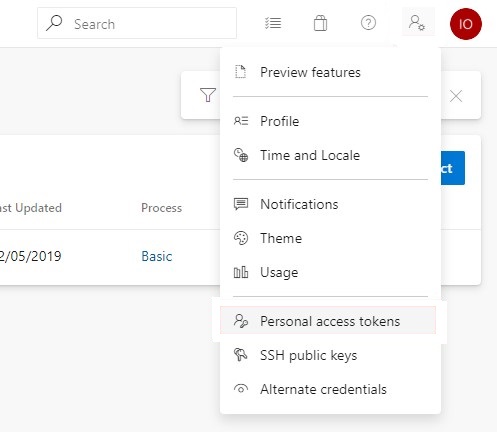
You need to create a Personal Access token from user settings. Click the path shown below to open the Personal Access token creation page.

Image-7

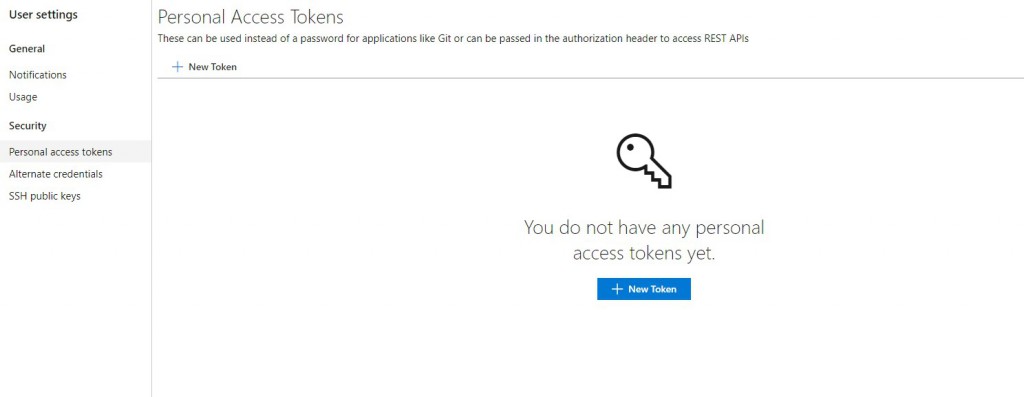
Click on New Token to open a new Token creation page.

Image-8

We define its name and authorization. Currently the longest duration it can be created for is 1 year. It is useful to give it full control.

Image-9

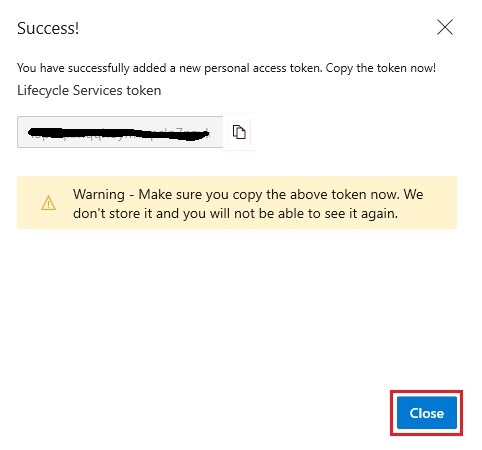
When you click Create, a new Token will be created and a screen like the one below will appear. It is not possible to reopen this page, so make sure to copy and note the Token created.

Image-10

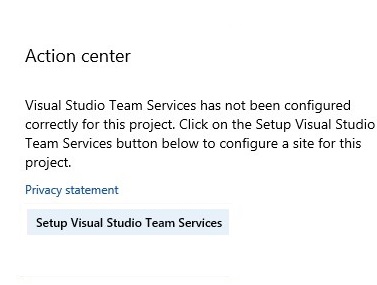
When you select your Lifecycle Services login project, if you click the Azure DevOps link from the hamburger menu, you open the page with a setup link.

Image-11

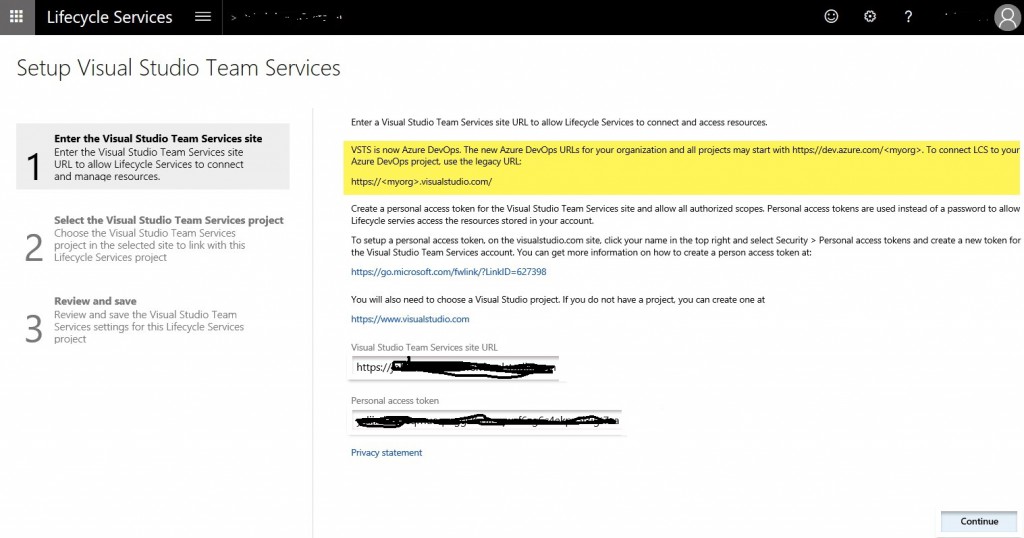
When you click on Setup Visual Studio Team Services, the following page will open. Paste the URL and Token you created here.

Image-12

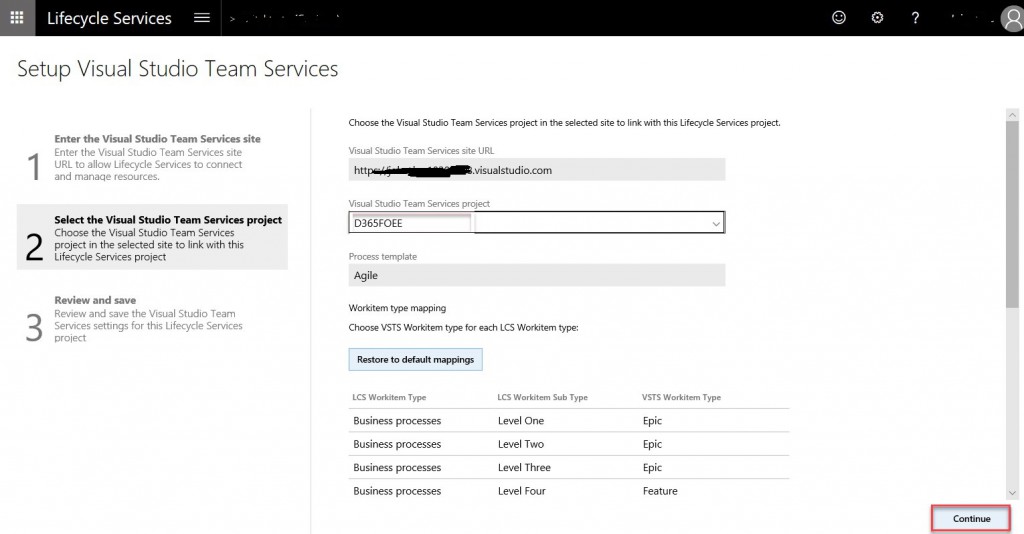
If there is no problem, you should see the project you created in the list. Select your project and continue.

Image-13

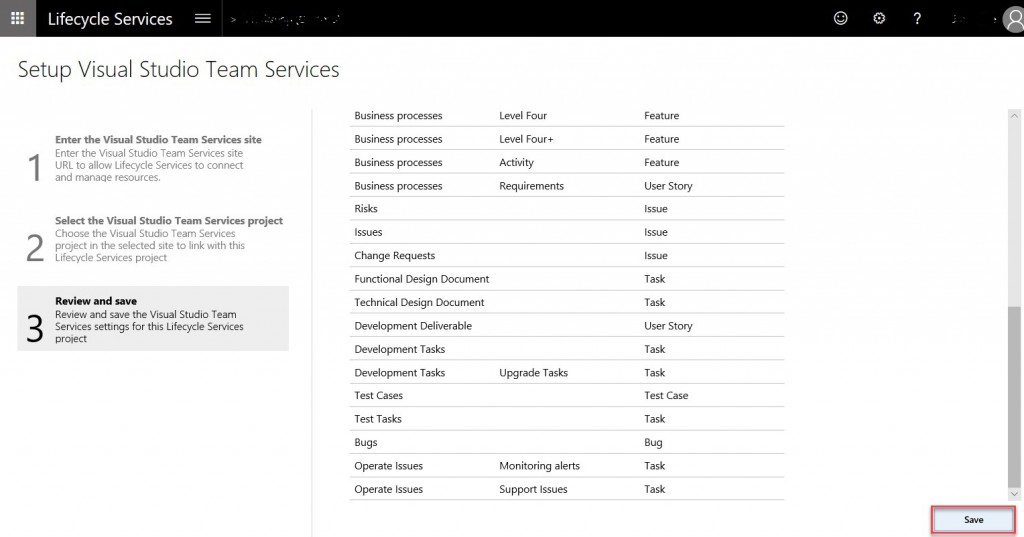
Automatic relationships are established between Azure DevOps steps and LCS steps. If you want to change them, you can, but it is OK to continue with the initial ones. Click Save to complete the connection.

Image-14

In this article, I tried to explain how Azure DevOps and Lifecycle Services are connected. These topics are new for old X++ software developers like me, but it is really easy to adapt and you may even think that it is too late when you consider the possibilities.

Regards.

www.fatihdemirci.net

TAGs: Lifecycle Services, LCS, Azure, Azure DevOps, Project onboarding, Microsoft Dynamics 365, MsDyn365FO, MsDyn365CE, MsDyn365, what is Dynamics 365, Personal Access token

How to set up a new Dynamics 365 Finance and Operations application project through Microsoft Life Cycle Services (LCS).

In this article, I will try to tell you the steps required to start the adaptation project after the sale of a new license for Dynamics 365 Finance, Dynamics 365 Supply Chain Management or Dynamics 365 Commerce.

First of all, the activation process should be performed in Azure Active Directory (Azure AD) with the company’s Tenant Administrator account by following the steps below:

  1. Create a new session as InPrivate / Incognito and open the Microsoft 365 Admin Center.
  2. Log in with the Tenant Administrator account.
  3. Go to Billing> Products & services and make sure the product you purchased is there. If not, contact your business partner.
  4. If the Subscription is active, login to LCS to trigger the Implementation Project creation.
  5. Log in to the LCS with a Tenant Administrator account on a new page.
  6. Confirm the boxes that appear and the project will be created.
  7. Tenant Administrator is automatically assigned to the Project Owner role. You can then view the project in LCS.

After completing the above steps, if there is no problem, the Implementation project will be created as shown in Image-1.
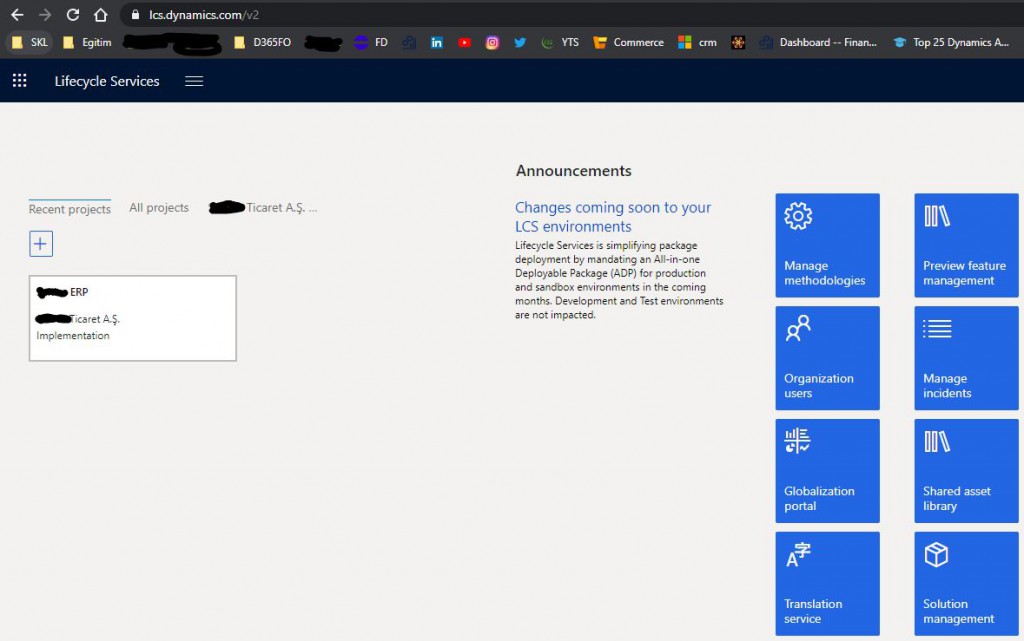
Image-1

When you click and enter the project, you will see a menu on the right as shown in Image-2. The first thing to do is to click on Project onboarding and start making the necessary definitions. When you click it, a wizard will open and steps will appear. You can skip the steps. You can return to them later.
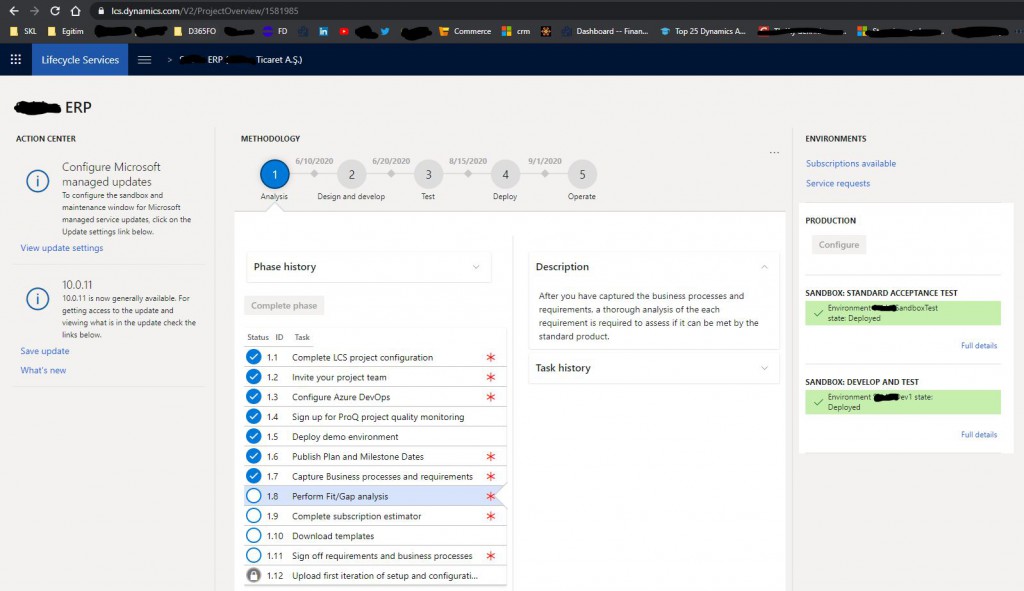
Image-2

After completing the steps, you will have a project screen similar to Image-3. I will try to explain the Environments section on the right in detail in another article.

Image-3

I had already defined the steps for this project and had not taken a picture. So I clicked on Project Onboarding from the hamburger menu and reopened it and took the pictures.  It is not exactly the same as the first form, but the definitions are the same.
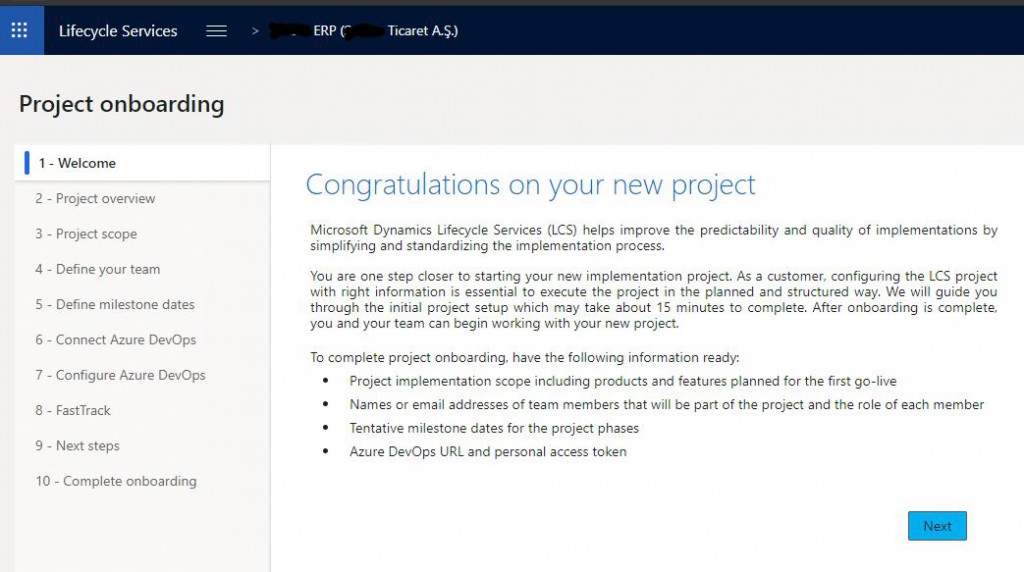
Image-4

Welcome page. It is useful to read all the explanations in the steps carefully.
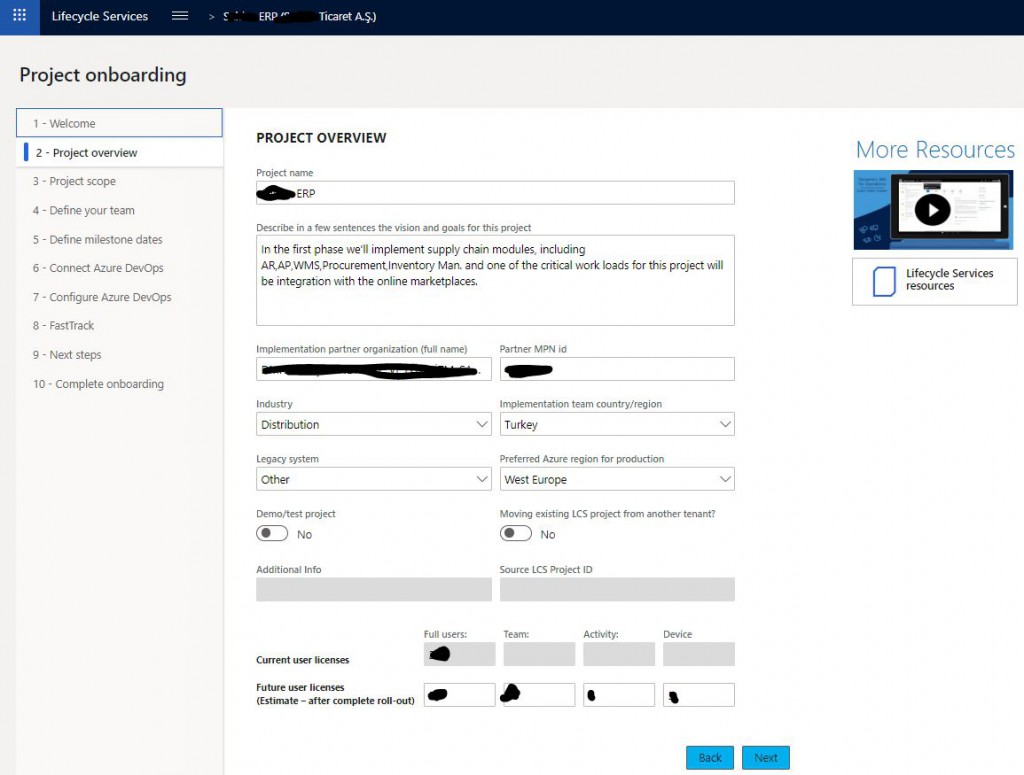
Image-5

There are some important fields on this page. First of all, a name and a description are required for the project. It is useful for everything to be in English. Because Microsoft employees who will assist you need to be able to understand the information about your project. Here you choose the business partner you will work with on the project.

Industry: The field of activity of the company is important because the FastTrack engineer to be assigned to you is selected according to the industry expertise here. For example, if the project is a retail project, an engineer specialized in retail is assigned to you.

Implementation team country/region: The location of the main project team.

Legacy system: If there is a migration from an older version or a different ERP, you can select it here.

Preferred Azure region for production: Currently the optimal choice for Turkey is Data Center West Europe. Generally we choose this in projects.

Future user licenses: If you expect an increase in the number of languages when the whole project goes live, you can specify it here. It is useful to do this because the live server configurations are set according to your license and some information you provide.
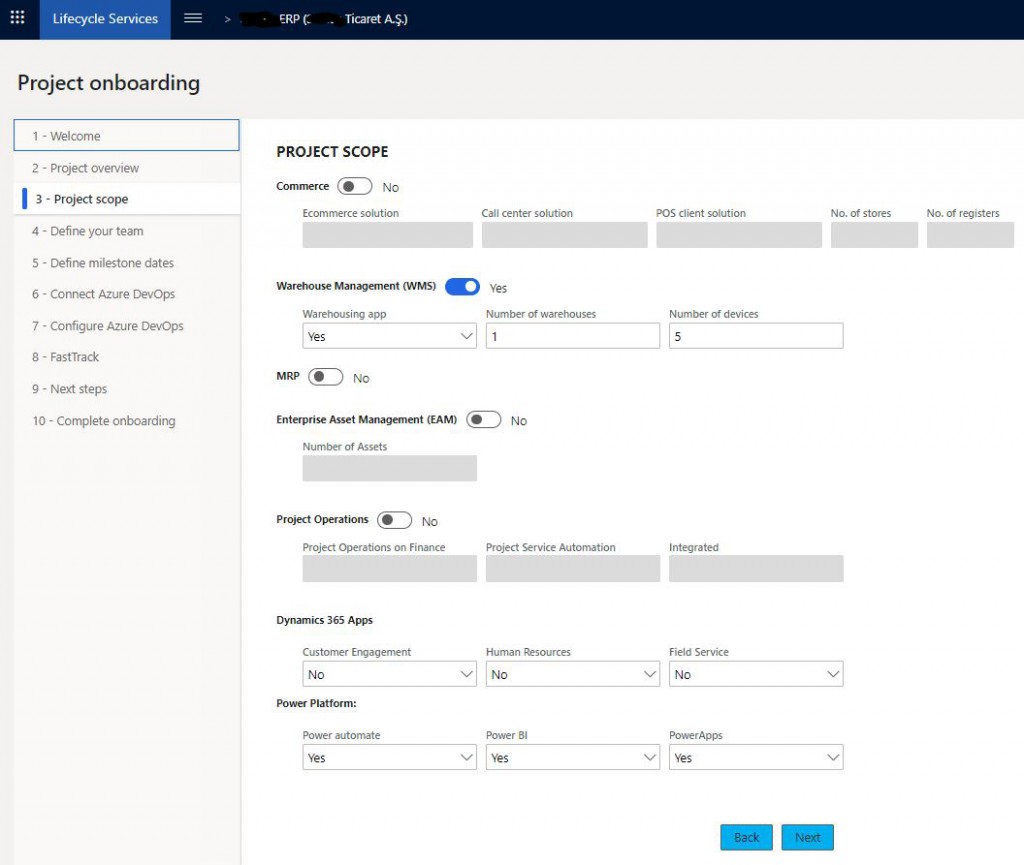
Image-6

In this section, we select the modules to be used for the project and the necessary settings. We marked warehouse management and MRP, since they will be used in this project. Also, we mark any of the other Dynamics 365 products that will be used. We marked Power Platform, since only that will be used in our project.
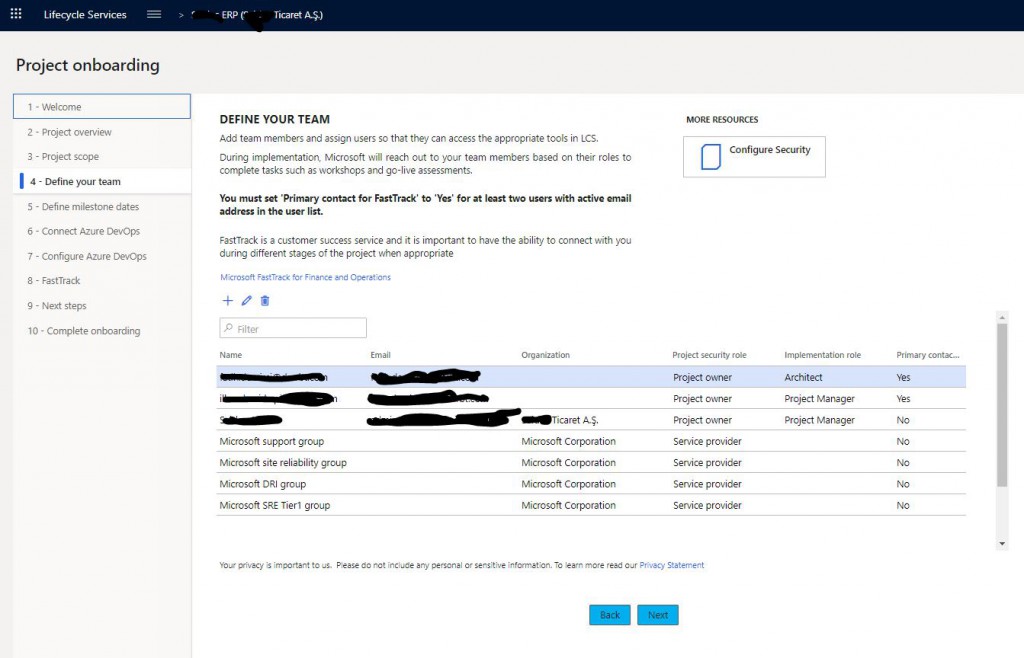
Image-7

In this section, we define the project team. You do not need to enter the whole team at the first stage. It is useful to define Project Manager and Architect roles especially for the FastTrack team to communicate.  Those starting with Microsoft come automatically, you don’t need to do anything for them.

Image-8

Project dates are required to be entered at the first stage.  A separate window opens for that. The dates can be changed later, but you need to enter the correct dates at the first stage. The whole project plan is created according to these dates and the FastTrack team supports you according to these dates.
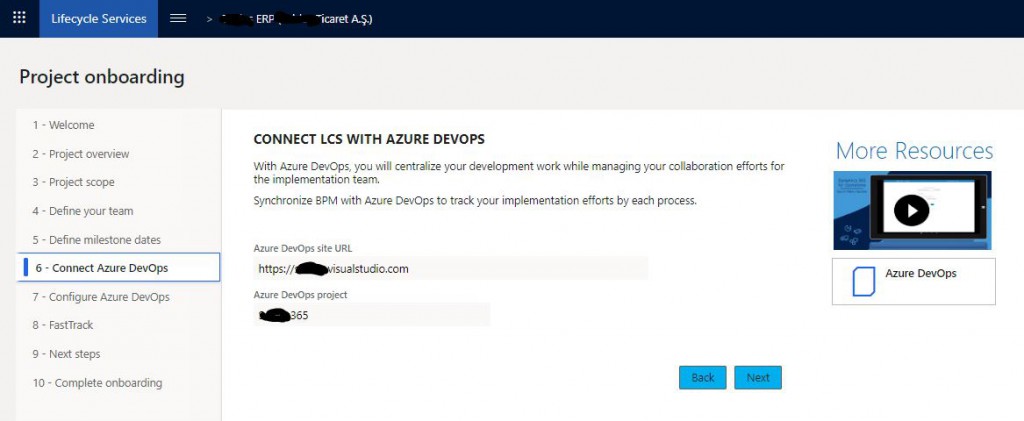
Image-9

This is one of the most important steps. Dynamics 365 projects are now managed through Azure DevOps. First, you need to set up Azure DevOps with the given Admin account and create a TFVC type project. Unfortunately Git is not yet supported. I’ve come across Git uses in some articles, but haven’t tried it yet.  You will then establish the relationship between LCS and Azure DevOps here. There are a lot of details on Azure DevOps, which I will cover in another article.

Image-10

After connecting the project, you should establish a link between LCS and Azure DevOps steps. I leave this part as it is. In the future, there may be projects that we change according to the project needs.
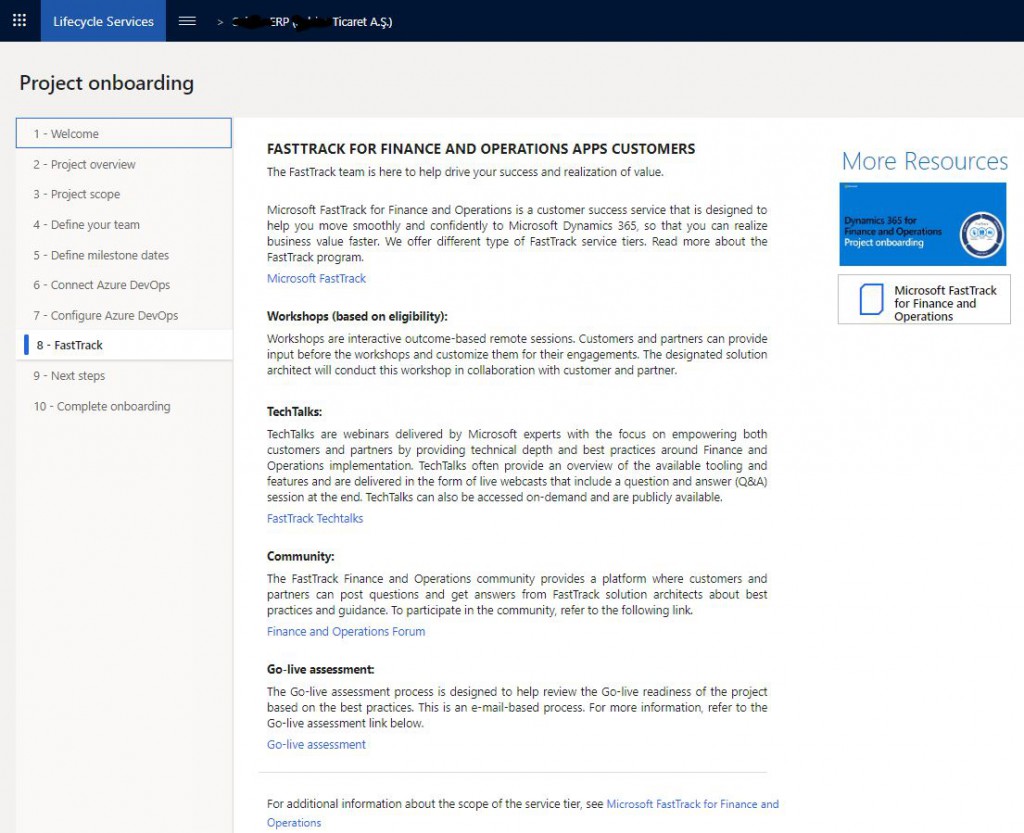
Image-11

FastTrack introduction and related links are available on this page. Especially TechTalks has very good content, you should definitely watch it before the project.

Image-12

This section provides general information about the project steps and useful links.

Image-13

In the last step, we complete the project start.
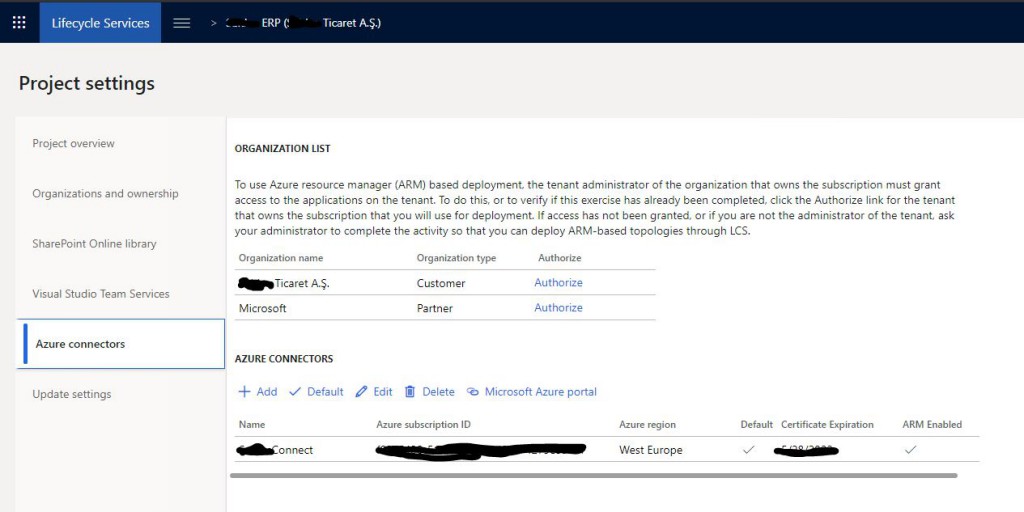
Image-14

One of the most important settings you need to set after you finish is to add Azure Connection. If the company does not have an Azure account, you must start a membership through the Azure Portal with an Admin account. Here there are a few steps you need to follow. To connect LCS with the Azure you have opened, you must download the certificate and upload it to the Azure Portal. You must also authorize Dynamics 365 application installation via the Azure Portal. I will prepare a separate article for this section.

Image-15

After completing all these steps, you are ready to set up the media. Depending on the license you purchased, Microsoft gives 3 media rights shown in Image-16. There is no charge in these media. You pay according to the pay-as-you-go method for each additional environment you want to set up. Often additional environments are needed for DevBox and Test. You can install these machines from the Cloud-hosted environments menu.

PRODUCTION: It is deployed by Microsoft in the final phase of the Project.

SANDBOX: STANDARD ACCEPTANCE TEST: This machine is Tier-2 and is mainly used for Testing. We setup this environment. By setup, I mean we adjust the settings, determine its type and Microsoft prepares it for us.

SANDBOX: DEVELOP AND TEST: We usually set this machine as the Build machine. They have removed connecting to these machines with the Admin account, so you shouldn’t use this machine for development.

Image-16

In this article, I tried to explain the necessary steps for starting the project after licensing. It is necessary to consider many different options depending on the size and complexity of the project. There are now three indispensable places for an ERP project and you should know them well. LCS, Azure and Azure DevOps. Knowing the basic features of these three products, each of which is a separate world, makes it easier to project and reduce costs. I have made an introduction to the LCS and I will continue to explain the details.

Regards.

www.fatihdemirci.net

TAGs: Microsoft Life Cycle Services, LCS, Azure, Azure DevOps, Project onboarding, Microsoft Dynamics 365, MsDyn365FO, MsDyn365CE, MsDyn365, Dynamics 365 Insights Power BI, Power Automate, Power Apss, Power Virtual Agents, what is Dynamics 365, Dynamics 365 ERP, Dynamics 365 CRM
Linking Dynamics 365 Finance and Operations Branch Logic and Local Folders to a Azure DevOps project.

In this article, using version control for Dynamics 365 Finance and Operations is now a must. It was also possible to use it in older versions, but it did not work very well, so we used version control in only a few of the projects I have worked on until now. Of course, our development environment is Visual Studio, which makes it very easy.  Now let’s look at how to adjust some basic settings that are required at the beginning of the project and the Branch logic. Branch allows you to manage your code and developers to work independently. There are many Branch strategies available. I am not an expert on this subject, so I try to use the simpler versions. The 3 most used approaches are as follows. Main, Main and Dev, Main, Dev and Release. You can use these 3 different methods. For more information, you can review the Branching strategies article. I usually use the Dev and Main structure. If the project is small and there are no other developers other than you, you can just continue with Main. When there is a single Branch, merging is not required, you can bring to live faster, but when you do not want to bring certain things, you need to work with Dev at the very least because one Branch does not cut it. Let’s look at how the first definitions are made.

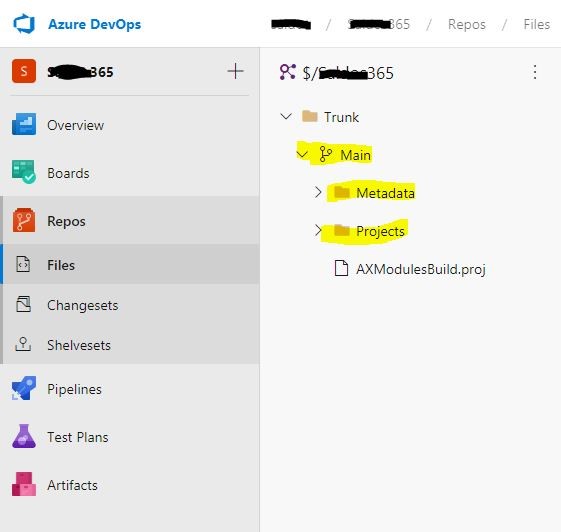
I explained how to connect Azure DevOps over LCS in my previous articles. When you establish this connection, the following Trunk folder will be created in your Azure DevOps project. You have to keep this structure. Initial creation process creates Main as a folder. You have to change this to Branch from Visual Studio. I couldn’t get the screenshot because I didn’t have a brand new environment, so the image shows Main Branch.

Image-1

To turn a folder into Branch, you have to open the Source Control Explorer screen from Visual Studio, right-click the folder and select Branching and Merging -> Convert to Branch.

Image-2

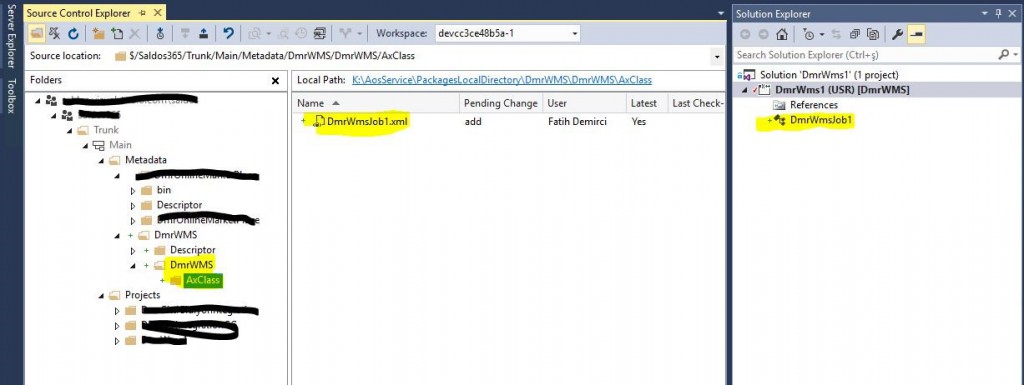
Now, using the model I created in my previous article, let’s associate the Metadata and Projects folders with our Azure DevOps project. Don’t let the images mislead you. Since I don’t have a brand new environment, I took the screenshots from a previously processed environment, but the logic is the same. First of all, this project only includes Main. If you are going to work with Dev, all development environments must be connected to Dev. The process is the same.  Open the Source Control Explorer screen.

Image-3

In brand new environment, there is no folder under Metadata and Project. Just ignore them. Now we can associate the Azure DevOps folders on the left with the folders in our virtual machine. Click on the Not Mapped link.

Image-4

Map to K:\AosService\PackagesLocalDirectory. Selecting the folder automatically adds Metadata. Don’t forget to delete it. Complete the process by clicking Map.

Image-5

I create the K:\VSProject folder. This is not a must, but it is useful to keep the path short.

Image-6

Similarly, when you are on the Projects folder, click the Not mapped link. I associate it with K:\VSProjects. Here it directly adds Projects as well, be careful. I delete it. Complete the process by clicking Map.

Image-7

At this point, you have linked your folders. However, you have not specified which files will be included in the version control. Let’s create these connections using the Model and project I created in my previous article. I had a package called DmrWMS. Right click on the Metadata and click Add Item to Folder. Find your package in the window that opens.

Image-8

Go to the Descriptor folder and select the xml file that has the same name as the package. This file contains our package and model information.

Image-9

After you continue and see it in the Item to add section, click Finish.

Image-10

Actually, our codes are stored under the model, but since we are linking this through the project, no further additions are required. If it is not added by default, you can add your project by clicking Add Item to Folder. You only need to add metadata and code to the version control.  When you check, you can see all your codes in the DmrWMS model folder. Do not be confused by the same model and package name.

Image-11

Now let’s add a job to our project and see how it looks in version control.

Image-12

While creating my project, I marked it as add to version control. I can also add it later. So when I create a new object it is automatically created in my model folder.

Image-13

I can see my pending Check Ins in the Pending Changes section. There are 3 files. These are the must have ones. My project file, My package file, and Job. Let’s Check In and see our development on Azure DevOps.

Image-14

If you have reached this stage, you are ready to develop. We saw the same structure on Azure DevOps. Now we can test and go live after Build operation.

Image-15

In this article, I tried to explain the required Azure DevOps and Devbox machine’s first folder association for a new project and how to connect the model, package and project we just created. This is a much more comprehensive topic, but I wanted to at least make an introduction. I will cover it in more detail later. For example, in Branch logic, there is no single truth, everyone has different experiences. It is also necessary to make changes when it is required to decide according to the team and the project. There are many people who do not have any experience in Dynamics 365 but are Azure DevOps experts, you can get assistance from them. But it is always useful to explain the unique features of Dynamics 365. You will produce a better solution.

Regards.

www.fatihdemirci.net

TAGs: Microsoft Life Cycle Services, LCS, Azure, Azure DevOps, Project onboarding, Microsoft Dynamics 365, MsDyn365FO, MsDyn365CE, MsDyn365, Dynamics 365 Insights Power BI, Power Automate, Power Apss, Power Virtual Agents, what is Dynamics 365, Dynamics 365 ERP, Dynamics 365 CRM