Posts Tagged ‘ Lifecycle Services

Dynamics 365 Finance and Operations için yeni bir Build ortamı nasıl ayağa kaldırılır?

Bu yazıda Dynamics 365 Finance and Operations için yeni Build tipinde bir sanal makine nasıl ayağa kaldırılır adım adım anlatmaya çalışacağım.

Başlamadan önce eğer bir müşteri uyarlama projeniz varsa burada gelen SandBox Develop And Test ortamını Build olarak ayarlamanız öneriliyor. Çünkü bu ortama yakın zamanda admin giriş yetkisi kalkacak ve geliştirme için kullanmak pek mümkün olmayacak. Dolayısıyla Build olarak ayarlamakta fayda var. Ayrıca yine yakın zamanda çıkacak bir Agent sayesinde bütün bir VM ayırmadan Build yapabileceğiz.

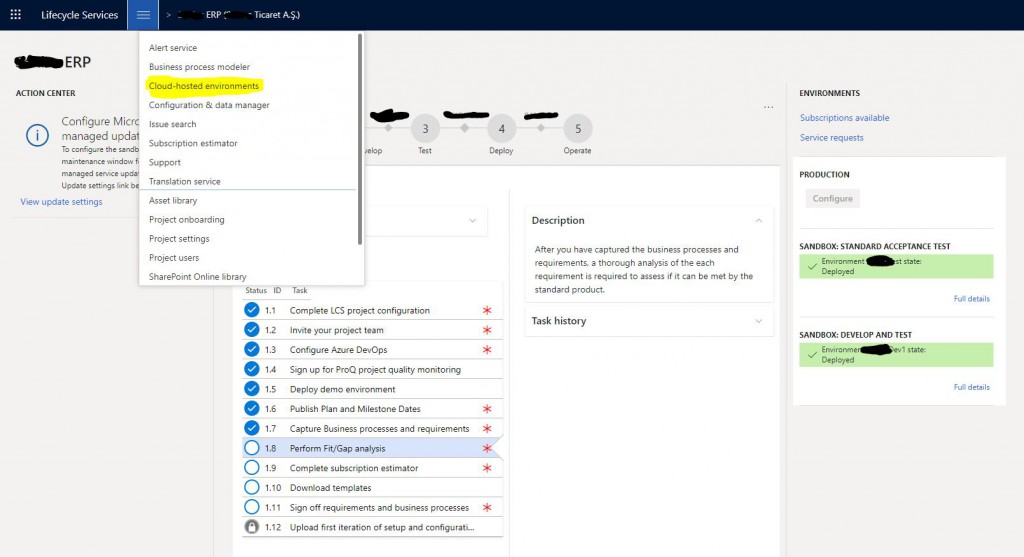
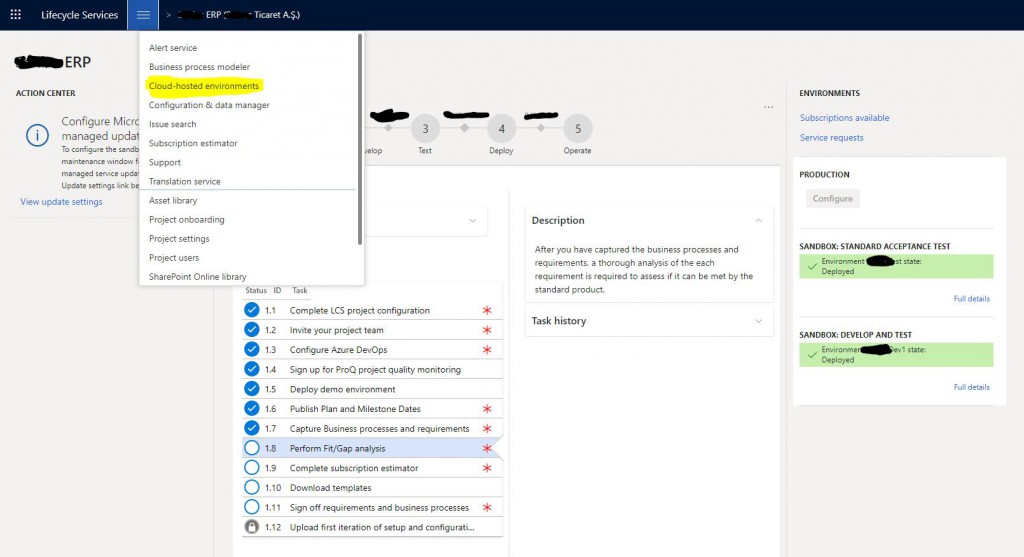
Biz bu örnekte Cloud-hosted environment üzerinden yeni bir Build makine oluşturmayı göreceğiz. Sandbox ile aynı adımlara sahip dolayısıyla ikisini de kapsayacak bir yazı olacak. Öncelikle Lifecycle Services’a giriş yapıyoruz. Projemizi seçip hamburger menüden Cloud-hosted environments’ı seçiyoruz.

Resim-1

Read more

Yeni bir Azure Devops hesabı nasıl oluşturulur ve Lifecycle Services (LCS) Dynamics 365 Finance and Operations projesine nasıl bağlanır.

Bu yazıda yeni bir Azure DevOps hesabı oluşturup yeni bir proje başlatıp bunu Lifecycle Services’e nasıl bağlıyoruz anlatmaya çalışacağım. Bu yazıyı hazırlarken sıfır bir hesabım olmadığı için bazı resimleri eski projelerden aldım. Ancak maksadımı anlatmaya yeteceğini düşünüyorum.

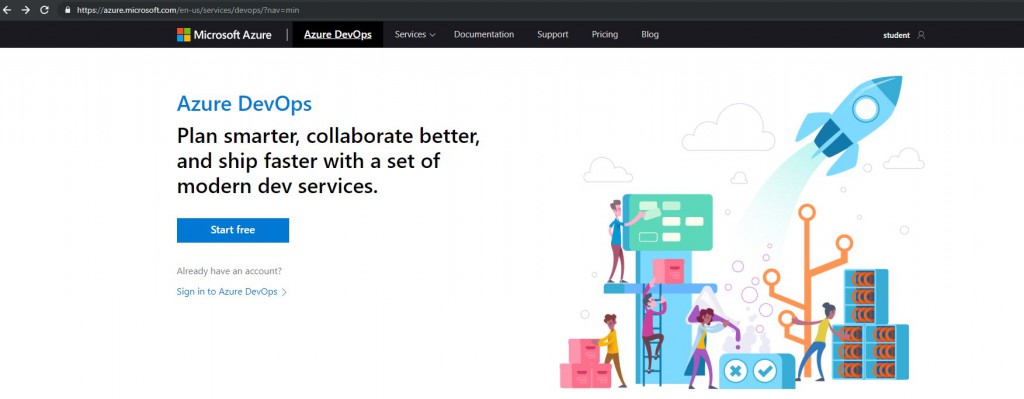
Eğer hali hazırda bir hesabınız varsa onu kullanabilirsiniz. Yoksa yeni bir mail ile aşağıdaki ekrandan Start free butonunu kullanarak yeni Azure DevOps hesabı oluşturmayı başlatabilirsiniz.

Resim-1

Read more

Lifecycle Services için Azure Connector kurulumu nasıl yapılır?

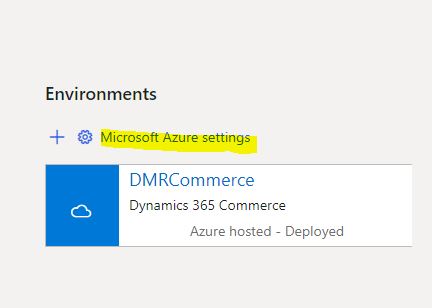
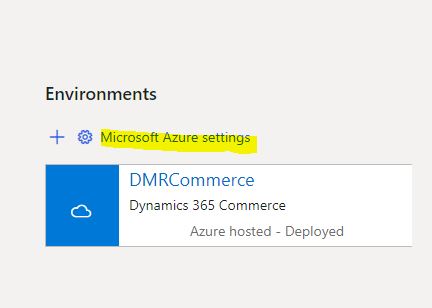
Bu yazıda Dynamics 365 For Finance and Operations Deploy edebilmek için gerekli olan Azure bağlantısı Lifecycle Services üzerinden nasıl ayarlanır anlatmaya çalışacağım. Öncelikle Lifecycle Services içinden projemizi açıyoruz. Environments altında Microsoft Azure settings’e tıklıyoruz.

Resim-1

Read more

How to set up Azure Connector for Lifecycle Services?

In this article, I will try to explain how to set up the Azure connection required to Deploy Dynamics 365 For Finance and Operations via Lifecycle Services. First, open your project from Lifecycle Services. Under Environments, click on Microsoft Azure settings.

Image-1

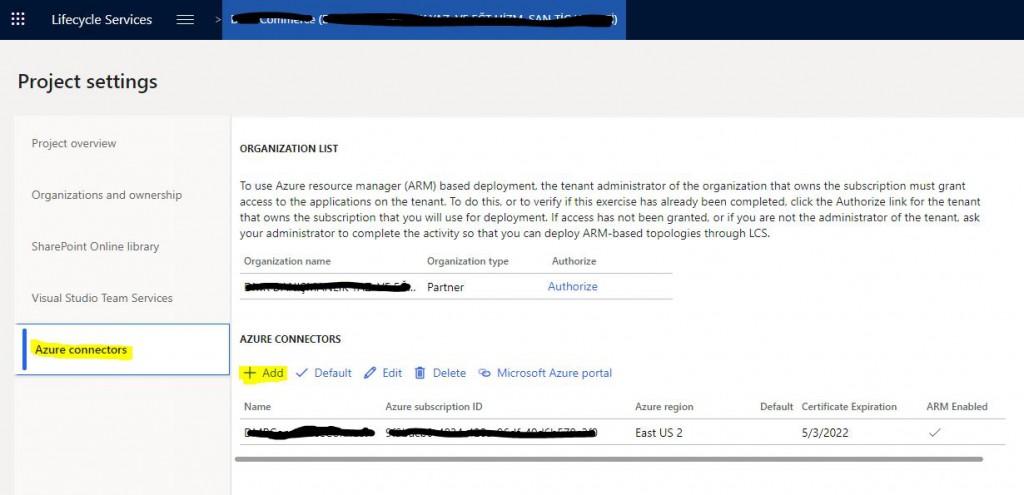
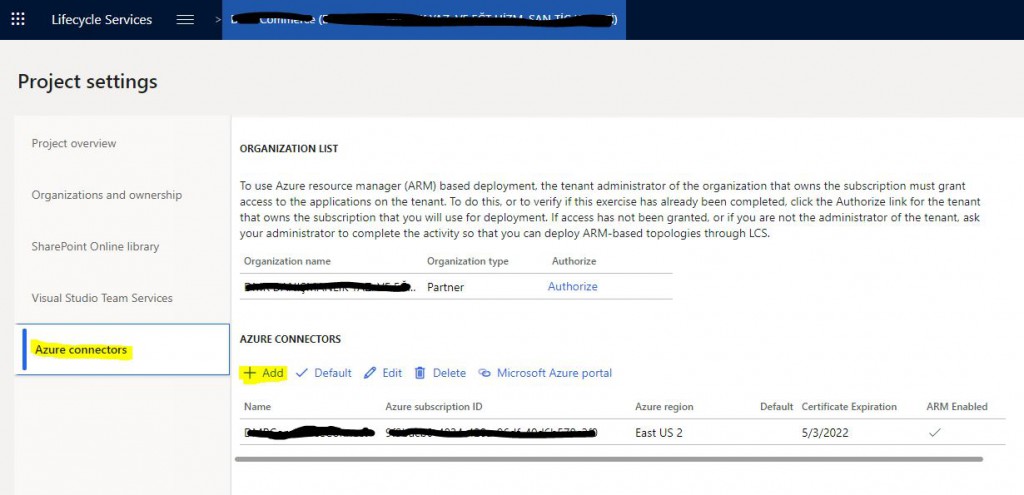
Your Azure Connectors will appear from the Azure connectors tab, if any. Since I have an available connection for this environment, it appears on the list. When you check here again after completing these steps, the connection should be established.  You can start adding a new link by clicking the + Add button.

Image-2

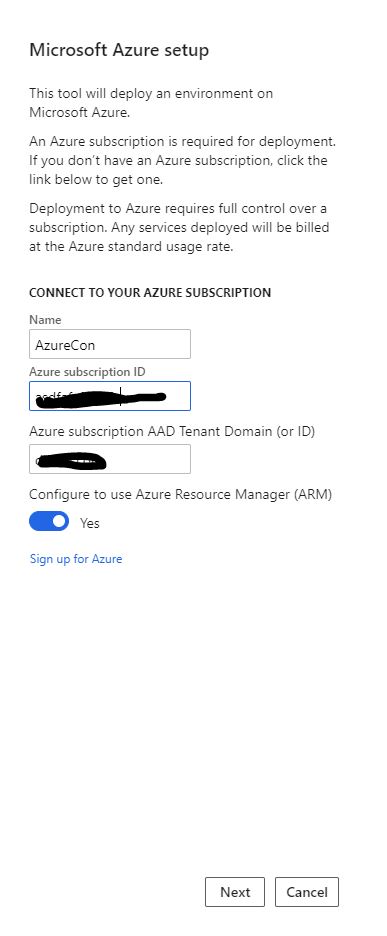
In the window that opens, Name will be the name we gave for the link.  In the Azure subscription ID section, you must enter the code of the Azure membership we want to connect to. Tenant Domain information will automatically be available. You should mark Azure Rsource Manager(ARM) as Yes. Proceed to the next page by clicking Next.

Image-3

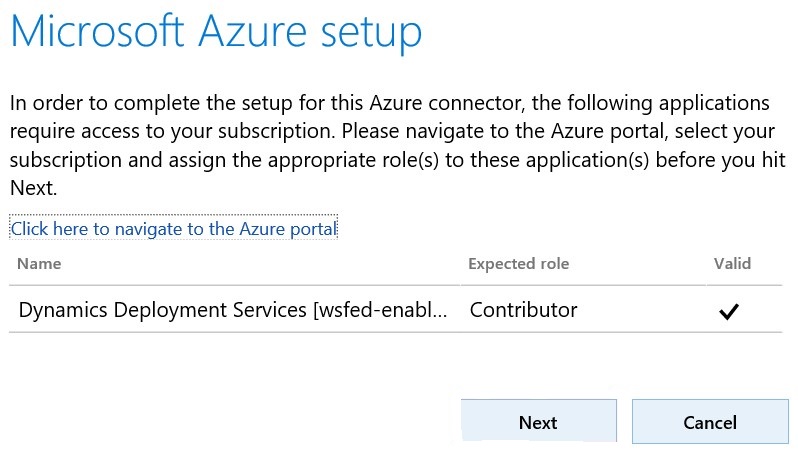
You must have given the Dynamics Deployment Services authorization that I mentioned in my previous article before this step. If you have, you will see the screen below. Proceed to the next page by clicking Next.

Image-4

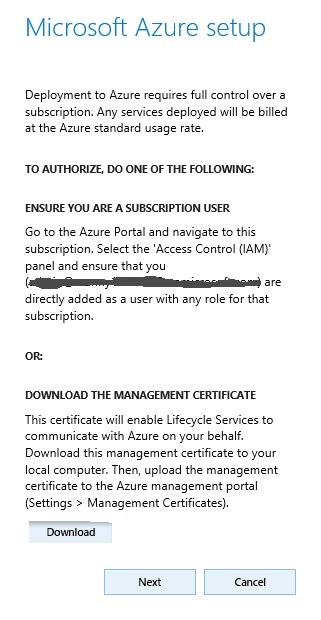
Before continuing, you need to download the Management certificate and upload it to the Microsoft Azure Portal. You can leave this page open.

Image-5

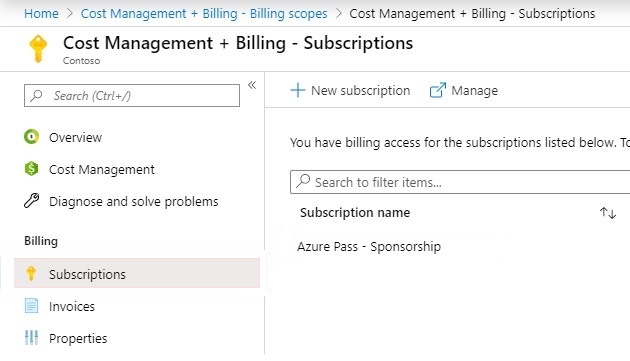
Sign in to the Azure portal and choose the membership you want to connect with.

Image-6

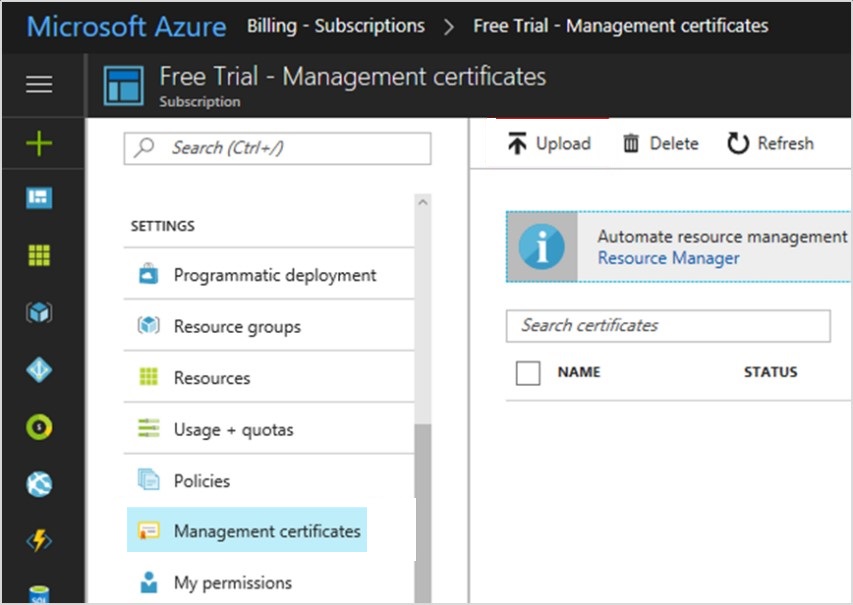
Click on the Management certificates section and click the Upload button in the window that opens.

Image-7

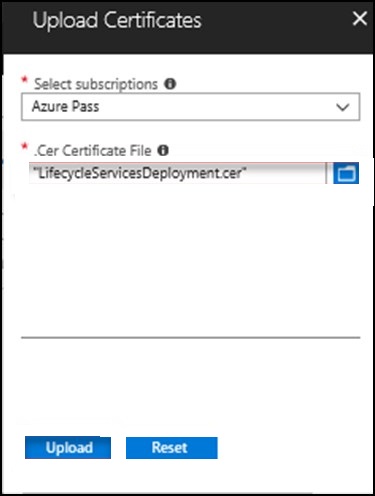
Select the certificate you downloaded and install it.

Image-8

When you see this screen, it means the installation process is completed.

Image-9

You can return to the screen in Lifecycle Services and continue by clicking the Next button. After this stage, you can continue without any errors. 

Image-10

In the Azure region, you usually choose West Europe.

Image-11

After clicking the Connect button, you should see an item like the one below in your Azure Connection list. At this point, the connection is complete.

Image-12

In this article, I tried to explain how to set up Azure connection through Lifecycle Services. Since Dynamics 365 is a structure running on Azure, it is necessary to have knowledge about many Azure issues. I plan to continue writing articles on these topics. I hope it is useful for you.

Regards.

www.fatihdemirci.net

TAGs: Lifecycle Services, LCS, Azure, Azure DevOps, Dynamics 365, MsDyn365FO, MsDyn365CE, MsDyn365, Dynamics 365 Insights, what is Dynamics 365, Dynamics 365 ERP, Dynamics 365 CRM, Azure Connections

How to deploy a new Build environment for Dynamics 365 Finance and Operations?

In this article, I will try to explain step by step how to deploy a new Build type virtual machine for Dynamics 365 Finance and Operations.

Before you start, if you have a customer adaptation project, it is recommended to set the SandBox Develop And Test environment that appears here as Build. Because the admin login authorization to this environment will soon be removed and it will not be possible to use it for development. Therefore, it is useful to set it as Build. In addition, thanks to an Agent that will be released soon, we will be able to Build without allocating an entire VM.

In this example, you will see how to create a new Build machine via Cloud-hosted environment. It has the same steps as Sandbox, so it will be a post that will cover both. First, we log in to Lifecycle Services. Select your project and select Cloud-hosted environments from the hamburger menu.

Image-1

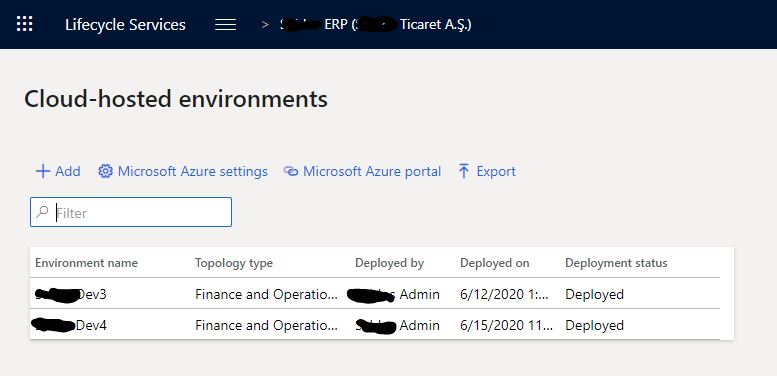
A page will open and list your environments. Here you can view the details and manage their status. For a new Build environment, click the + Add button.

Image-2

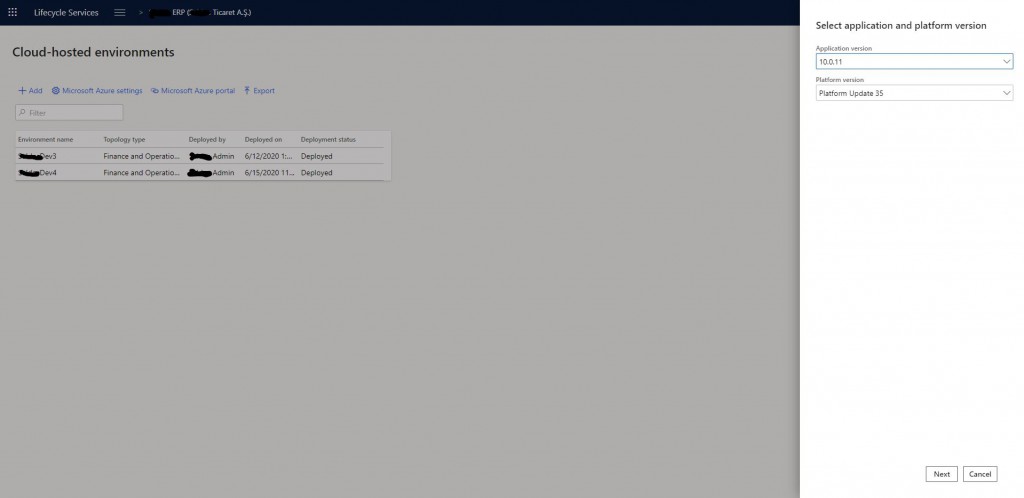
The first screen that opens has Application Version and Platform Version. You usually select the most recent one. Of course, you should select the version of your environment here. Click Next to proceed.

Image-3

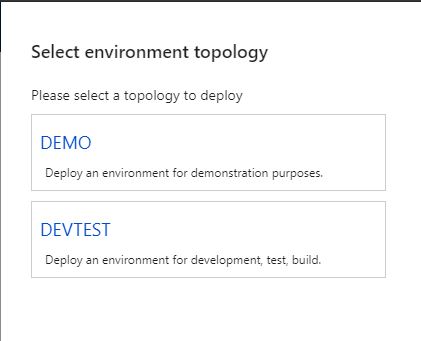
Here you select the type of the environment. Available options are Demo and DevTest. For Build, you should choose DevTest.

Image-4

There are two options here. First one is used for Build or Test. For development, you should select Develop. We will choose the one above.

Image-5

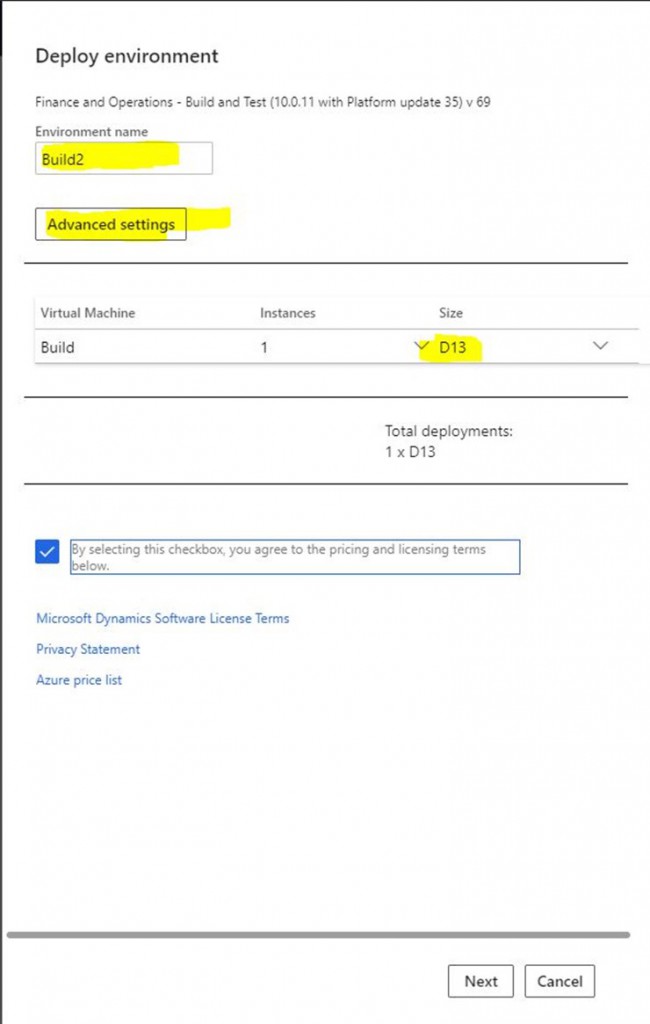
Here you can adjust the environment settings. First give a name. This name is not virtual machine’s name. We will set it from the advanced settings. The most important option is D12  or DS12 V2 machines that are recommended For you, but if you want it to be a little faster and money is not an issue, choose D13. You can view the advanced settings by clicking Advanced Settings.

Image-6

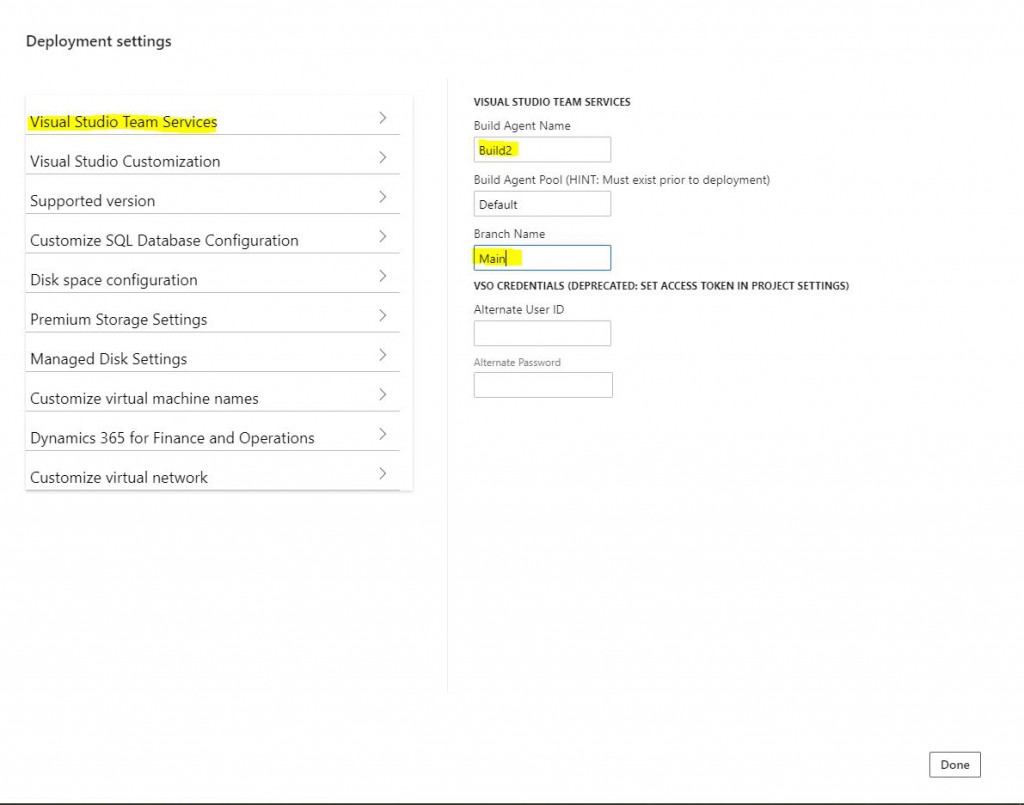
You can make advanced settings from the screen that opens. You don’t need to change many settings.  I will talk about the important ones. Build Agent Name is the name you will see in Azure DevOps. You should give it an appropriate name. The most important part is the Branch Name. I typed Main here. It is case sensitive, so it is necessary to type Branch name correctly.

Image-7

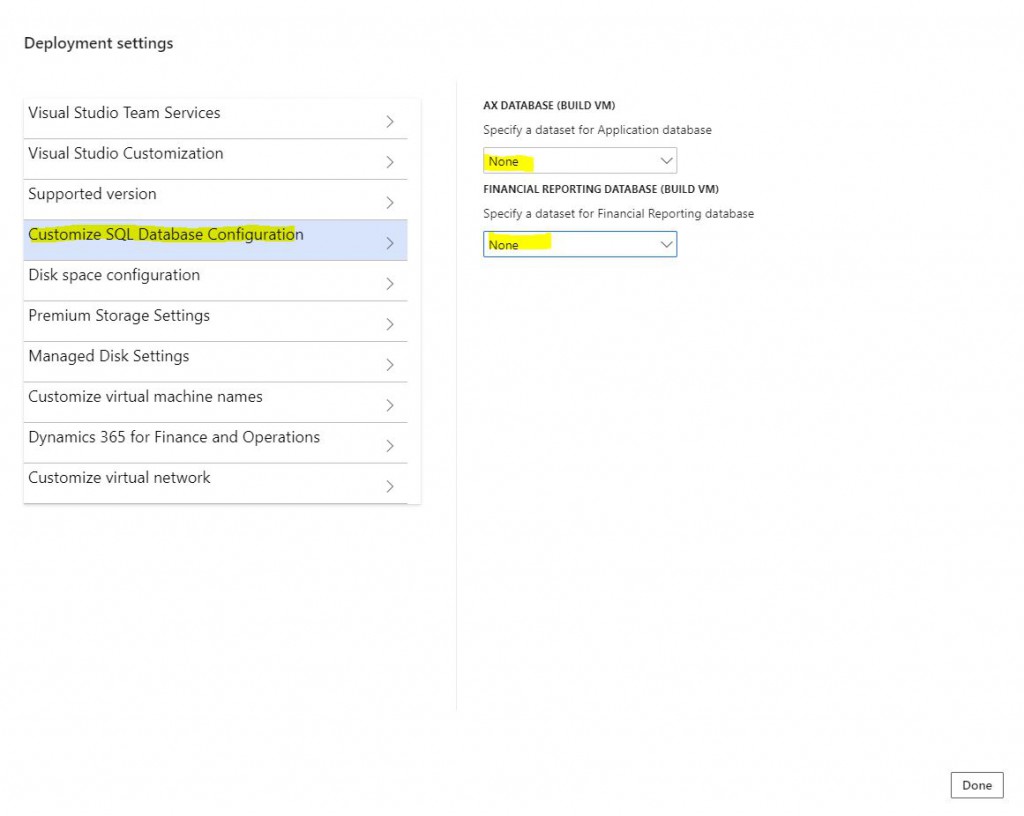
There is no need for Demo data for the Build environment, you can remove it from here.

Image-8

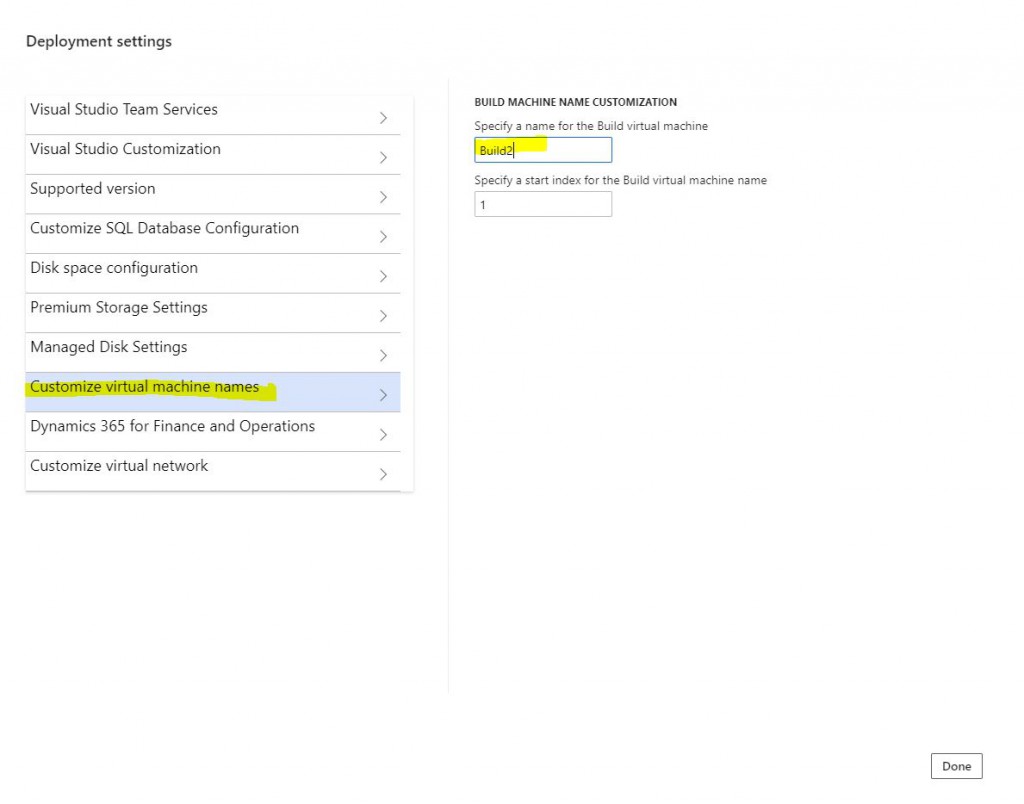
You can name your virtual machine in this section.

Image-9

Settings are done. Continue with Next. I selected D12 V2 for the For you. However the picture shows D13. Recommended dimension is D12 and its derivatives.

Image-10

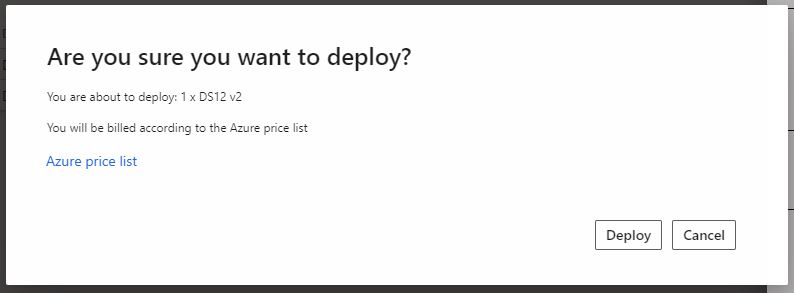
The confirmation screen will appear. When you click Deploy, the Build environment will be queued to be deployed. This process is completed in 3-6 hours.

Image-11

In this article, I tried to briefly explain how to deploy a new Build machine and I will explain how to Build in my next articles. I will try to explain how the resulting packages are transferred to the test and live. I hope it is useful for you.

Regards.

www.fatihdemirci.net

TAGs: Build VM, Lifecycle Services, LCS, Azure DevOps, X++, Microsoft Dynamics 365, MsDyn365FO, MsDyn365CE, MsDyn365, Dynamics 365 Insights Power BI, Power Automate, Power Apss, Power Virtual Agents, what is Dynamics 365, Dynamics 365 ERP, Dynamics 365 CRM

How to create a new Azure Devops account and connect to Lifecycle Services (LCS) Dynamics 365 Finance and Operations project.

In this article, I will try to explain how to create a new Azure DevOps account, start a new project and connect it to Lifecycle Services. Since I did not have a new account while preparing this article, I used some pictures from old projects. However, I think it will be enough to make my point.

If you already have an account, you can use it. If not, you can start creating a new Azure DevOps account with a new mail using the Start free button on the screen below.
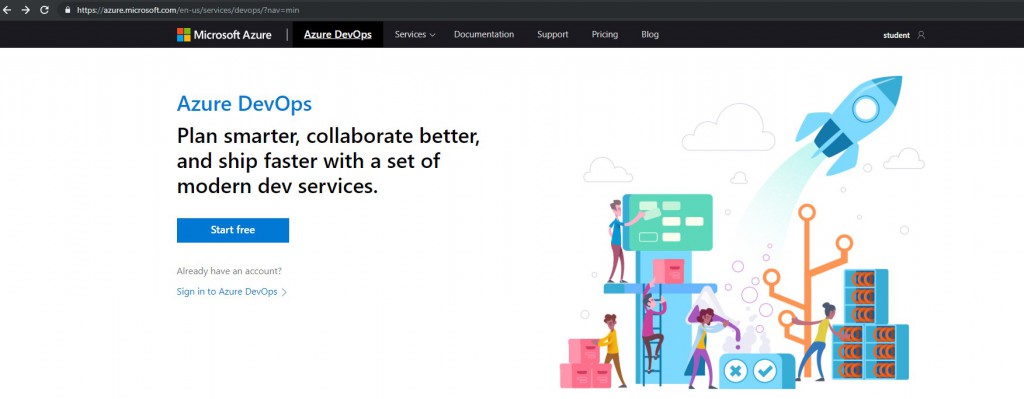
Image-1

First, you will pass certain steps and reach the Organization step. If you are making this installation for a customer or company, it is useful to use an appropriate mail and give the names correctly. You can choose where the project will be hosted. It makes more sense for us to choose Europe.

Image-2

When you continue, the screen below will appear. Click on Organization Settings.

Image-3

Since Lifecycle Services supports the old URL format, here you need to turn off Use the new URL.

Image-4

After this step, your account will be ready. If you already have an account like I do, you can log in directly and go to the project page. Start creating a new project with the New Project button.
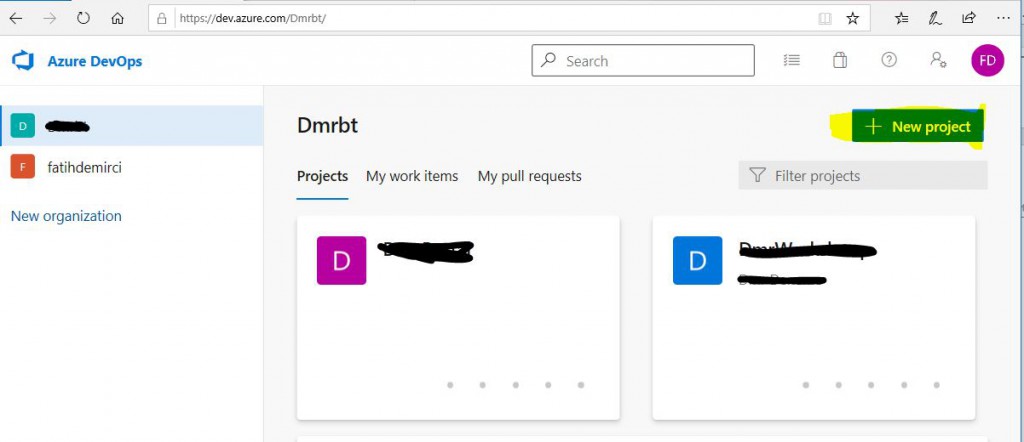
Image-5

The name and description of the project is very important. We usually choose Private projects. There are two options in Version Control. Git is not officially supported but I’ve seen projects using it. We select TFVC. In the Work Item Process section, you can set up a project and choose the one that suits your methodology.  When you click on the Create button, the project will be created.
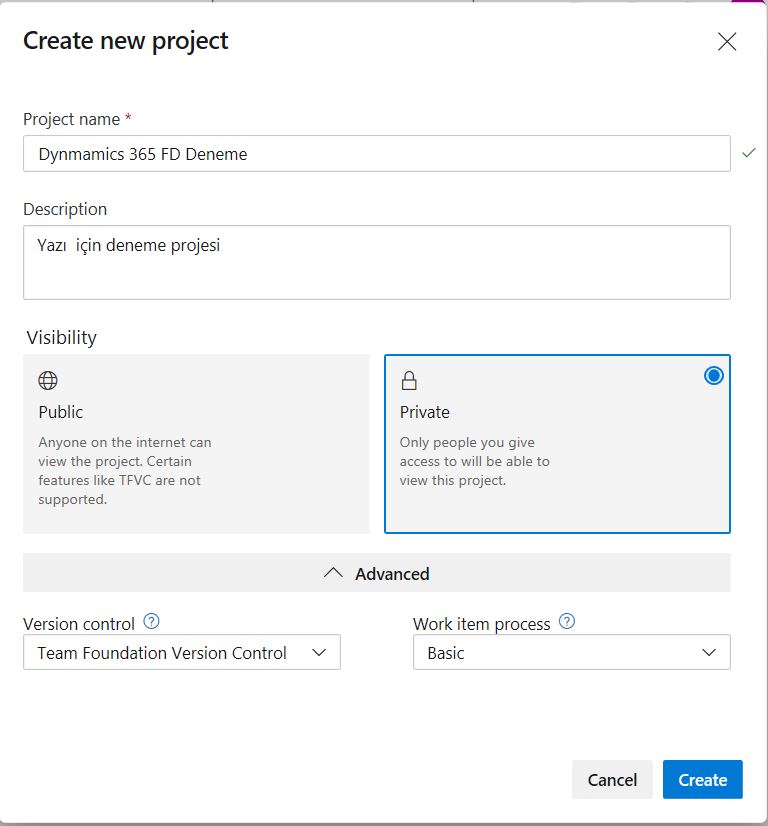
Image-6

You need to create a Personal Access token from user settings. Click the path shown below to open the Personal Access token creation page.
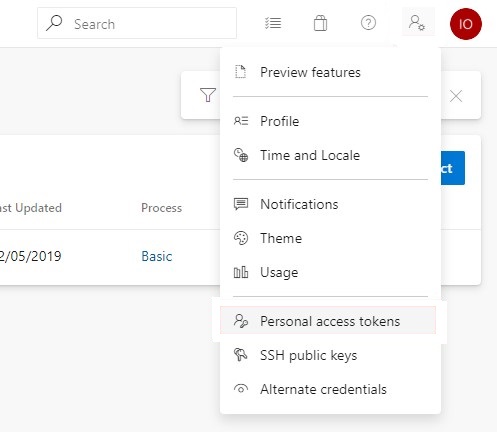
Image-7

Click on New Token to open a new Token creation page.
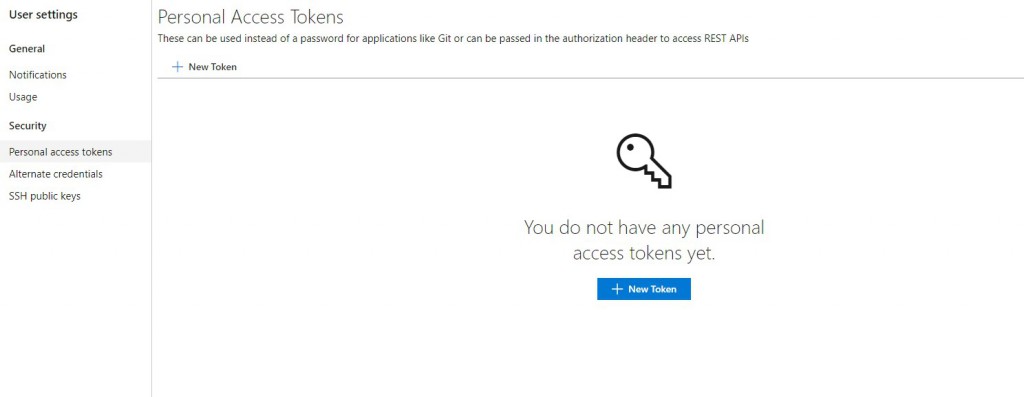
Image-8

We define its name and authorization. Currently the longest duration it can be created for is 1 year. It is useful to give it full control.

Image-9

When you click Create, a new Token will be created and a screen like the one below will appear. It is not possible to reopen this page, so make sure to copy and note the Token created.
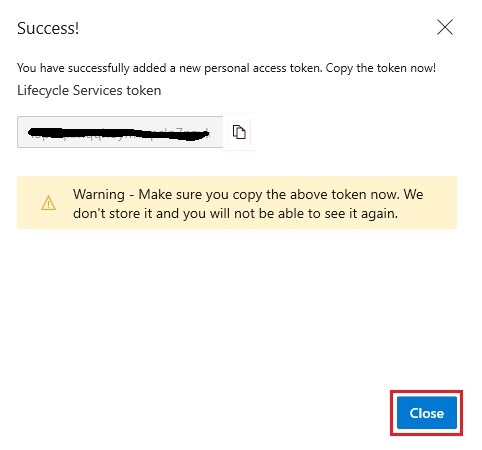
Image-10

When you select your Lifecycle Services login project, if you click the Azure DevOps link from the hamburger menu, you open the page with a setup link.
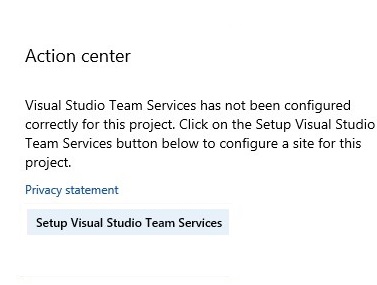
Image-11

When you click on Setup Visual Studio Team Services, the following page will open. Paste the URL and Token you created here.
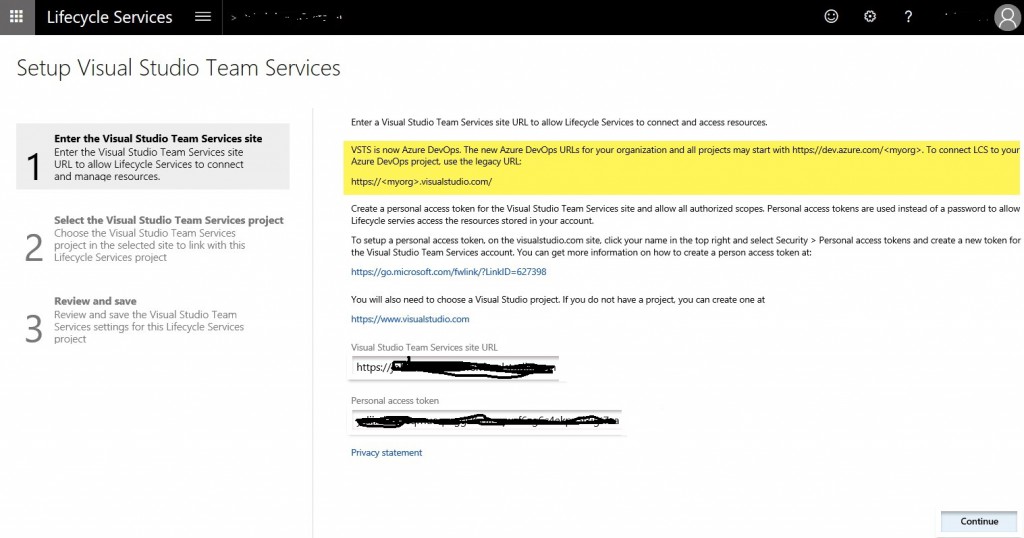
Image-12

If there is no problem, you should see the project you created in the list. Select your project and continue.
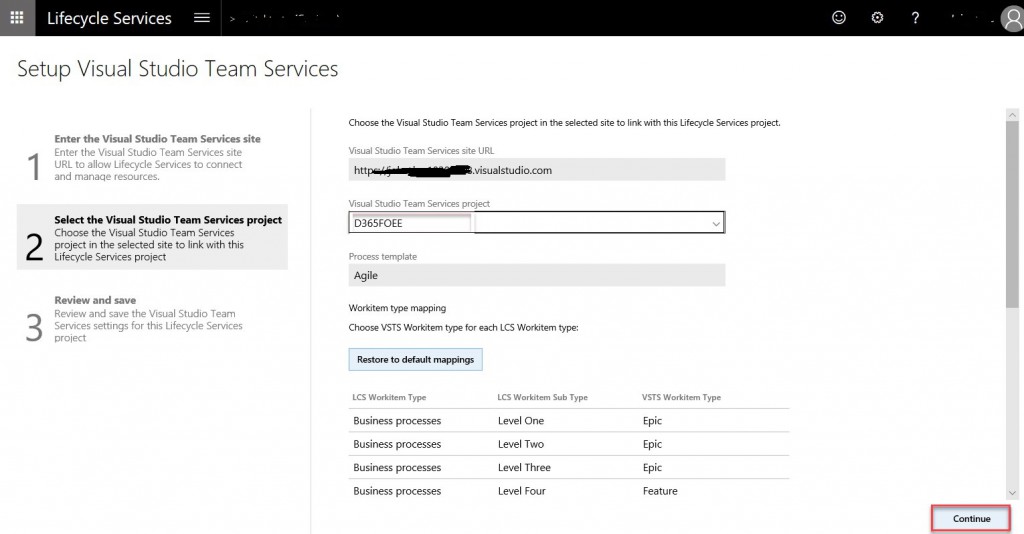
Image-13

Automatic relationships are established between Azure DevOps steps and LCS steps. If you want to change them, you can, but it is OK to continue with the initial ones. Click Save to complete the connection.
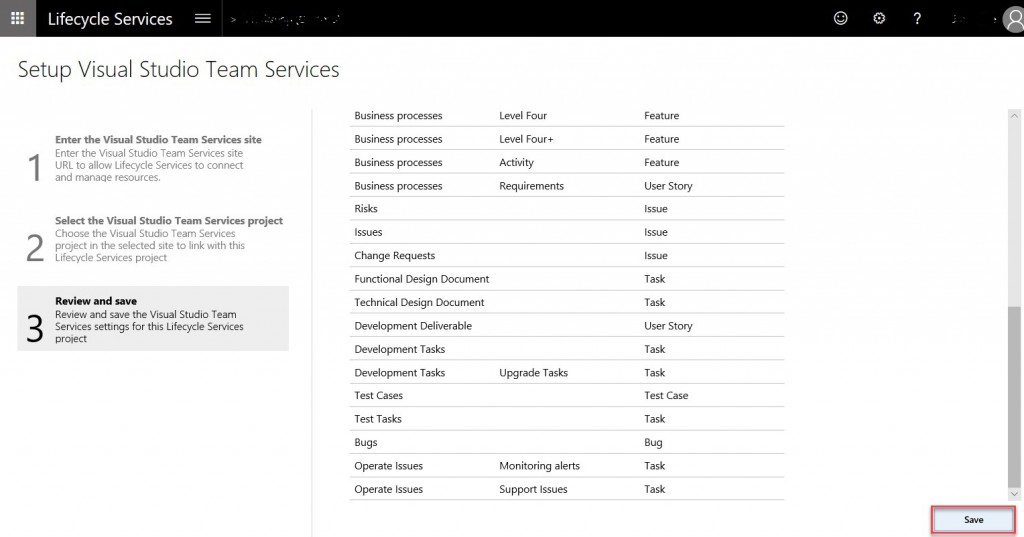
Image-14

In this article, I tried to explain how Azure DevOps and Lifecycle Services are connected. These topics are new for old X++ software developers like me, but it is really easy to adapt and you may even think that it is too late when you consider the possibilities.

Regards.

www.fatihdemirci.net

TAGs: Lifecycle Services, LCS, Azure, Azure DevOps, Project onboarding, Microsoft Dynamics 365, MsDyn365FO, MsDyn365CE, MsDyn365, what is Dynamics 365, Personal Access token